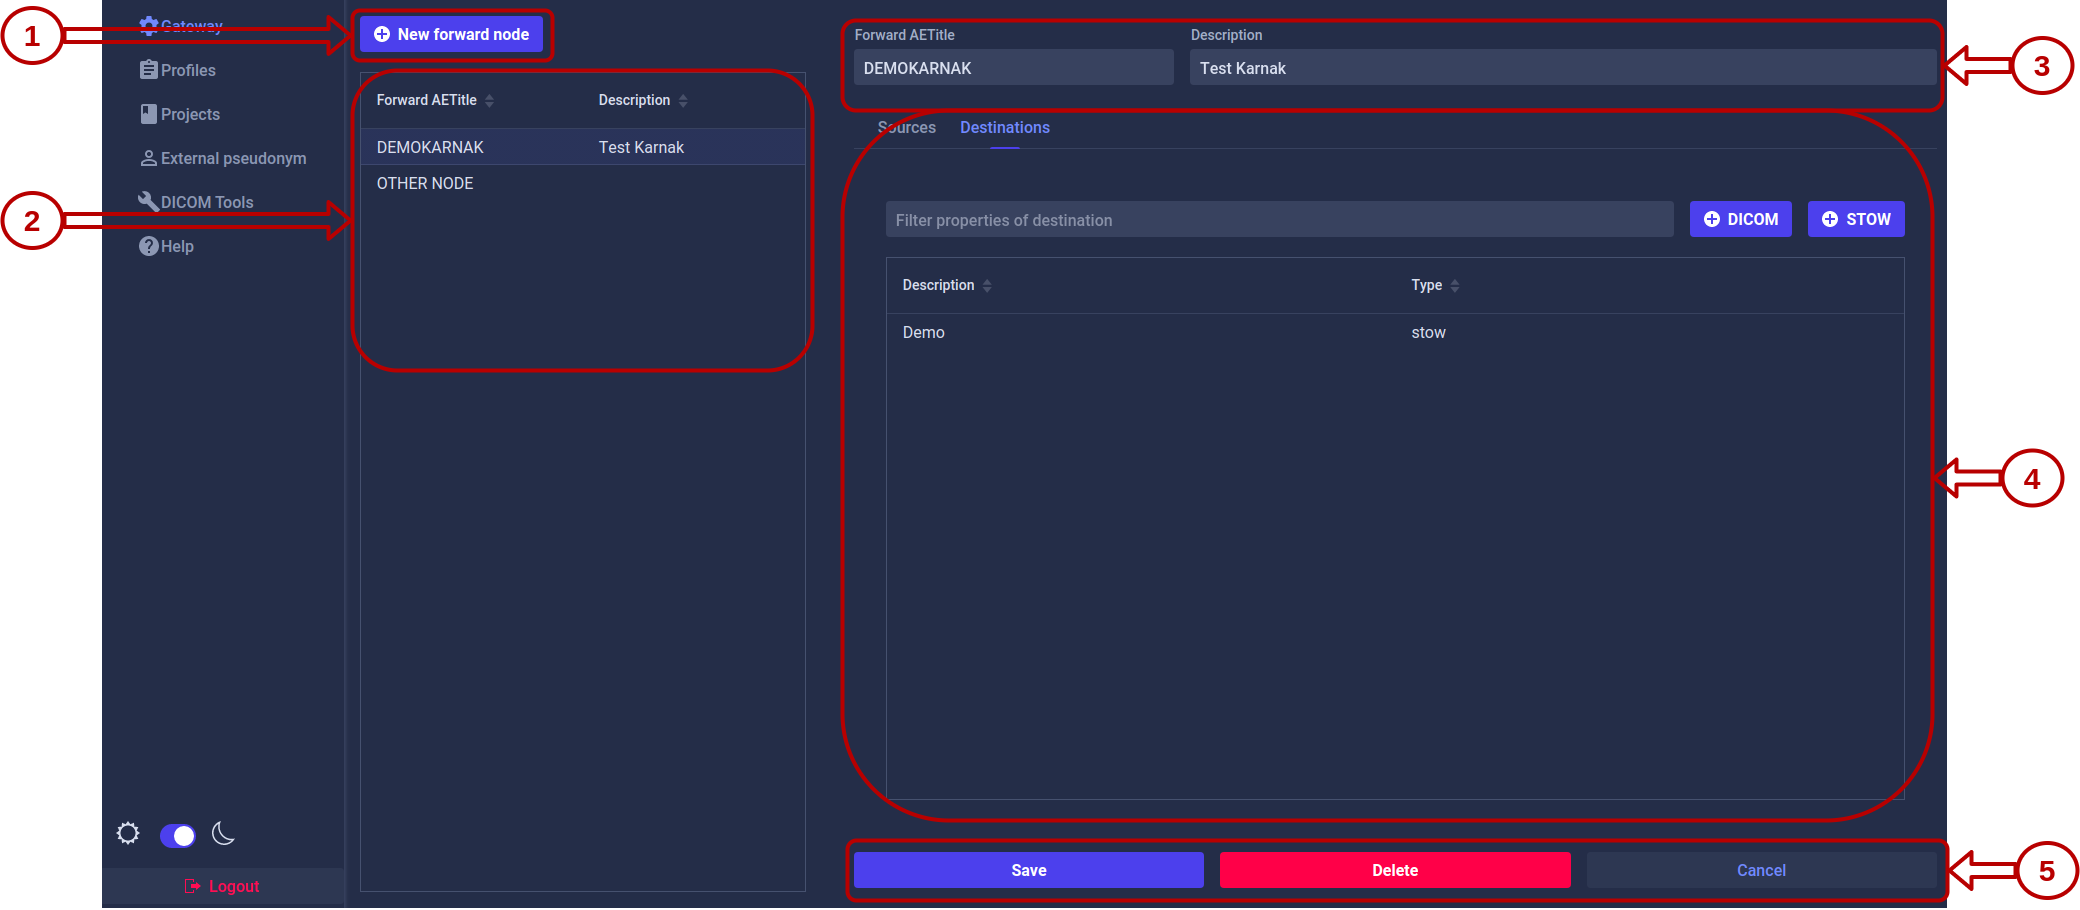
The Gateway page allows you to configure Forward Nodes in Karnak. A Forward Node represents a DICOM Application Entity (AE) that receives DICOM instances and routes them to one or more destinations.
Forward Node
This page lists all the forward nodes configured in Karnak and allows you to create, edit, and delete them.
1. Create a Forward Node
Click the New forward node button. A form will appear:
Enter a unique value in the Forward AETitle field. AE Titles must not exceed 16 characters.
Click the Add button
The new forward node appears in the list and is automatically selected. Optionally, add a description and save your changes.
Info
The Forward AETitle must be unique across all forward nodes in the Karnak instance.
2. Forward Node List
All configured forward nodes are displayed in the left panel.
Select a forward node from the list to view and manage its configuration in the right panel.
Info
The copy icon
next to each forward node allows you to quickly copy its DICOM configuration in the clipboard for use in DICOM clients.
3. Forward Node Parameters
In the details view, you can modify:
Forward AETitle: The Application Entity Title of the forward node
Description: An optional description to help identify the node’s purpose
Click the Save button to apply your changes.
4. Sources and Destinations
Each forward node can be configured with:
Sources: Control which DICOM nodes are authorized to send data to this forward node
Destinations: Define where received DICOM instances should be forwarded
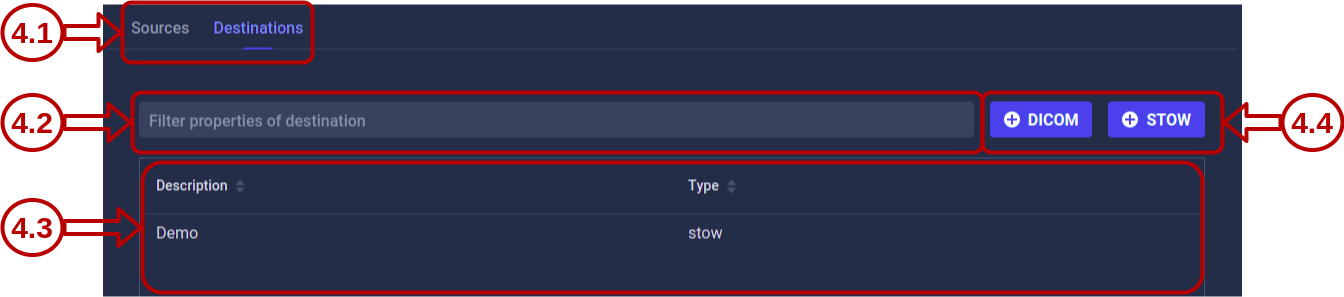
4.1 Navigation
Use the tabs to switch between the Destinations and Sources views for the selected forward node.
4.2 Filtering
Destinations tab: Filter by destination description
Sources tab: Filter by AE Title and hostname
4.3 List
All destinations or sources associated with the forward node are displayed here.
Click any item in the list to open its detailed view and edit its configuration.
4.4 Actions
The available action buttons depend on the active tab.
Destinations tab:
Create a new destination using either the DICOM or DICOM WEB (STOW) protocol. See the Destinations page for detailed configuration instructions.
Sources tab:
Create a new source to control which DICOM nodes can send data to this forward node. See the Sources page for detailed configuration instructions.
5. Forward Node Actions
Three action buttons are available:
Action
Description
Save
Saves changes made to the forward node parameters
Delete
Deletes the selected forward node and all associated configurations
Cancel
Reverts unsaved changes to the forward node parameters
Warning
Deleting a forward node will also remove all associated sources and destinations. This action cannot be undone.
Subsections of Gateway
Destinations
This page allows you to configure destinations for your forward nodes. Destinations define where DICOM instances are sent and how they are processed during transfer.
Info
To access this page, first select a forward node from the Gateway page, then click the Destinations tab.
Depending on the protocol used, two types of destinations can be created:
A DICOM Destination uses the traditional DICOM protocol to forward instances to another DICOM node.
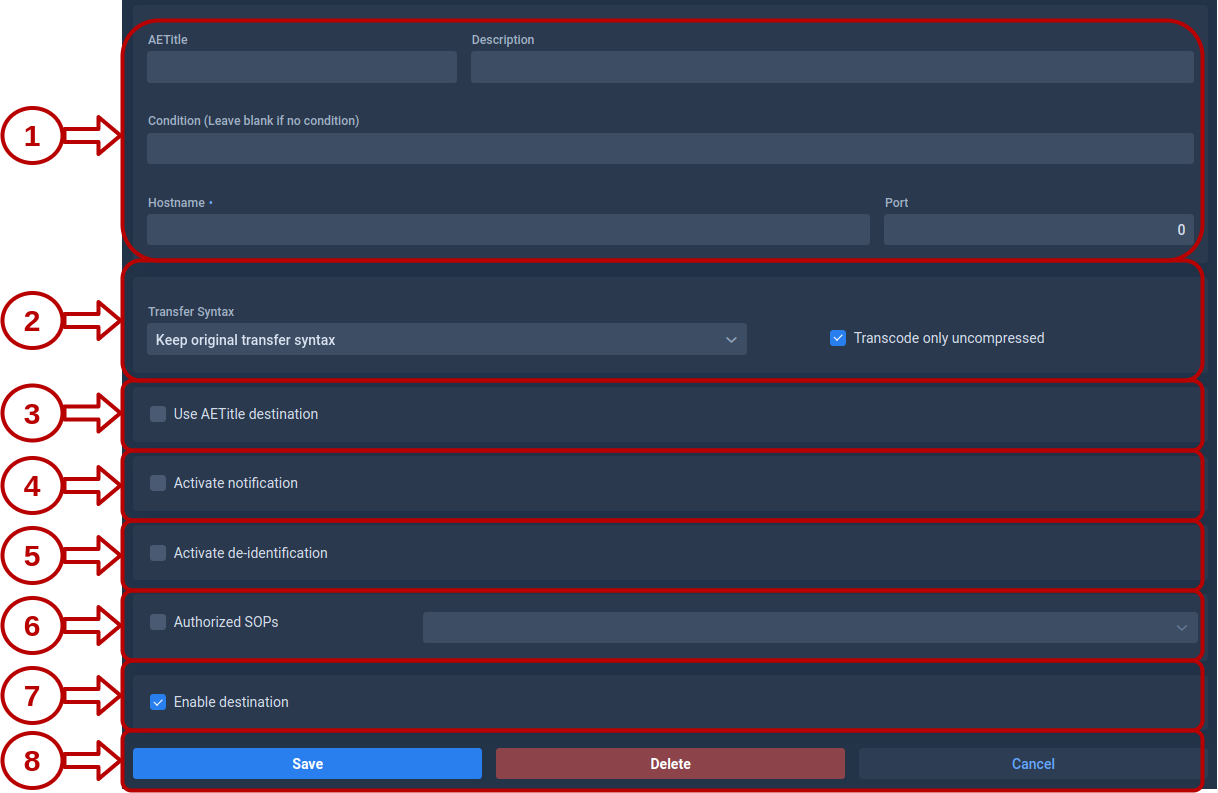
Creating a DICOM Destination
AETitle, Hostname and Port are mandatory when creating a DICOM Destination.
Configuration Options
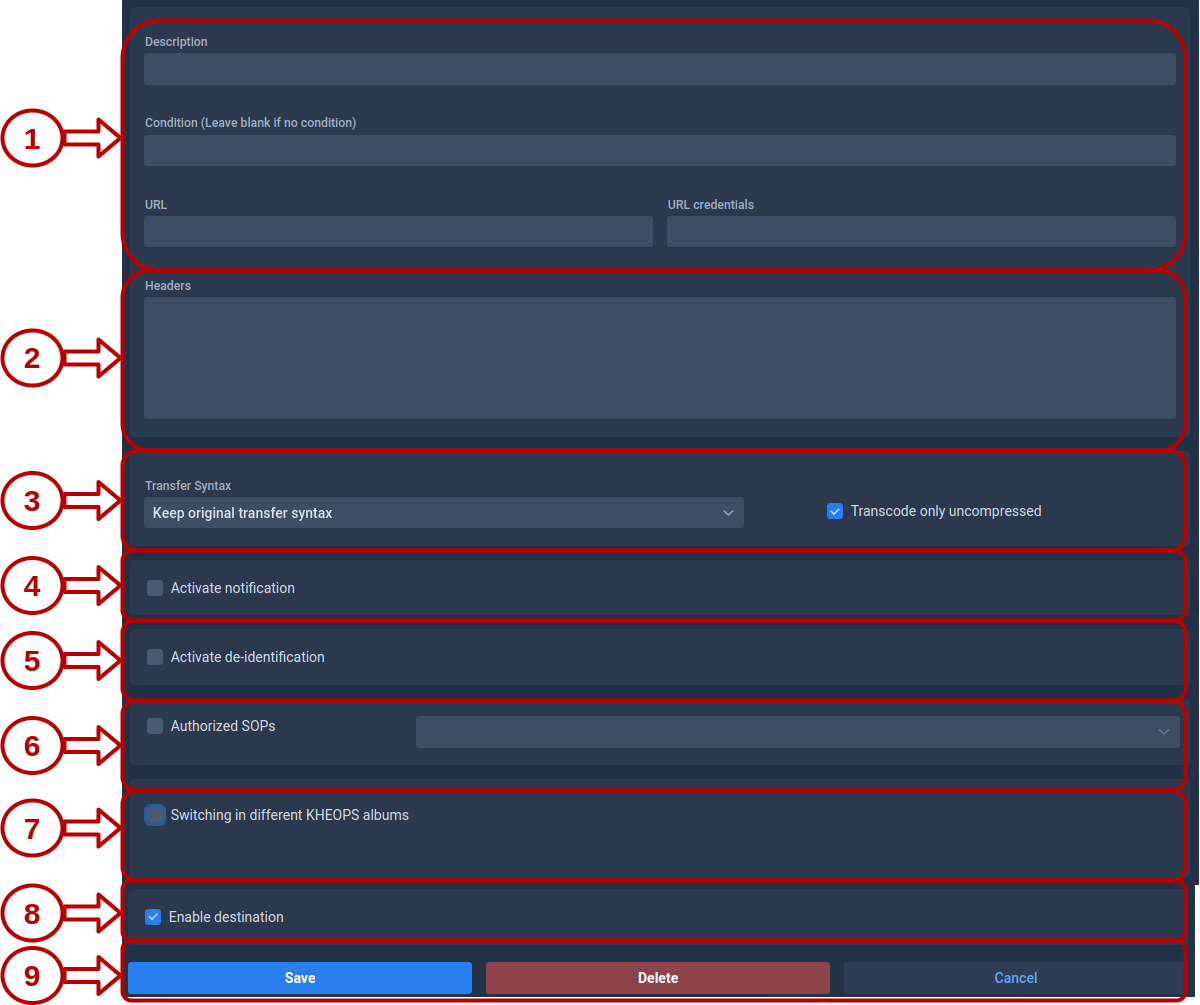
1. Destination Parameters
These fields define where Karnak should send the DICOM instances.
AETitle: The Application Entity Title that identifies the destination DICOM node.
Hostname: The IP address or hostname of the destination server.
Port: The network port used by the destination DICOM service (must be between 1 and 65535).
Condition: An optional field that can contain an expression. If the condition is met, the destination will be activated. See Conditions for more details.
2. Transfer Syntax
This field defines the transfer syntax used when sending DICOM instances to this destination. The transfer syntax determines the encoding and compression format of the DICOM data.
It is recommended to choose “Keep original transfer syntax” unless you have specific requirements for compression or compatibility with the destination system.
When selecting a specific transfer syntax, ensure that the destination system supports it to avoid decompression or compatibility issues. It is also recommended to check “Transcode only uncompressed” when selecting lossy syntaxes to avoid re-compressing already compressed data.
Info
Transcoding may increase processing time and resource usage, especially for large datasets. Use it judiciously based on your workflow needs.
3. Use AETitle Destination
When this option is checked, use the destination AETitle as the calling AETitle instead of the Forward Node AETitle during the DICOM association.
4. Notifications
Enable email notifications to receive automatic summaries of forwarded instances, including success and error reports.
Configuration fields:
Field
Description
Default Value
List of emails
Comma-separated list of recipient email addresses
None
Error subject prefix
Prefix added to email subjects when an error occurs
**ERROR**
Rejection subject prefix
Prefix added when an instance is rejected due to filters or criteria
DICOM attributes to inject into the subject pattern (PatientID, StudyDescription, StudyDate, StudyInstanceUID)
PatientID,StudyDescription
Interval
Time in seconds to wait before sending notification (aggregates multiple instances)
45
Info
The interval setting helps reduce email volume by aggregating notifications. All instances received within the specified interval are summarized in a single email.
5. Tag Morphing
Tag morphing allows you to modify specific DICOM tag values defined in a profile. With this mode, it is not mandatory to de-identify patient information like in De-identification mode.
The applied profile and its version are displayed below the selection
Info
Activate tag morphing and Activate de-identification are mutually exclusive options. Only one can be active at a time.
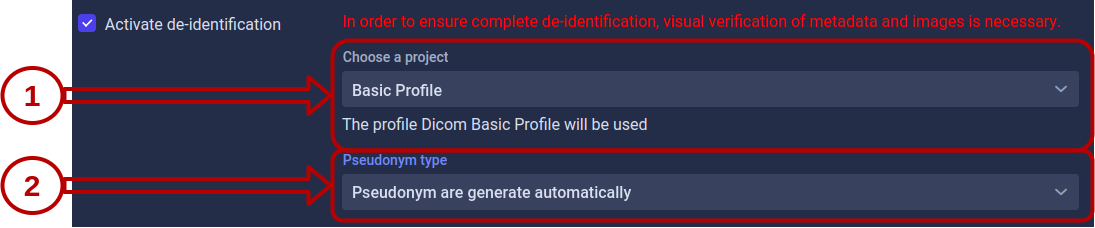
6. De-identification
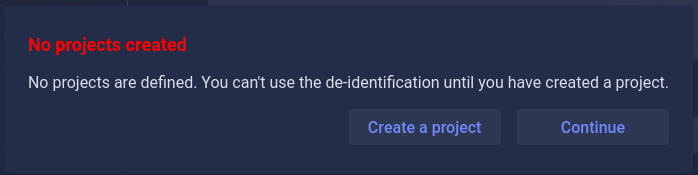
De-identification removes or replaces patient-identifying information in DICOM instances according to configurable rules and profiles. It is not possible to preserve the patient identity in the profile when this option is activated.
Info
Activate de-identification and Activate tag morphing are mutually exclusive options. Only one can be active at a time.
A popup will appear with two options, either create a project or continue without activating de-identification.
If a project exists:
Configure de-identification as shown below:
Project Selection
Select the project that defines the de-identification profile to apply. The profile name and version are displayed below the selection.
Each project is associated with:
A de-identification profile
A secret key used for pseudonymization and UID generation
See the Projects page for more information about project configuration.
Pseudonym Type
Pseudonyms replace patient identifiers while maintaining the ability to link de-identified data back to the original patient (when necessary and authorized).
Choose how Karnak should retrieve or generate pseudonyms:
This field provides a default value for the Issuer of Patient ID when it’s not present in the DICOM instance.
Usage:
This value is used when retrieving the pseudonym using the External Pseudonym cache. The pseudonym is queried based on:
Patient ID (from DICOM tag 0010,0020)
Issuer of Patient ID (from DICOM tag 0010,0021 or this default value)
The combination of Patient ID and Issuer ensures unique patient identification across different healthcare systems.
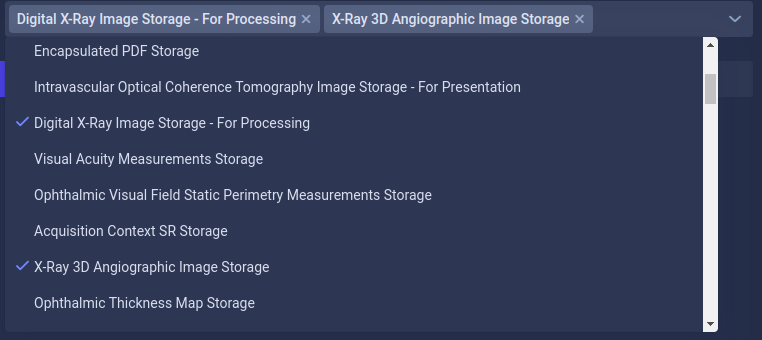
7. Authorized SOPs
Filter which DICOM instance types (SOP Classes) are forwarded to this destination.
Configuration:
Enabled: Only instances matching the specified SOP Classes are transferred
Disabled: All SOP Classes are transferred without restriction
8. Enable the Destination
This toggle allows you to temporarily disable a destination without deleting it. The state is also visible in the destination list with a green (enabled) or red (disabled) indicator.
Use this feature to:
Temporarily pause forwarding during maintenance
Test configurations without affecting production destinations
Keep backup destination configurations ready but inactive
9. Action Buttons
Three actions are available to manage the destination:
Button
Description
Save
Saves all changes made to the destination configuration
Delete
Permanently deletes the selected destination
Cancel
Reverts all unsaved changes to the last saved state
Warning
Deleting a destination cannot be undone. All configuration settings will be permanently removed.
Creating a STOW Destination
The URL is required for STOW Destination creation. Most configuration options are identical to DICOM Destinations. Only the differences are detailed below.
Configuration Differences
1. Destination Parameters
URL: The DICOMweb STOW-RS endpoint where DICOM instances will be sent (e.g., https://pacs.example.com/dicomweb/studies).
Condition: An optional expression that activates the destination when met. See Conditions for more details.
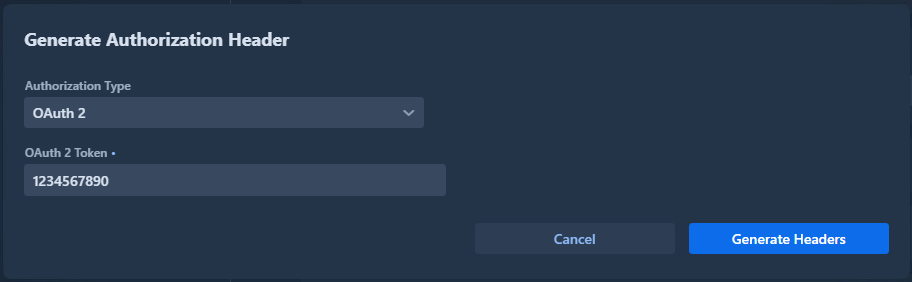
HTTP Headers
The Headers field contains HTTP headers added to each STOW-RS request.
Format: Headers are defined using XML-style key-value tags as shown below:
Click the Generate Authorization Header button to automatically generate properly formatted authentication headers.
Warning
If a header with <key>Authorization</key> already exists, an error will be displayed. The generator will append to existing headers if they don’t conflict.
If the destination is a Kheops endpoint, it is possible to configure multiple albums by selecting the option “Switching in different KHEOPS albums”.
Explanations for configuring Kheops-related parameters can be found in the Kheops section.
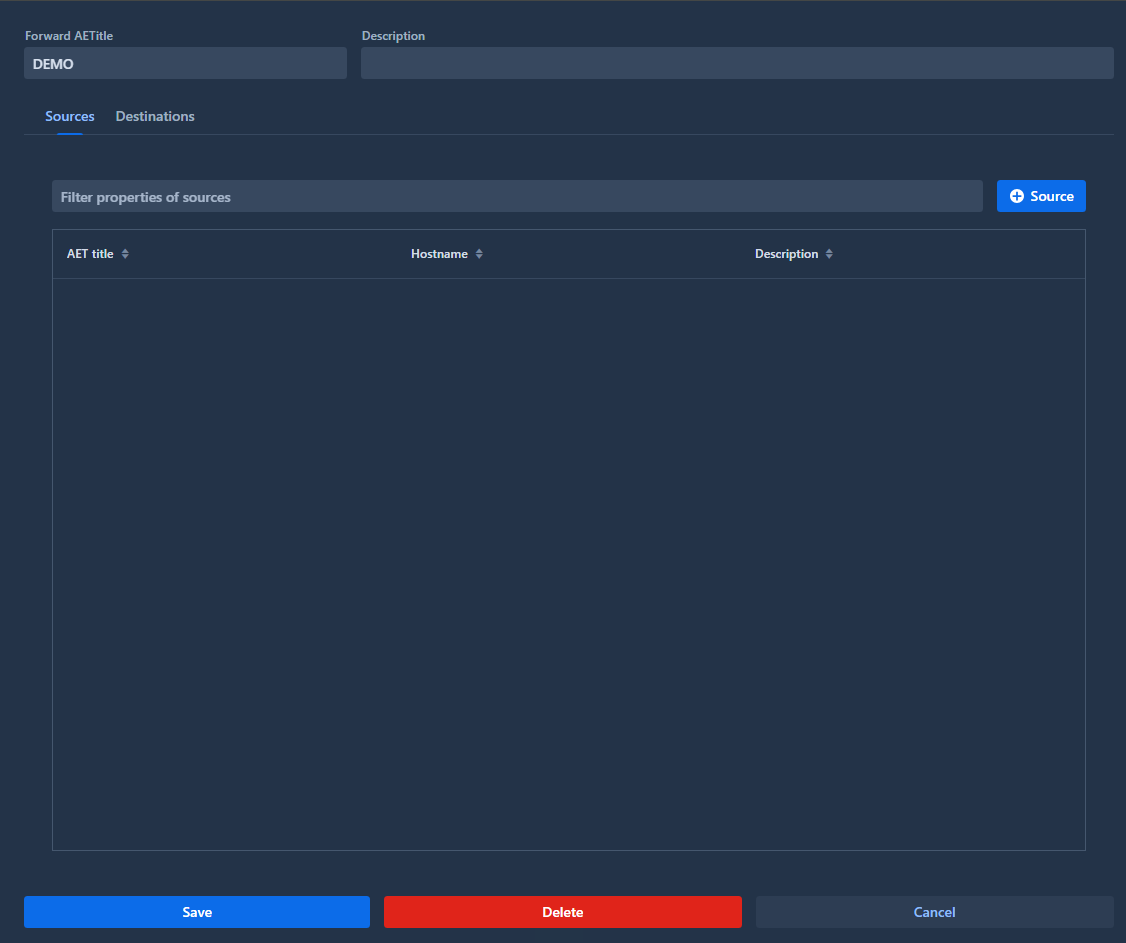
Sources
Sources
The Sources tab displays all configured sources for the selected forward node.
A source is used to control which entities can send DICOM data to the forward node. It validates that received DICOM instances come from a known Application Entity Title (AET).
Info
If no sources are defined, the forward node will accept DICOM instances from any AET without restrictions.
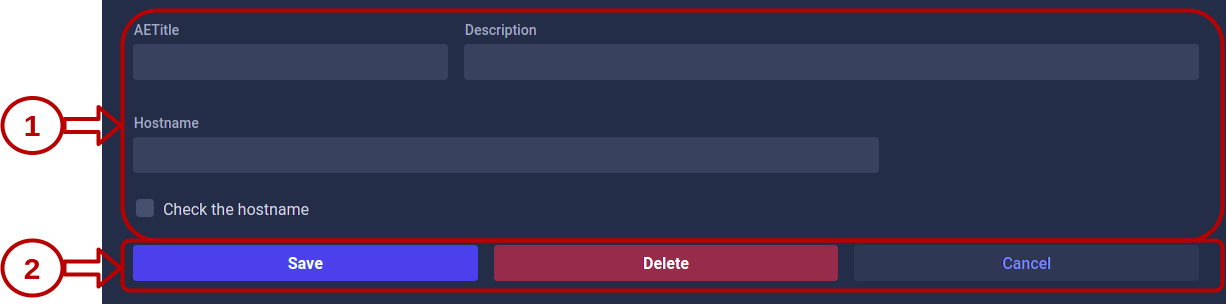
Create a source
To create a new source, click the Source button and configure the following fields:
Field
Description
Required
AETitle
Application Entity Title of the source DICOM node
Yes
Description
Optional description to identify the source
No
Hostname
Hostname or IP address of the source DICOM node
No*
*The Hostname field becomes required if you enable the “Check the hostname” option. When enabled, Karnak will validate both the AET and the hostname of incoming DICOM instances.
Source validation behavior
When a DICOM instance is received by the forward node:
With sources configured: Only instances from registered AETs (and hostnames, if enabled) are accepted
Without sources configured: All instances are accepted.
This provides flexible security control for your DICOM workflow.