Karnak is a DICOM gateway for data de-identification and DICOM attribute normalization. It is distributed as a containerized and portable application, making it easy to deploy and use across various environments.
Karnak manages a continuous DICOM flow with a DICOM listener as input and a DICOM and/or DICOMWeb as output.
Key Features
DICOM Gateway: Acts as a proxy between DICOM modalities/workstations and PACS/Archives.
Flexible Connectivity: Supports standard DICOM protocols (C-STORE) and DICOMWeb (STOW-RS).
De-identification: Robust de-identification based on DICOM standards with configurable actions in YAML files.
Clean pixels: Remove burned-in annotations from images to ensure patient privacy.
Pseudonymization: Apply pseudonyms from DICOM fields, by importing CSV, or with external web services.
Tag Morphing: Normalizes DICOM attributes to ensure consistency across your workflow.
Conditional Processing: Apply de-identification and tag morphing rules based on customizable conditions.
Notification System: Email notifications for successful transfers and errors.
Project Management: Organize de-identification rules and secrets by project.
Web Interface: User-friendly web portal for configuration and monitoring.
Karnak is distributed as a containerized application using Docker and Docker Compose. The karnak-docker repository contains all the necessary files to run Karnak with Docker Compose. Follow the steps described in the readme.
Set the environment variable LOGBACK_CONFIGURATION_FILE with the path to your Logback configuration file. This will override the default log configuration.
Example:
If you create a custom configuration file named my-logback.xml in the same directory as your docker-compose.yml:
Create a volume to mount the file inside the Karnak container
Define the LOGBACK_CONFIGURATION_FILE environment variable with the container path
Set the ENVIRONMENT variable to DEV to activate this mode
Logs everything at the INFO level by default
Packages org.karnak and org.weasis are logged at the DEBUG level for detailed troubleshooting
Production Mode
Active by default (when ENVIRONMENT is not set to DEV)
Logs everything at the WARN level or higher
Creates two log files:
all.log
Contains:
All WARN level logs and above
org.weasis logs at INFO level
org.karnak logs at INFO level (excluding clinical logs)
clinical.log
Contains:
All logs marked with the CLINICAL marker
Specifically tracks de-identification operations and clinical data processing
Info
Clinical logs provide detailed tracking of the de-identification process, including which profiles were applied and how patient data was transformed. This is useful for auditing and compliance purposes.
Technical explanations about the de-identification process
Subsections of Profiles
Profile Structure
The Profiles page allows you to manage de-identification profiles for your projects in the Karnak interface. This page explains the structure of these profiles and how to create or modify them using YAML files.
Overview
A profile defines how DICOM attributes should be modified during de-identification or tag morphing. It consists of one or more profile elements, each specifying:
Which DICOM attributes to target
What action to apply (e.g., remove, replace, keep)
Optional conditions for applying the action
Important behavior:
Profile elements are applied sequentially in the order they appear in the YAML file
Only the first applicable profile element modifies each DICOM attribute
Once modified, subsequent profile elements won’t affect that attribute
Info
Profiles must be YAML files that conform to the YAML specification and follow Karnak’s profile structure defined here.
Profile Metadata
Metadata fields help identify and manage your profiles. While optional, we recommend defining at least name and version for clarity.
Field
Description
Required
name
Profile name displayed in the UI
Optional (recommended)
version
Profile version number
Optional (recommended)
minimumKarnakVersion
Minimum Karnak version required
Optional
defaultIssuerOfPatientID
Default value when IssuerOfPatientID is missing in DICOM files. Used for building patient pseudonyms during de-identification
Optional
profileElements
List of profile elements to apply
Required
Profile Element Structure
Each profile element defines a specific de-identification rule.
Required Fields
Field
Description
name
Descriptive name for this profile element
codename
Type identifier (see available types in this documentation)
Optional Fields
Field
Description
When Required
condition
Boolean expression to conditionally apply this element
Optional
action
Action type to perform (e.g., K, X, D, U, Z)
For certain codenames
option
Single configuration value
For certain codenames
arguments
Key-value pairs for advanced configuration
For certain codenames
tags
DICOM attributes this element should target
For certain codenames
excludedTags
DICOM attributes to skip (can be modified by later elements)
Optional
DICOM Tag Formats
Tags can be specified in multiple formats:
Format
Example
Description
Parentheses
(0010,0010)
Standard DICOM notation
Comma-separated
0010,0010
Without parentheses
Concatenated
00100010
No separators
Pattern
(0010,XXXX)
All tags in group 0010
Wildcard
(XXXX,XXXX)
All DICOM attributes
Conditions
Add optional conditions to control when a profile element applies. The expression is evaluated for each matching tag.
For complete syntax and examples, see the Conditions page.
Basic DICOM Profile
The Basic DICOM Profile is the DICOM standard’s reference profile for removing Personally Identifying Information (PII) from DICOM files.
The conditions to apply rules for a specific tag depend on its attribute type (Type 1, Type 2, etc.) based on the Information Object Definition (IOD). Karnak automatically determines the attribute type for each tag during de-identification.
Important
We strongly recommend including this profile as the foundation for de-identification.
Why Use It?
Removes all attributes containing identifiable patient information
This profile should be placed at the end of your profile elements to ensure all other rules are applied first.
Actions on tags
This page describes profile elements that apply actions to DICOM tags. These actions allow you to selectively keep, remove, or add tags during de-identification.
Actions on specific tags
This profile element applies an action to a tag or group of tags defined by the user.
Required Parameters
Parameter
Description
name
Description of the action applied
codename
action.on.specific.tags
action
Remove (X) or Keep (K)
tags
List of tags the action should be applied to
Optional Parameters
Parameter
Description
condition
Defines a condition to evaluate if this profile element should be applied to this DICOM instance
excludedTags
List of tags that will be ignored by this action
Example
In this example, all tags starting with 0028 will be removed except (0028,1199) which will be kept.
This profile element applies an action to private tags or groups of private tags defined by the user. This action is only applied if the tag is private (where the group number is odd).
Required Parameters
Parameter
Description
name
Description of the action applied
codename
action.on.privatetags
action
Remove (X) or Keep (K)
Optional Parameters
Parameter
Description
condition
Defines a condition to evaluate if this profile element should be applied to this DICOM instance
tags
List of tags the action should be applied to. If not specified, the action is applied to all private tags
excludedTags
List of tags that will be ignored by this action
Example
In this example, all tags starting with 0009 will be kept and all other private tags will be removed.
- name:"Keep private tags starting with 0009"codename:"action.on.privatetags"action:"K"tags:- "(0009,xxxx)"- name:"Remove all private tags"codename:"action.on.privatetags"action:"X"
Add new tags
This profile element adds a tag if it is not already present in the instance. This action is ignored if the tag already exists.
Required Parameters
Parameter
Description
name
Description of the action applied
codename
action.add.tag
arguments
Contains: • value: Value to set for the tag
tags
Must contain exactly one tag - the tag to add
Optional Parameters
Parameter
Description
condition
Defines a condition to evaluate if this profile element should be applied to this DICOM instance
Behavior
When the tag is not present:
The tag will be added by this action
Further profile element actions that match this tag won’t be applied
When the tag already exists:
The add action is ignored
A subsequent profile element action can be applied to that tag
Warning
Only tags at the root level of the DICOM instance can be added. Adding elements inside a sequence is not supported.
Info
The tag must exist in the DICOM Standard, otherwise the profile validation will fail. The VR is retrieved from the Standard.
If this profile element is applied to a SOP class that doesn’t contain this tag, it won’t be added to prevent corrupting the DICOM instance. A warning will be generated in the logs.
Use Case
This feature is especially useful when applying masks to non-compliant SOPs by using the Burned In Annotation attribute. See the Cleaning Data Pixel Exceptions page for a complete example.
Example
In this example, we add the optional tag Recognizable Visual Features (0028,0302).
- name:"Add Recognizable Visual Features tag"codename:"action.add.tag"arguments:value:"YES"tags:- "(0028,0302)"
Add new private tags
This profile element adds a private tag if it is not already present in the instance. This action is ignored if the tag already exists or if there is a collision with a different Private Creator ID.
Required Parameters
Parameter
Description
name
Description of the action applied
codename
action.add.private.tag
arguments
Contains: • value: Value to set for the tag • vr: Value Representation of the tag • privateCreator: (Optional) Value of the PrivateCreatorID
tags
Must contain exactly one tag - the tag to add
Optional Parameters
Parameter
Description
condition
Defines a condition to evaluate if this profile element should be applied to this DICOM instance
PrivateCreator Management
The privateCreator argument is optional but recommended for consistency.
When the PrivateCreatorID tag does not exist:
The privateCreator argument must be specified
The PrivateCreatorID tag will be created automatically
When the PrivateCreatorID tag exists:
If privateCreator is not specified: The tag will be added as part of the existing PrivateCreatorID
If privateCreator is specified: The existing value is matched against the argument
If they match: The new tag is added
If they don’t match: A collision occurs and the tag is not added (a warning is logged)
Info
The behavior for root-level tags and sequences follows the same rules as Add new tags.
name:"Profile Example"version:"1.0"minimumKarnakVersion:"0.9.7"profileElements:- name:"Keep StudyDescription tag according to a condition"codename:"action.on.specific.tags"condition:"tagValueContains(#Tag.StudyDescription, 'R2D2')"action:"K"tags:- "(0008,1030)"- name:"Keep Philips PET Private Group"codename:"action.on.privatetags"action:"K"tags:- "(7053,xx00)"- "(7053,xx09)"- name:"DICOM basic profile"codename:"basic.dicom.profile"
Actions on dates
This profile element applies a specific action to tags containing dates.
These actions can only be applied to the following Value Representations: Age String (AS), Date (DA), Date Time (DT), and Time (TM).
Parameters
Required parameters
name: Description of the action applied
codename: Must be set to action.on.dates
option: The action to be applied (see options below)
arguments: Additional parameters depending on the chosen option
Optional parameters
condition: Defines a condition to evaluate whether this profile element should be applied to the DICOM instance
tags: List of tags the action should be applied to. If not specified, the action applies to all tags with AS, DA, DT, or TM Value Representation
excludedTags: List of tags that will be ignored by this action
Available Options
The option parameter can have one of the following values:
shift - Apply a fixed time shift
shift_range - Apply a random time shift within specified ranges
shift_by_tag - Apply a shift based on values from another DICOM tag
date_format - Remove date precision (day and/or month)
Shift Option
The shift option applies a fixed shift to dates using the following required arguments:
seconds: Integer representing the number of seconds for the shift operation
days: Integer representing the number of days for the shift operation
Behavior by Value Representation:
Age String (AS): Seconds and days are added to the existing value
Date (DA), Date Time (DT), Time (TM): Seconds and days are subtracted from the existing value
Example
This example shifts all tags starting with 0010 that have AS, DA, DT, or TM Value Representation by 30 seconds and 10 days:
The shift_range option applies a random shift to dates within user-defined ranges.
Arguments
max_seconds (required): Upper bound for the number of seconds to shift
max_days (required): Upper bound for the number of days to shift
min_seconds (optional): Lower bound for the number of seconds to shift (defaults to 0)
min_days (optional): Lower bound for the number of days to shift (defaults to 0)
The random operation is deterministic and reproducible based on the patient and project.
Example
This example shifts all tags starting with 0008,002 that have AS, DA, DT, or TM Value Representation randomly within a range of 0 to 60 seconds and 50 to 100 days:
- name:"Shift Range Date"codename:"action.on.dates"arguments:max_seconds:60min_days:50max_days:100option:"shift_range"tags:- "0008,002X"
Date Format Option
The date_format option removes date precision by deleting specific date components.
This action can only be applied to Date (DA) and Date Time (DT) Value Representations.
Arguments
remove: Specifies which date components to remove
day: Removes the day information, replacing it with 01
month_day: Removes both month and day information, replacing them with 01 for each
Example: Remove Day
This example removes the day from all tags starting with 0008,003 that have DA or DT Value Representation:
For example, if the value contained in the tag is 20230512, the output value will be 20230501.
Shift By Tag Option
The shift_by_tag option applies a shift based on values contained in other DICOM tags.
Arguments
At least one of the following arguments must be specified:
seconds_tag: Tag containing the number of seconds for the shift operation
days_tag: Tag containing the number of days for the shift operation
Example
This example shifts all tags starting with 0010 that have AS, DA, DT, or TM Value Representation by the number of days stored in the private tag (0015,0011):
- name:"Shift Date By Tag"codename:"action.on.dates"arguments:days_tag:"(0015,0011)"option:"shift_by_tag"tags:- "0010,XXXX"
Complete Profile Example
This example demonstrates a complete de-identification profile that applies multiple date actions in sequence:
Shift Range: Randomly shift tags matching (0008,003X) and (0008,0012) (except (0008,0030) and (0008,0032)) by 0 to 60 seconds and 10 to 50 days
Date Format: Remove month and day from tags (0008,0023) and (0008,0021)
Fixed Shift: Shift tags matching (0010,XXXX) (except (0010,0010)) by 30 seconds and 10 days
Basic Profile: Apply the Basic DICOM Profile to all remaining tags
name:"De-identification profile"version:"1.0"minimumKarnakVersion:"0.9.2"defaultIssuerOfPatientID:profileElements:- name:"Shift Range Date with arguments"codename:"action.on.dates"arguments:max_seconds:60min_days:10max_days:50option:"shift_range"tags:- "0008,0012"- "0008,003X"excludedTags:- "0008,0030"- "0008,0032"- name:"Date Format"codename:"action.on.dates"arguments:remove:"month_day"option:"format_date"tags:- "0008,0023"- "0008,0021"- name:"Shift Date with arguments"codename:"action.on.dates"arguments:seconds:30days:10option:"shift"tags:- "0010,XXXX"excludedTags:- "0010,1010"- name:"DICOM basic profile"codename:"basic.dicom.profile"
Expressions
Actions on specific tags
This profile element applies an expression to a tag or a group of tags defined by the user. An expression is based on Spring Expression Language (SpEL) and returns a value or an action according to a certain condition.
Parameters
This profile element requires the following parameters:
Parameter
Required
Description
name
Yes
Description of the action applied
codename
Yes
Must be expression.on.tags
arguments
Yes
Definition of the expression with the expr argument
tags
Yes
List of tags the action should be applied to
condition
No
Optional condition to evaluate if this profile element should be applied to this DICOM instance
excludedTags
No
List of tags that will be ignored by this action
Expression Context
The expression is contained in the expr argument. When executed, it can either:
Return an action to be executed
Return a null value (does nothing and moves to the next profile element)
Available Variables
The following variables are available in the expression context, containing information about the current attribute:
Variable
Description
Example
tag
Current attribute tag
(0010,0010)
vr
Current attribute VR
PN
stringValue
Current element value
'John^Doe'
Constants
Constants improve readability and reduce errors:
Constant
Description
Example
#Tag
Retrieve any tag integer value from the DICOM standard
#Tag.PatientBirthDate returns (0010,0030)
#VR
Retrieve any VR value from the DICOM standard
#VR.LO returns the Long String type
Utility Functions
The following utility functions help work with tags:
Function
Description
Return Value
getString(int tag)
Returns the value of the given tag in the DICOM instance
String value or null if tag is not present
tagIsPresent(int tag)
Checks if the tag exists in the DICOM instance
true if present, false otherwise
Available Actions
Actions are defined as functions and set the operation to perform on the current tag:
Action
Description
ReplaceNull()
Sets the current tag value to empty
Replace(String dummyValue)
Replaces the current tag value with the specified value
Remove()
Removes the tag from the DICOM instance
Keep()
Keeps the tag unchanged
UID()
Replaces the current tag value with a newly generated UID and sets the tag’s VR to UI
Add(int tagToAdd, int vr, String value)
Adds a new tag to the DICOM instance
ComputePatientAge()
Replaces the current tag value with a computed patient’s age at the time of the exam
ExcludeInstance()
Interrupts the transfer of this instance (appears as Rejected in monitoring)
Examples
Conditional replacement based on tag value and type
Replace the Patient Name with the Institution Name if the current value is ‘John’, otherwise keep it unchanged:
- name:"Expression"codename:"expression.on.tags"arguments:expr:"stringValue == 'John' and tag == #Tag.PatientName? Replace(getString(#Tag.InstitutionName)) : Keep()"tags:- "(xxxx,xxxx)"
Info
This example applies to all attributes in the DICOM instance. For each tag, it either applies Keep or Replace, which prevents further profile elements from modifying those tags.
Remove tags with undefined values
Remove tags with ‘UNDEFINED’ value, otherwise keep them:
JSON path of the value used as replacement, using JSON Pointer syntax. Empty string means the entire response value will be used.
method
Optional
HTTP method: GET or POST. Defaults to GET.
body
Optional
Request body for POST requests in JSON format. Can contain runtime parameters (see URL and Body Arguments).
authConfig
Optional
Identifier of an existing Authentication Configuration for authenticating the call. No authentication used if not specified.
defaultValue
Optional
Fallback value used when an error occurs during the API call (e.g., Unauthorized, value not found, authConfig not found). If not specified, the transfer will be aborted with an error displayed in monitoring. When specified, the default value is used and transfer continues.
URL and Body Arguments
The URL and body may require values directly linked to the instance being transferred, such as the Patient ID.
A specific syntax allows this runtime injection. Parts evaluated at runtime must be enclosed in double brackets. The syntax uses Spring Expression Language (SpEL), with functions and constants defined similarly to Expressions.
In the body, hence the JSON format, the expression must be enclosed in double quotes if the expected value is a String.
Examples
Example 1: Replace Patient ID with API response
The profile element below replaces the value of the Patient ID tag with the value retrieved from the url, it extracts the String value from the response at the specified path. Since it is not specified, the HTTP method is GET.
The authConfig argument contains the identifier of the Authentication Configuration used to authenticate the API call.
If an error occurs during the call, this transfer will be aborted. If the defaultValue was specified, it would have been used as the replacement value and the transfer would not have been blocked.
- name:"Replace Patient ID from API call"codename:"action.replace.api"arguments:url:"http://example.com/{{getString(#Tag.PatientID)}}/endpoint"responsePath:"/_embedded/0/value"authConfig:"endpoint-auth-config"tags:- "(0010,0020)"
Example 2: POST request with body and default value
- name:"Replace Patient Name with fallback"codename:"action.replace.api"arguments:url:"http://example.com/patients"method:"POST"body:'{"patientId": "{{getString(#Tag.PatientID)}}"}'responsePath:"/name"authConfig:"endpoint-auth-config"defaultValue:"ANONYMOUS"tags:- "(0010,0010)"
Image modifications
This page describes the profile elements available in Karnak for modifying DICOM image data to remove identifying information.
Overview
Karnak provides two main approaches to protect patient identity in DICOM images:
Defacing: Automated removal of facial features from CT images
Pixel Data Cleaning: User-defined masks to remove burned-in annotations and identifying information
Both methods ensure that visual identifying information is removed from images while preserving the diagnostic value of the data.
Defacing
Defacing automatically removes facial features from CT images to protect patient identity.
Supported Images
This profile can only be applied to images with Axial orientation in the following SOP Classes:
Images with non-axial orientation will be skipped.
Currently, the CT images that do not represent the head are not automatically excluded. It is recommended to use conditions to restrict defacing to head CT images only.
Configuration
This profile element requires the following parameters:
Parameter
Description
Required
name
Description of the action applied
Yes
codename
Must be clean.recognizable.visual.features
Yes
condition
Condition to evaluate if this profile element should be applied
No
Pixel Data Cleaning
Pixel data cleaning applies user-defined masks to DICOM images to remove identifying information burned into the pixels, such as patient or institution information.
Condition for Automatic Application
This profile is automatically applied to the following SOP Classes:
Or if the tag Burned In Annotation (0028,0301) is set to "YES"
Configuration
This profile element requires the following parameters:
Parameter
Description
Required
name
Description of the action applied
Yes
codename
Must be clean.pixel.data
Yes
condition
Condition to evaluate if this profile element should be applied
No
Using Conditions
The condition parameter allows you to apply cleaning selectively. For example, to exclude images from a specific machine that does not add burned-in annotations, you can use the following configuration:
This example demonstrates a profile that handles specific pixel data cleaning for equipment that burns patient information into the images and does not match the conditions for automatic application.
This profile below performs the following actions for images from a machine with Station Name containing “ICT256”:
Ensures the Burned In Annotation tag is present and set to “YES”
Applies pixel data cleaning with a station-specific mask
Applies the basic DICOM de-identification profile
name:"Clean pixel data"version:"1.0"minimumKarnakVersion:"0.9.2"defaultIssuerOfPatientID:profileElements:- name:"Add tag BurnedInAnnotation if does not exist"codename:"action.add.tag"condition:"tagValueContains(#Tag.StationName, 'ICT256') && !tagIsPresent(#Tag.BurnedInAnnotation)"arguments:value:"YES"vr:"CS"tags:- "(0028,0301)"- name:"Set BurnedInAnnotation to YES"codename:"expression.on.tags"condition:"tagValueContains(#Tag.StationName, 'ICT256')"arguments:expr:"Replace('YES')"tags:- "(0028,0301)"- name:"Clean pixel data"codename:"clean.pixel.data"- name:"DICOM basic profile"codename:"basic.dicom.profile"masks:- stationName:"*"color:"ffff00"rectangles:- "25 75 150 50"- stationName:"ICT256"color:"00ff00"rectangles:- "25 25 150 50"- "350 15 150 50"
Conditions
Overview
A condition is an expression evaluated against a DICOM instance that returns a boolean value (true or false). Conditions are used in profiles to determine whether specific actions or transformations should be applied to DICOM elements based on the content of the instance.
To improve readability and reduce errors, the following constants are available:
#Tag - Retrieves DICOM tag identifiers by their standard names
Example: #Tag.PatientBirthDate → 0010,0030
Example: #Tag.StudyDescription → 0008,1030
Example: #Tag.Modality → 0008,0060
#VR - Retrieves DICOM Value Representation types
Example: #VR.LO → Long String
Example: #VR.DA → Date
Example: #VR.PN → Person Name
Using these constants is recommended over hardcoded tag values to make profiles more maintainable and self-documenting.
Available Functions
All utility functions are detailed below with their parameters, return types, and usage examples.
Utility functions are available to define the conditions and are detailed below.
tagValueIsPresent
tagValueIsPresent(int tag, String value) or tagValueIsPresent(String tag, String value)
This function will retrieve the tag value of the DICOM and check if the value parameter is the same as the tag value.
//Check if the study description is equals to "755523-st222-GE"tagValueIsPresent(#Tag.StudyDescription,"755523-st222-GE")tagValueIsPresent("0008,1030","755523-st222-GE")//Check if the study description is not equals to "755523-st222-GE"!tagValueIsPresent(#Tag.StudyDescription,"755523-st222-GE")!tagValueIsPresent("0008,1030","755523-st222-GE")
tagValueContains
tagValueContains(int tag, String value) or tagValueContains(String tag, String value)
This function will retrieve the tag value of the DICOM and check if the value parameter appears in the tag value.
//Check if the study description contains "st222"tagValueContains(#Tag.StudyDescription,"st222")tagValueContains("0008,1030","st222")//Check if the study description does not contain "st222"!tagValueContains(#Tag.StudyDescription,"st222")!tagValueContains("0008,1030","st222")
tagValueBeginsWith
tagValueBeginsWith(int tag, String value) or tagValueBeginsWith(String tag, String value)
This function will retrieve the tag value of the DICOM and check if the tag value begins with the parameter value
//Check if the study description begins with "755523"tagValueBeginsWith(#Tag.StudyDescription,"755523")tagValueBeginsWith("0008,1030","755523")//Check if the study description does not begin with "755523"!tagValueBeginsWith(#Tag.StudyDescription,"755523")!tagValueBeginsWith("0008,1030","755523")
tagValueEndsWith
tagValueEndsWith(int tag, String value) or tagValueEndsWith(String tag, String value)
This function will retrieve the tag value of the DICOM and check if the tag value ends with the parameter value
//Check if the study description ends with "GE"tagValueEndsWith(#Tag.StudyDescription,"GE")tagValueEndsWith("0008,1030","GE")//Check if the study description does not end with "GE"!tagValueEndsWith(#Tag.StudyDescription,"GE")!tagValueEndsWith("0008,1030","GE")
tagIsPresent
tagIsPresent(int tag) or tagIsPresent(String tag)
This function will check if the tag is present in the DICOM instance.
//Check if the tag study description is present in the DICOM filetagIsPresent(#Tag.StudyDescription)tagIsPresent("0008,1030")//Check if the tag study description is not present in the DICOM file!tagIsPresent(#Tag.StudyDescription)!tagIsPresent("0008,1030")
Combining Conditions
Multiple conditions can be combined using logical operators.
&& corresponds to the AND logical operator
|| corresponds to the OR logical operator
//Check if the tag study description ends with "GE" and if the station name is "CT1234"tagValueEndsWith(#Tag.StudyDescription,"GE")&&tagValueContains(#Tag.StationName,"CT1234")//Check if the tag study description ends with "GE" or if the station name is "CT1234"tagValueEndsWith(#Tag.StudyDescription,"GE")||tagValueContains(#Tag.StationName,"CT1234")
How does de-identification work?
This page provides technical details about how Karnak performs DICOM de-identification, including the algorithms used for UID generation, date shifting, and pseudonymization.
Overview
Karnak is a gateway that receives DICOM files and forwards them to one or multiple destinations using DICOM or DICOMWeb protocols. Each destination can be linked to a project that defines the de-identification method and a secret used to generate deterministic values.
Basic Profile
The Basic Profile for de-identifying DICOM objects is provided by the DICOM standard. This profile defines an exhaustive list of DICOM tags and their related actions for proper de-identification.
De-identification Actions
Five different actions are defined in the DICOM standard:
Action
Description
D
Replace with a dummy value
Z
Set to null
X
Remove
K
Keep
U
Replace with a new UID
Multiple Actions for IOD Conformance
The DICOM type is often dependent on the Information Object Definition (IOD) of the instance. To avoid DICOM corruption, multiple actions can be defined for a tag, ensuring that destructive actions like REMOVE won’t be applied on Type 1 or Type 2 attributes.
Combined actions:
Action
Behavior
Z/D
Z unless D is required to maintain IOD conformance (Type 2 versus Type 1)
X/Z
X unless Z is required to maintain IOD conformance (Type 3 versus Type 2)
X/D
X unless D is required to maintain IOD conformance (Type 3 versus Type 1)
X/Z/D
X unless Z or D is required to maintain IOD conformance (Type 3 versus Type 2 versus Type 1)
X/Z/U*
X unless Z or replacement of contained instance UIDs (U) is required to maintain IOD conformance. (Type 3 versus Type 2 versus Type 1 sequences containing UID references)
Action Selection:
Karnak loads the SOPs and attributes as specified in the DICOM Standard. Based on the tag’s type in the current instance, the proper action is set and applied.
Info
If the tag cannot be identified in the SOP or its type cannot be inferred, the strictest action will be applied (U/D > Z > X).
Examples of action resolution:
Z/D, X/D, X/Z/D → apply action D
X/Z → apply action Z
X/Z/U, X/Z/U* → apply action U
Action D: Replace with Dummy Value
The action D replaces the tag value with a dummy one that is consistent with the Value Representation (VR) of the tag.
Default Values by VR
Karnak uses these default values based on the VR when no specific dummy value is defined:
For date and time VRs (AS, DA, DT, TM), the shiftRange() function generates a random value within configurable limits:
Default maximum days: 365
Default maximum seconds: 86400
Action U: Generate a New UID
For each U action, Karnak hashes the input value using a one-way function to ensure it’s not possible to revert to the original UID. The function hashes the input UID and generates a new deterministic UID from the result.
Context and Project Secrets
A DICOM study may be de-identified multiple times using different methods. Karnak ensures deterministic UID generation to maintain data quality and usability.
Requirements:
A project must be created and associated with the destination
The project defines a de-identification method and a secret
The project’s secret is used as the key for the HMAC algorithm
Project Secret Format
Info
The secret is 16 bytes long and randomly generated when the project is created.
Users can upload their own secret, but it must be exactly 16 bytes long in hexadecimal format.
Hash Function
The algorithm used is “Message Authentication Code” (MAC). Karnak uses MAC as a one-way function rather than for message authentication.
A MAC provides a way to check the integrity of information transmitted over or stored in an unreliable medium, based on a secret key. Typically, message authentication codes are used between two parties that share a secret key in order to validate information transmitted between these parties.
A MAC mechanism that is based on cryptographic hash functions is referred to as HMAC. HMAC can be used with any cryptographic hash function, e.g., SHA256 or SHA384, in combination with a secret shared key. HMAC is specified in RFC 2104.
Karnak’s HMAC Configuration:
Hash function: SHA256
Secret key: Project’s secret (16 bytes)
UID Generation Process
Karnak generates a new DICOM UID that starts with the OID root "2.25" followed by a decimal representation of a UUID derived from the HMAC hash.
The value after “2.25.” is the straight decimal encoding of the UUID as an integer. It must be a direct decimal encoding of the single integer, all 128 bits. See How do you create an OID?
UUID Generation Algorithm
The generated UUID uses the first 16 bytes (128 bits) from the hash value as a UUID type 4 with variant 1.
Pseudocode to ensure correct UUID type and variant:
Karnak implements randomized date shifting that is consistent per patient and project, ensuring data consistency across all instances for the same patient.
Algorithm
The random shift uses the HMAC function (defined above) with a configurable range of days or seconds.
Default values:
Minimum: 0 (if not specified)
Maximum: User-defined
Process:
The Patient ID is hashed using the project’s secret
The hash is converted to a numeric value within the specified range
The same shift is applied to all date fields for that patient
The Patient ID combined with the project’s secret ensures that date shifts are deterministic per patient while remaining unpredictable across different patients.
Pseudonymization
This section explains how Karnak handles Patient ID generation to prevent data leakage across different de-identification methods.
The Problem
A patient participating in multiple research projects may encounter different de-identification methods. Most patient identifying information is contained in the Patient Module.
Risk scenario:
If the same pseudonym is used across projects with different de-identification profiles, data can be leaked when studies are reconciled.
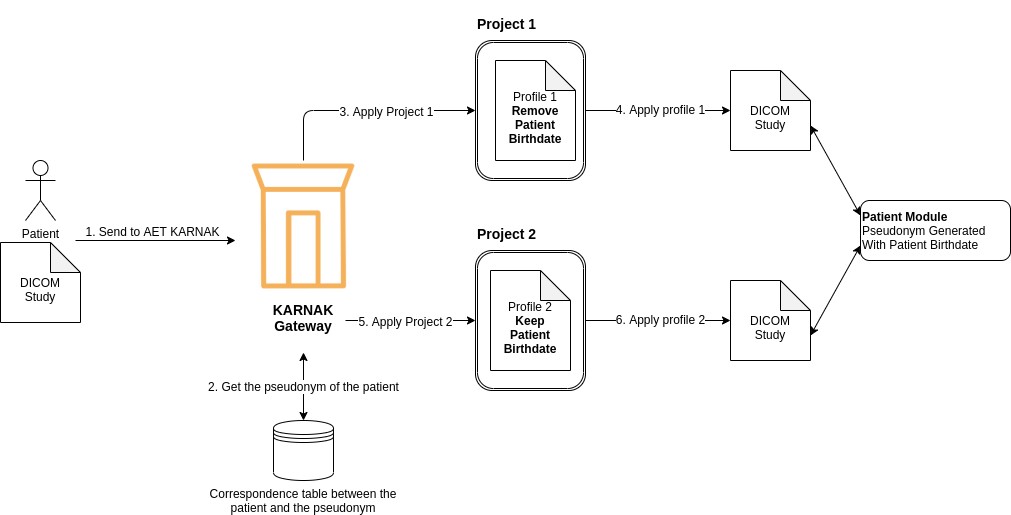
Example: Data Leakage Risk
In this example, a patient’s study falls within the scope of two different projects:
Project 1: Removes the patient birthdate
Project 2: Keeps the patient birthdate
If the patient pseudonym is used as patient identification and the data is reconciled, the birthdate will be leaked.
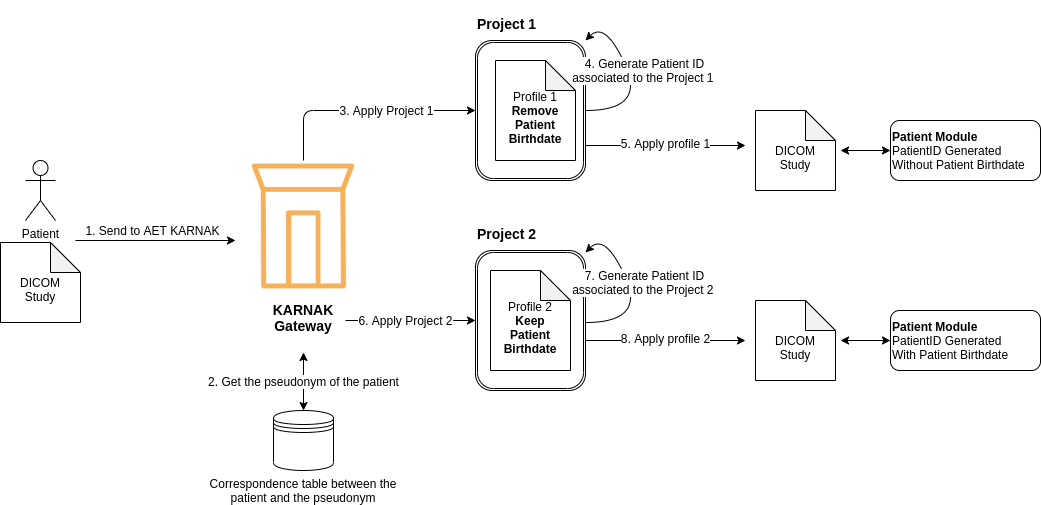
The Solution: Project-Specific Patient IDs
Karnak generates a unique Patient ID based on the pseudonym and project-specific characteristics. This prevents reconciliation across projects and eliminates data leakage.
PatientID Generation
The de-identified Patient ID is generated as follows:
The patient’s pseudonym is retrieved from an external service or mapping table
The pseudonym is hashed using the HMAC function and the project’s secret
The Patient ID is set to the first 16 bytes of the hashed pseudonym (in hexadecimal format)
Info
This makes the Patient ID unique and deterministic within the context of the project, preventing cross-project reconciliation.
Patient Name:
The pseudonym is used as the Patient’s Name if no other action has been defined during de-identification.
Attributes Added by Karnak
Karnak automatically sets certain attributes during de-identification to maintain compliance and traceability.
This user guide provides a comprehensive overview of the Karnak web interface, covering configuration, management, and operational features. Most of the sections below correspond to specific functionalities accessible from the left-hand menu in the main Karnak interface.
The Gateway page allows you to configure Forward Nodes in Karnak. A Forward Node represents a DICOM Application Entity (AE) that receives DICOM instances and routes them to one or more destinations.
Forward Node
This page lists all the forward nodes configured in Karnak and allows you to create, edit, and delete them.
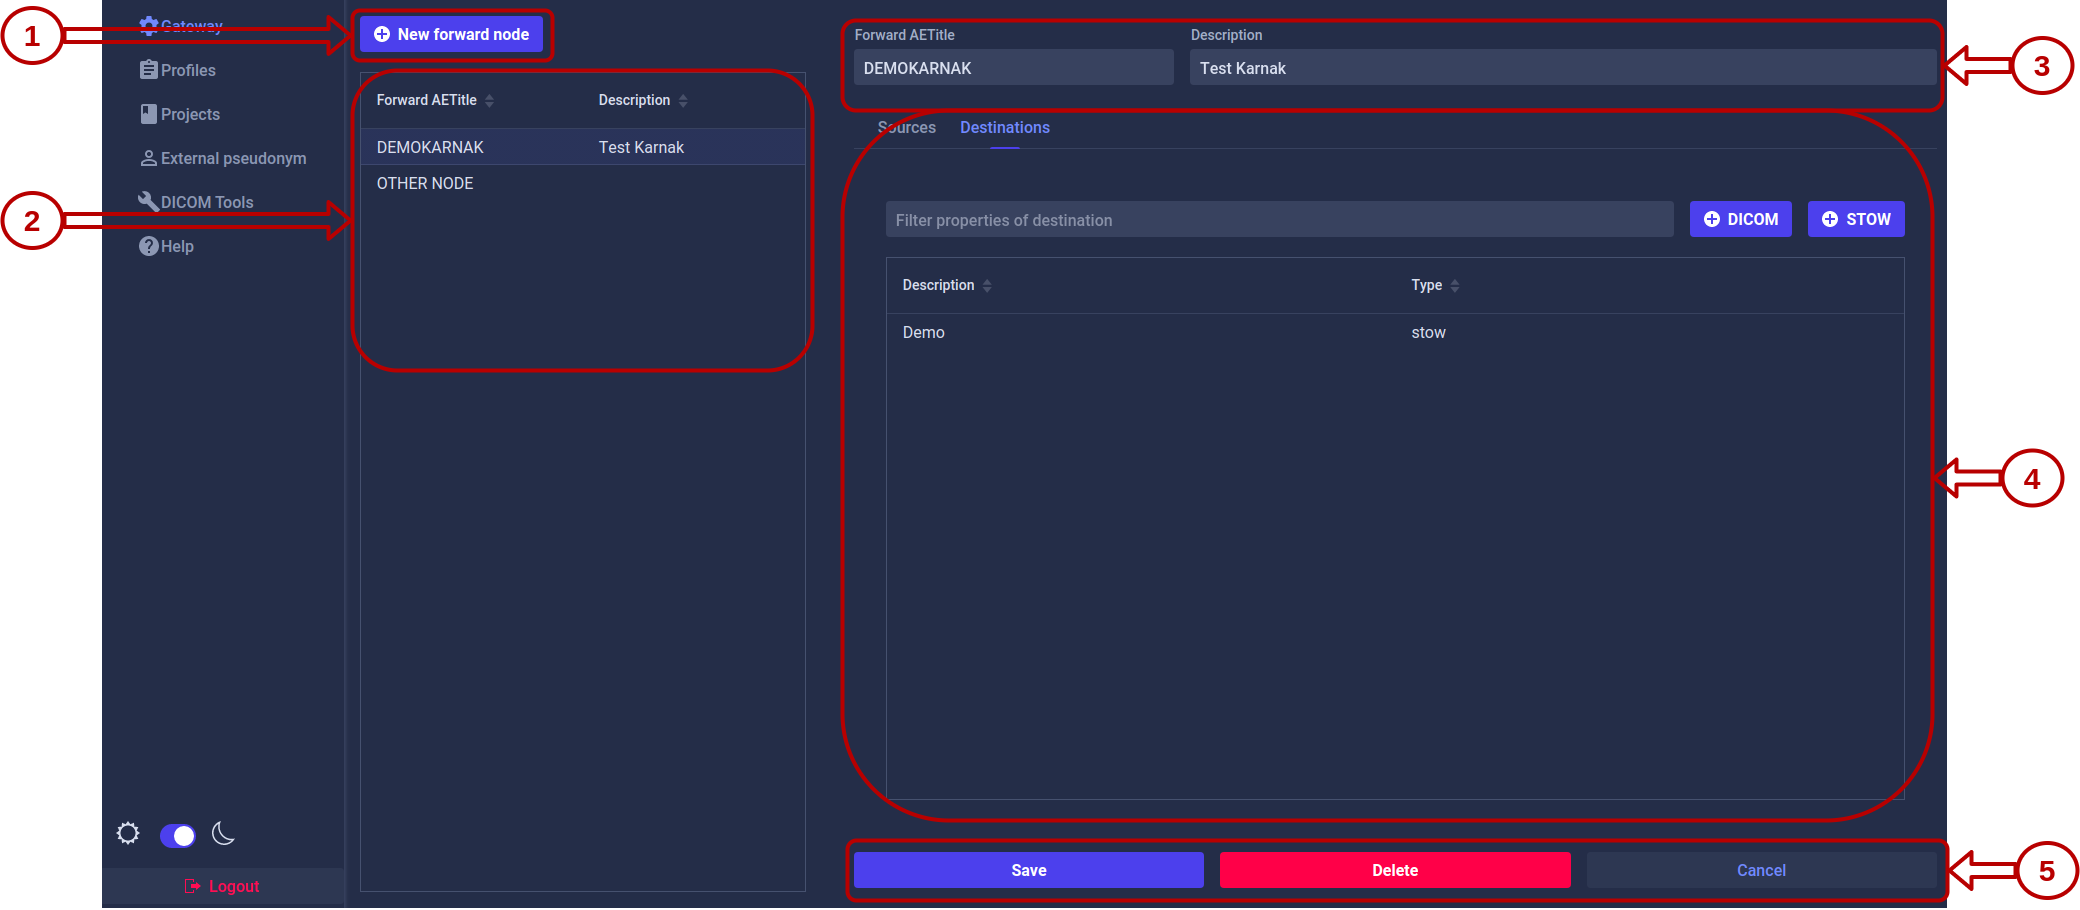
1. Create a Forward Node
Click the New forward node button. A form will appear:
Enter a unique value in the Forward AETitle field. AE Titles must not exceed 16 characters.
Click the Add button
The new forward node appears in the list and is automatically selected. Optionally, add a description and save your changes.
Info
The Forward AETitle must be unique across all forward nodes in the Karnak instance.
2. Forward Node List
All configured forward nodes are displayed in the left panel.
Select a forward node from the list to view and manage its configuration in the right panel.
Info
The copy icon
next to each forward node allows you to quickly copy its DICOM configuration in the clipboard for use in DICOM clients.
3. Forward Node Parameters
In the details view, you can modify:
Forward AETitle: The Application Entity Title of the forward node
Description: An optional description to help identify the node’s purpose
Click the Save button to apply your changes.
4. Sources and Destinations
Each forward node can be configured with:
Sources: Control which DICOM nodes are authorized to send data to this forward node
Destinations: Define where received DICOM instances should be forwarded
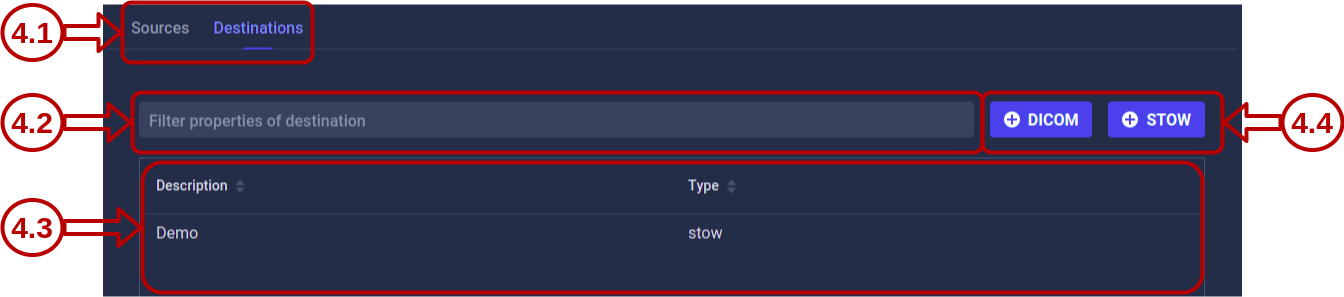
4.1 Navigation
Use the tabs to switch between the Destinations and Sources views for the selected forward node.
4.2 Filtering
Destinations tab: Filter by destination description
Sources tab: Filter by AE Title and hostname
4.3 List
All destinations or sources associated with the forward node are displayed here.
Click any item in the list to open its detailed view and edit its configuration.
4.4 Actions
The available action buttons depend on the active tab.
Destinations tab:
Create a new destination using either the DICOM or DICOM WEB (STOW) protocol. See the Destinations page for detailed configuration instructions.
Sources tab:
Create a new source to control which DICOM nodes can send data to this forward node. See the Sources page for detailed configuration instructions.
5. Forward Node Actions
Three action buttons are available:
Action
Description
Save
Saves changes made to the forward node parameters
Delete
Deletes the selected forward node and all associated configurations
Cancel
Reverts unsaved changes to the forward node parameters
Warning
Deleting a forward node will also remove all associated sources and destinations. This action cannot be undone.
Subsections of Gateway
Destinations
This page allows you to configure destinations for your forward nodes. Destinations define where DICOM instances are sent and how they are processed during transfer.
Info
To access this page, first select a forward node from the Gateway page, then click the Destinations tab.
Depending on the protocol used, two types of destinations can be created:
A DICOM Destination uses the traditional DICOM protocol to forward instances to another DICOM node.
Creating a DICOM Destination
AETitle, Hostname and Port are mandatory when creating a DICOM Destination.
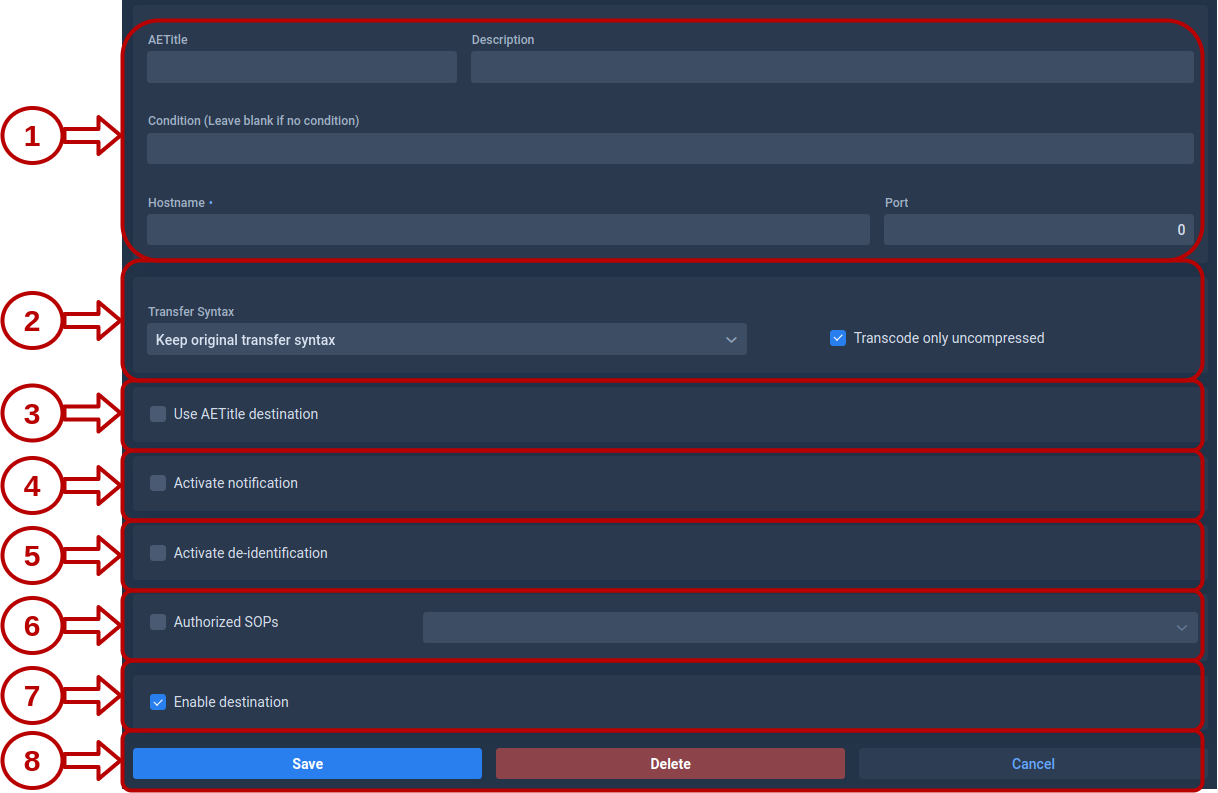
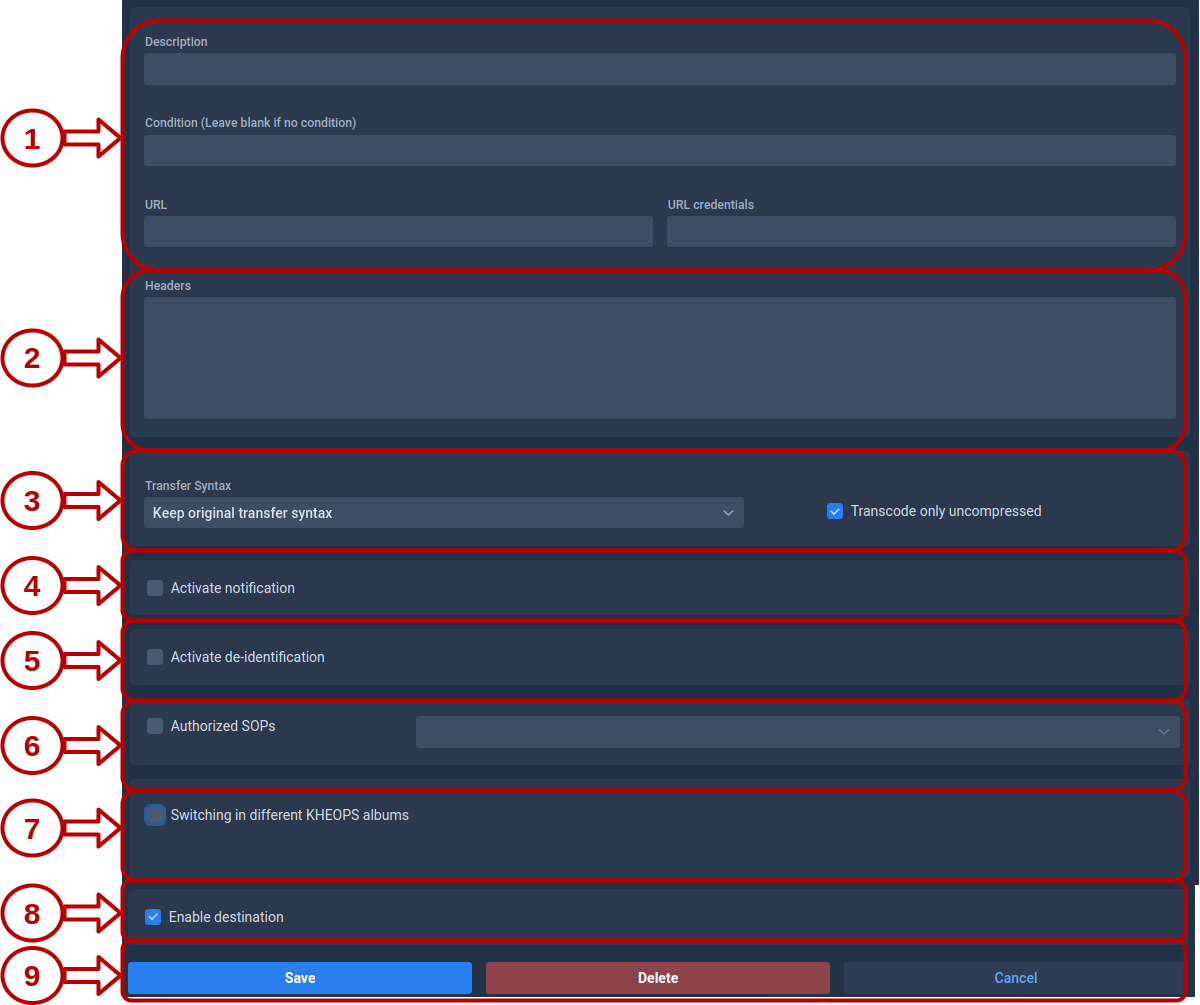
Configuration Options
1. Destination Parameters
These fields define where Karnak should send the DICOM instances.
AETitle: The Application Entity Title that identifies the destination DICOM node.
Hostname: The IP address or hostname of the destination server.
Port: The network port used by the destination DICOM service (must be between 1 and 65535).
Condition: An optional field that can contain an expression. If the condition is met, the destination will be activated. See Conditions for more details.
2. Transfer Syntax
This field defines the transfer syntax used when sending DICOM instances to this destination. The transfer syntax determines the encoding and compression format of the DICOM data.
It is recommended to choose “Keep original transfer syntax” unless you have specific requirements for compression or compatibility with the destination system.
When selecting a specific transfer syntax, ensure that the destination system supports it to avoid decompression or compatibility issues. It is also recommended to check “Transcode only uncompressed” when selecting lossy syntaxes to avoid re-compressing already compressed data.
Info
Transcoding may increase processing time and resource usage, especially for large datasets. Use it judiciously based on your workflow needs.
3. Use AETitle Destination
When this option is checked, use the destination AETitle as the calling AETitle instead of the Forward Node AETitle during the DICOM association.
4. Notifications
Enable email notifications to receive automatic summaries of forwarded instances, including success and error reports.
Configuration fields:
Field
Description
Default Value
List of emails
Comma-separated list of recipient email addresses
None
Error subject prefix
Prefix added to email subjects when an error occurs
**ERROR**
Rejection subject prefix
Prefix added when an instance is rejected due to filters or criteria
DICOM attributes to inject into the subject pattern (PatientID, StudyDescription, StudyDate, StudyInstanceUID)
PatientID,StudyDescription
Interval
Time in seconds to wait before sending notification (aggregates multiple instances)
45
Info
The interval setting helps reduce email volume by aggregating notifications. All instances received within the specified interval are summarized in a single email.
5. Tag Morphing
Tag morphing allows you to modify specific DICOM tag values defined in a profile. With this mode, it is not mandatory to de-identify patient information like in De-identification mode.
The applied profile and its version are displayed below the selection
Info
Activate tag morphing and Activate de-identification are mutually exclusive options. Only one can be active at a time.
6. De-identification
De-identification removes or replaces patient-identifying information in DICOM instances according to configurable rules and profiles. It is not possible to preserve the patient identity in the profile when this option is activated.
Info
Activate de-identification and Activate tag morphing are mutually exclusive options. Only one can be active at a time.
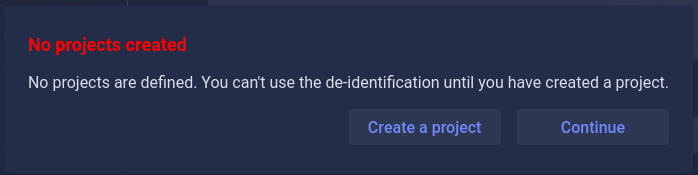
A popup will appear with two options, either create a project or continue without activating de-identification.
If a project exists:
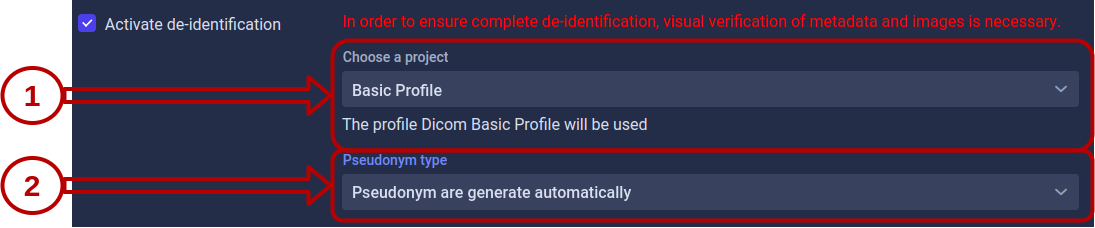
Configure de-identification as shown below:
Project Selection
Select the project that defines the de-identification profile to apply. The profile name and version are displayed below the selection.
Each project is associated with:
A de-identification profile
A secret key used for pseudonymization and UID generation
See the Projects page for more information about project configuration.
Pseudonym Type
Pseudonyms replace patient identifiers while maintaining the ability to link de-identified data back to the original patient (when necessary and authorized).
Choose how Karnak should retrieve or generate pseudonyms:
This field provides a default value for the Issuer of Patient ID when it’s not present in the DICOM instance.
Usage:
This value is used when retrieving the pseudonym using the External Pseudonym cache. The pseudonym is queried based on:
Patient ID (from DICOM tag 0010,0020)
Issuer of Patient ID (from DICOM tag 0010,0021 or this default value)
The combination of Patient ID and Issuer ensures unique patient identification across different healthcare systems.
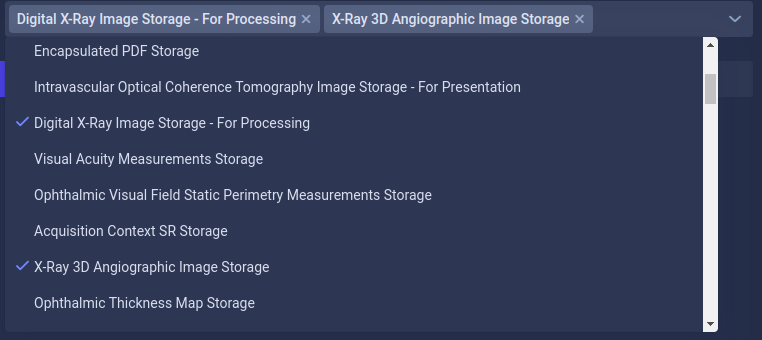
7. Authorized SOPs
Filter which DICOM instance types (SOP Classes) are forwarded to this destination.
Configuration:
Enabled: Only instances matching the specified SOP Classes are transferred
Disabled: All SOP Classes are transferred without restriction
8. Enable the Destination
This toggle allows you to temporarily disable a destination without deleting it. The state is also visible in the destination list with a green (enabled) or red (disabled) indicator.
Use this feature to:
Temporarily pause forwarding during maintenance
Test configurations without affecting production destinations
Keep backup destination configurations ready but inactive
9. Action Buttons
Three actions are available to manage the destination:
Button
Description
Save
Saves all changes made to the destination configuration
Delete
Permanently deletes the selected destination
Cancel
Reverts all unsaved changes to the last saved state
Warning
Deleting a destination cannot be undone. All configuration settings will be permanently removed.
Creating a STOW Destination
The URL is required for STOW Destination creation. Most configuration options are identical to DICOM Destinations. Only the differences are detailed below.
Configuration Differences
1. Destination Parameters
URL: The DICOMweb STOW-RS endpoint where DICOM instances will be sent (e.g., https://pacs.example.com/dicomweb/studies).
Condition: An optional expression that activates the destination when met. See Conditions for more details.
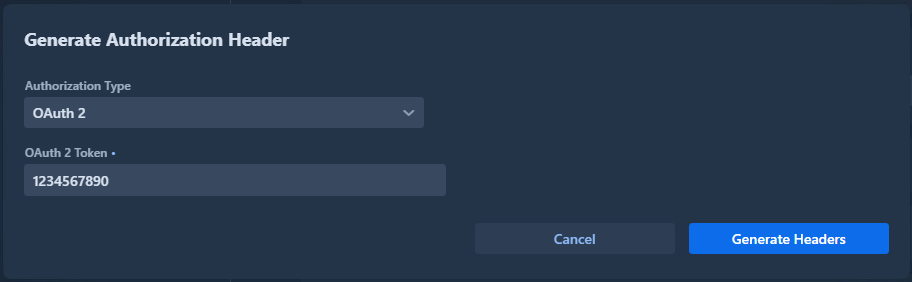
HTTP Headers
The Headers field contains HTTP headers added to each STOW-RS request.
Format: Headers are defined using XML-style key-value tags as shown below:
Click the Generate Authorization Header button to automatically generate properly formatted authentication headers.
Warning
If a header with <key>Authorization</key> already exists, an error will be displayed. The generator will append to existing headers if they don’t conflict.
If the destination is a Kheops endpoint, it is possible to configure multiple albums by selecting the option “Switching in different KHEOPS albums”.
Explanations for configuring Kheops-related parameters can be found in the Kheops section.
Sources
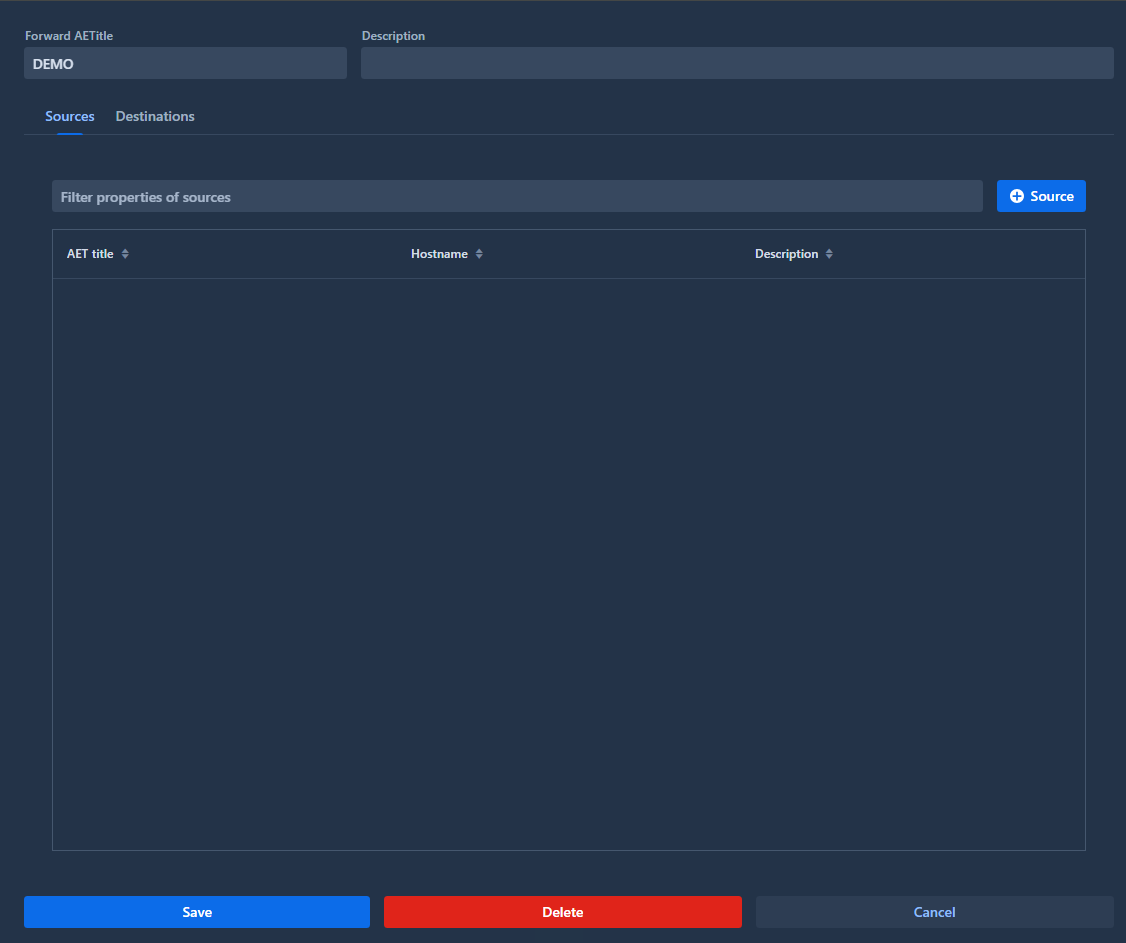
Sources
The Sources tab displays all configured sources for the selected forward node.
A source is used to control which entities can send DICOM data to the forward node. It validates that received DICOM instances come from a known Application Entity Title (AET).
Info
If no sources are defined, the forward node will accept DICOM instances from any AET without restrictions.
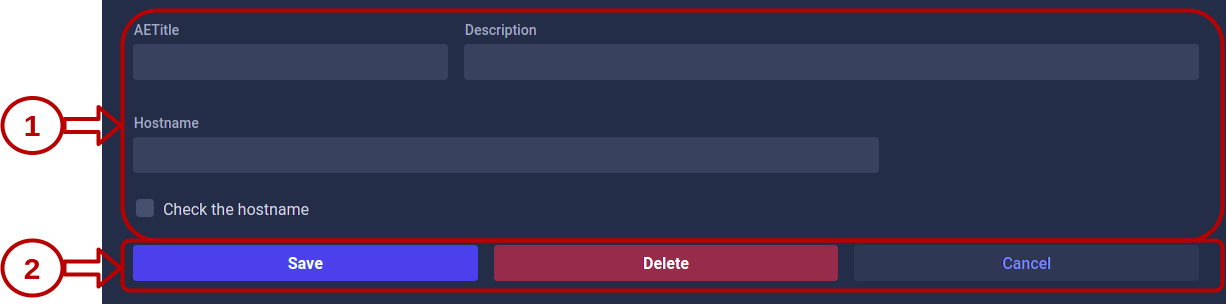
Create a source
To create a new source, click the Source button and configure the following fields:
Field
Description
Required
AETitle
Application Entity Title of the source DICOM node
Yes
Description
Optional description to identify the source
No
Hostname
Hostname or IP address of the source DICOM node
No*
*The Hostname field becomes required if you enable the “Check the hostname” option. When enabled, Karnak will validate both the AET and the hostname of incoming DICOM instances.
Source validation behavior
When a DICOM instance is received by the forward node:
With sources configured: Only instances from registered AETs (and hostnames, if enabled) are accepted
Without sources configured: All instances are accepted.
This provides flexible security control for your DICOM workflow.
Profiles
This page lists all profiles configured in Karnak and allows you to create, edit, and delete them. A profile defines the actions to apply to a DICOM instance before it is sent.
The Dicom Basic Profile is available by default and cannot be deleted. It is the reference de-identification profile based on the DICOM standard. For more details, see How does de-identification work?
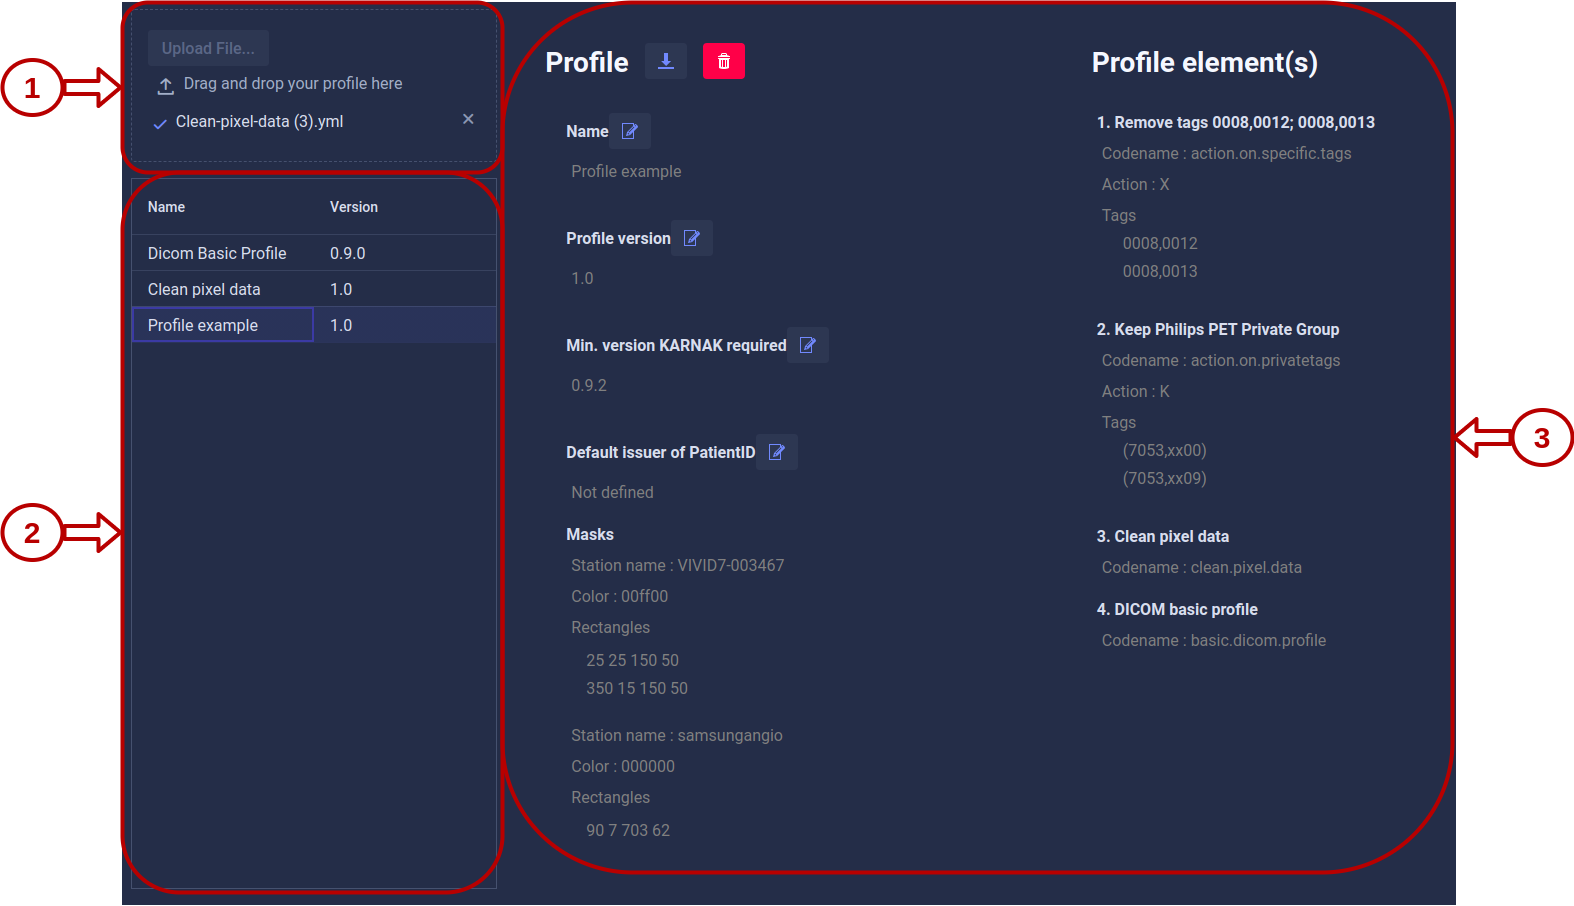
1. Profile drag and drop area
Profiles can only be created by importing a YAML file using the top-right component of the Profiles view. You can select a file by clicking the Upload file... button or by dragging and dropping it into the area. The file is then loaded and analyzed. If no errors are found, a new profile is automatically created from the file and added to the profile list.
Info
For details on the profile structure and how to create a valid YAML file, see the Profile Structure documentation.
2. Profile list
All available profiles are listed here. A profile can evolve over time and appear multiple times in the list under the same name but with different versions.
When you select a profile in the list, its details are displayed on the right.
3. Profile details
This area shows the details of the selected profile.
Some fields, such as the name, version, and minimum required Karnak version, can be edited by clicking the pen icon.
Edit the field value, then click the checkmark button to save the changes or the cross button to discard them.
Info
The rest of the profile cannot be modified. To make changes to the profile rules or structure, you must delete the profile and upload a new version.
4. Profile actions
You can download the entire profile as a YAML file by clicking the button on the right or delete it by clicking the trash icon.
Download: Export the profile configuration as a YAML file for backup or sharing with other Karnak instances.
Delete: Remove the profile from Karnak. If the profile is in use by one or more projects, a warning message appears to prevent accidental deletion.
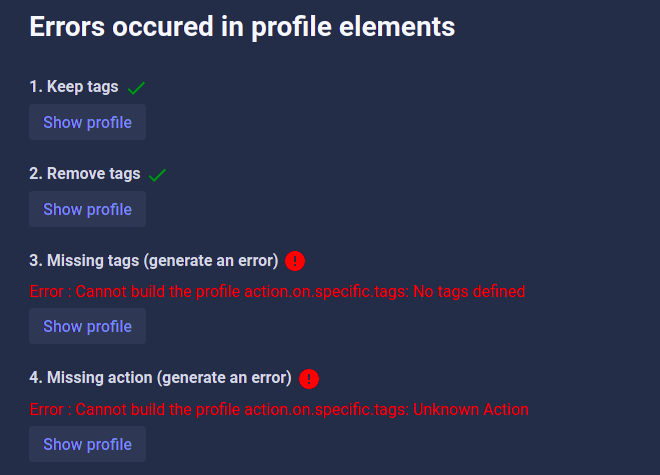
5. Profile upload feedback
When a YAML file is imported successfully, this view shows the details of the newly created profile.
If errors occur during profile creation, the profile is not added to the list. The errors are shown in the right panel with details about their cause, as illustrated below.
Projects
This page lists all projects configured in Karnak and lets you create, edit, and delete them. A project is linked to a profile and contains a secret used for de-identification.
1. Create a project
To create a new project:
Enter a name.
Select a profile.
Click Add.
The project is added to the list and its details appear in the right panel.
2. Project list
All available projects are listed in the left panel.
Selecting a project displays its details on the right.
3. Project details
In the details view you can:
Change the project name.
Change the de-identification profile.
Click Update to save your changes.
4. Project secret
The project secret is central to Karnak’s de-identification process.
It is a 32-character hexadecimal value.
A secret is automatically generated when the project is created.
In the details view, the secret is shown along with its creation date and time.
You can generate a new secret by clicking Generate Secret. When you do this:
Previous secrets are kept in the database.
You can select any previous secret to use again.
Warning
Changing the project secret can cause data consistency issues between old and new de-identified DICOM instances. Use this feature with caution and only when necessary.
A destination is associated with a project for de-identification, as described in the Destination configuration.
To generate new values like UIDs and pseudonymize some patient information, Karnak uses a hash function seeded with the project secret. This makes the generated values unique per project and deterministic as long as the secret does not change.
Implications of changing the secret:
If a DICOM instance is de-identified twice using the same project, secret, and profile, the resulting de-identified instances are identical.
If the secret changes, de-identifying the same DICOM instance again with the same project and profile but the new secret will produce different de-identified instances.
Details about the algorithm and UID generation using the project secret are available here.
5. Action buttons
Click Update to save any change made to a project.
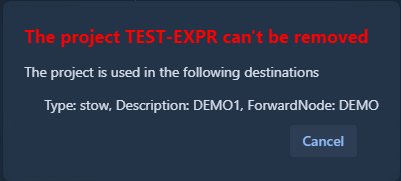
Click Remove to delete the selected project.
If the project is associated with a destination, deletion fails and an error message is displayed.
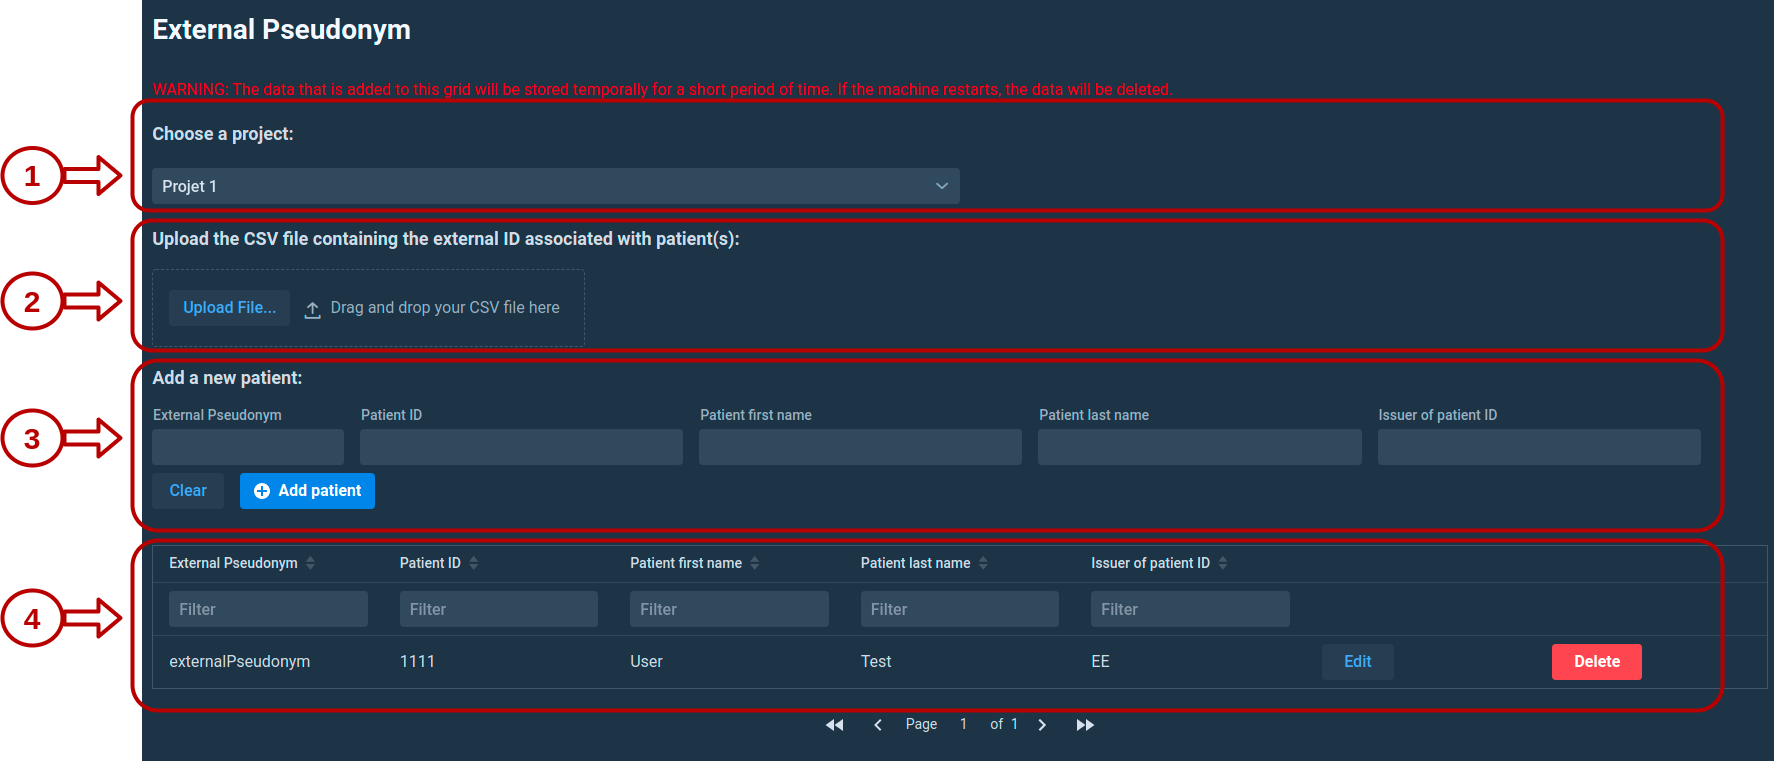
External Pseudonym
This page allows you to create or import pseudonyms that Karnak will use during de-identification. The de-identification process and how pseudonyms are used is detailed in the Pseudonym chapter.
Pseudonyms created or imported on this page are stored in a cache with a maximum lifetime of 7 days.
With the portable version of Karnak, the cache is persistent only the time the application is running. Restarting the application will clear the cache.
1. Choose a project
External pseudonyms are linked to a specific project. This allows Karnak to properly handle cases where:
A patient participates in multiple clinical studies with different pseudonyms
Potential pseudonym collisions occur between projects
2. Upload a CSV file
You can upload a CSV file containing external pseudonyms by:
Clicking the Upload File button
Dragging and dropping a file onto the upload area
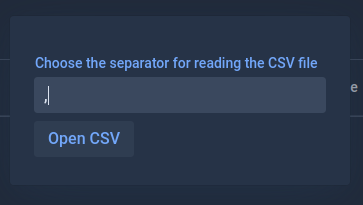
2.1 CSV separator configuration
After selecting a file, a dialog appears asking for the CSV separator character. The default value is a comma (,).
Click Open CSV to proceed to the import configuration.
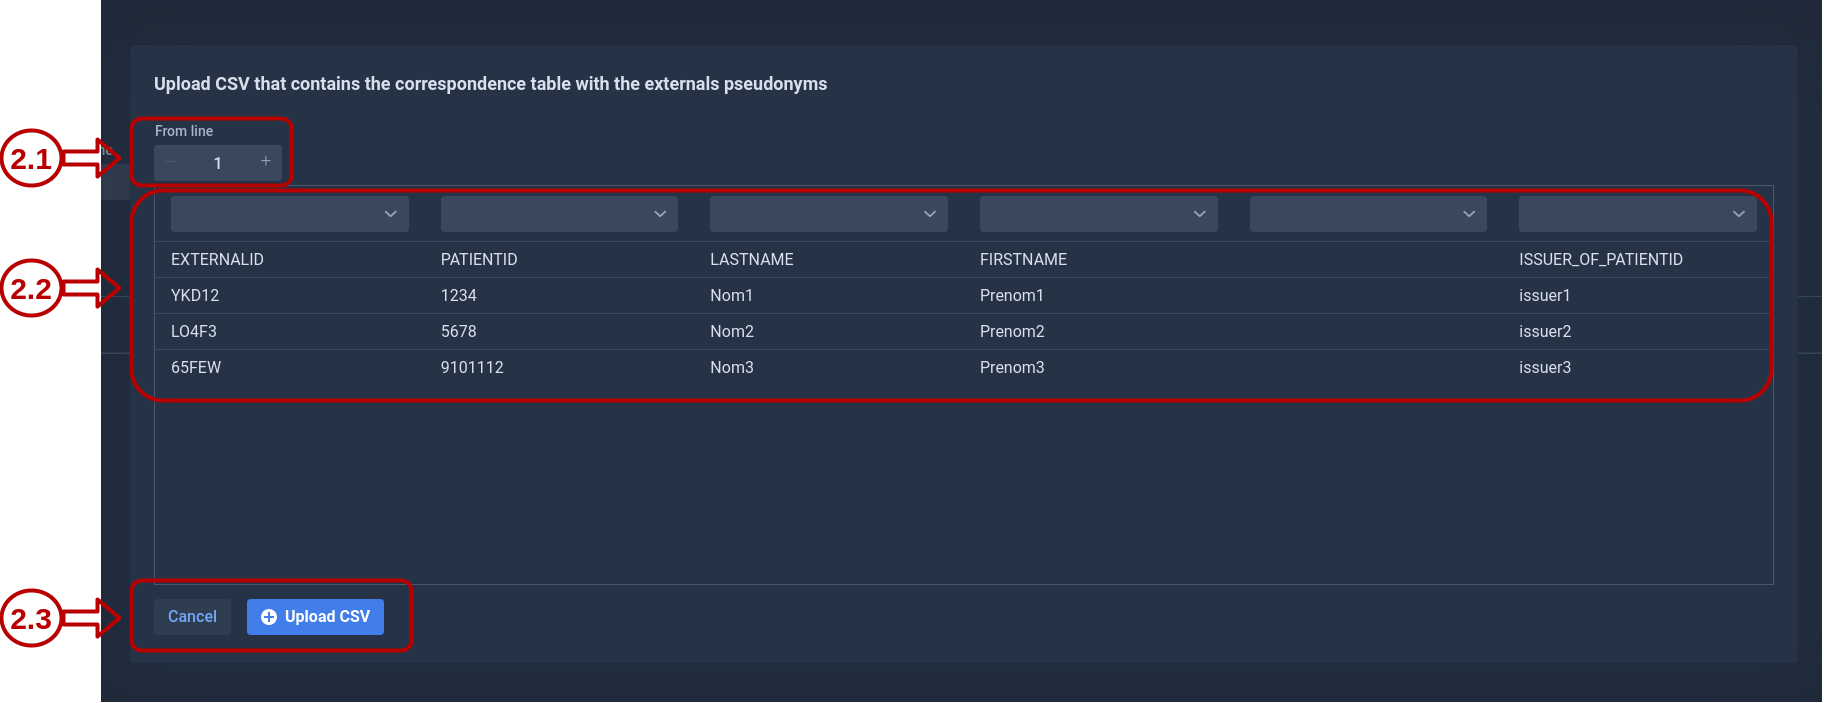
2.2 Preview and configuration
The CSV data is displayed in a grid for review and configuration.
From line: This field defines the starting row for the import. Use this to skip header rows or other non-data lines at the beginning of the file.
Column assignments: Map each CSV column to the corresponding pseudonym attribute. Only the Patient ID and External Pseudonym fields are required. Other fields are optional.
2.3 Import validation
Click Upload CSV to import the data. Karnak performs validation checks including:
Duplicate Patient IDs
Duplicate Pseudonyms
Required field validation
If validation errors occur, they will be displayed and the import will be rejected.
3. Add a new patient manually
You can also add external pseudonyms manually by filling in the form fields:
External Pseudonym (required)
Patient ID (required)
Patient First Name (optional)
Patient Last Name (optional)
Issuer of Patient ID (optional)
Click Add patient to add the entry to the external pseudonyms table.
4. Pseudonym management
4.1 Edit or delete individual entries
Each pseudonym row has action buttons:
Edit: Modify the patient fields
Delete: Remove the pseudonym from the cache
4.2 Bulk operations
Select multiple rows using the checkboxes on the left side of each row. Click Delete selected patients to remove all selected entries and confirm the action in the dialog.
4.3 Delete all patients
The Delete all patients button removes all external pseudonyms for the selected project only. Pseudonyms linked to other projects are not affected.
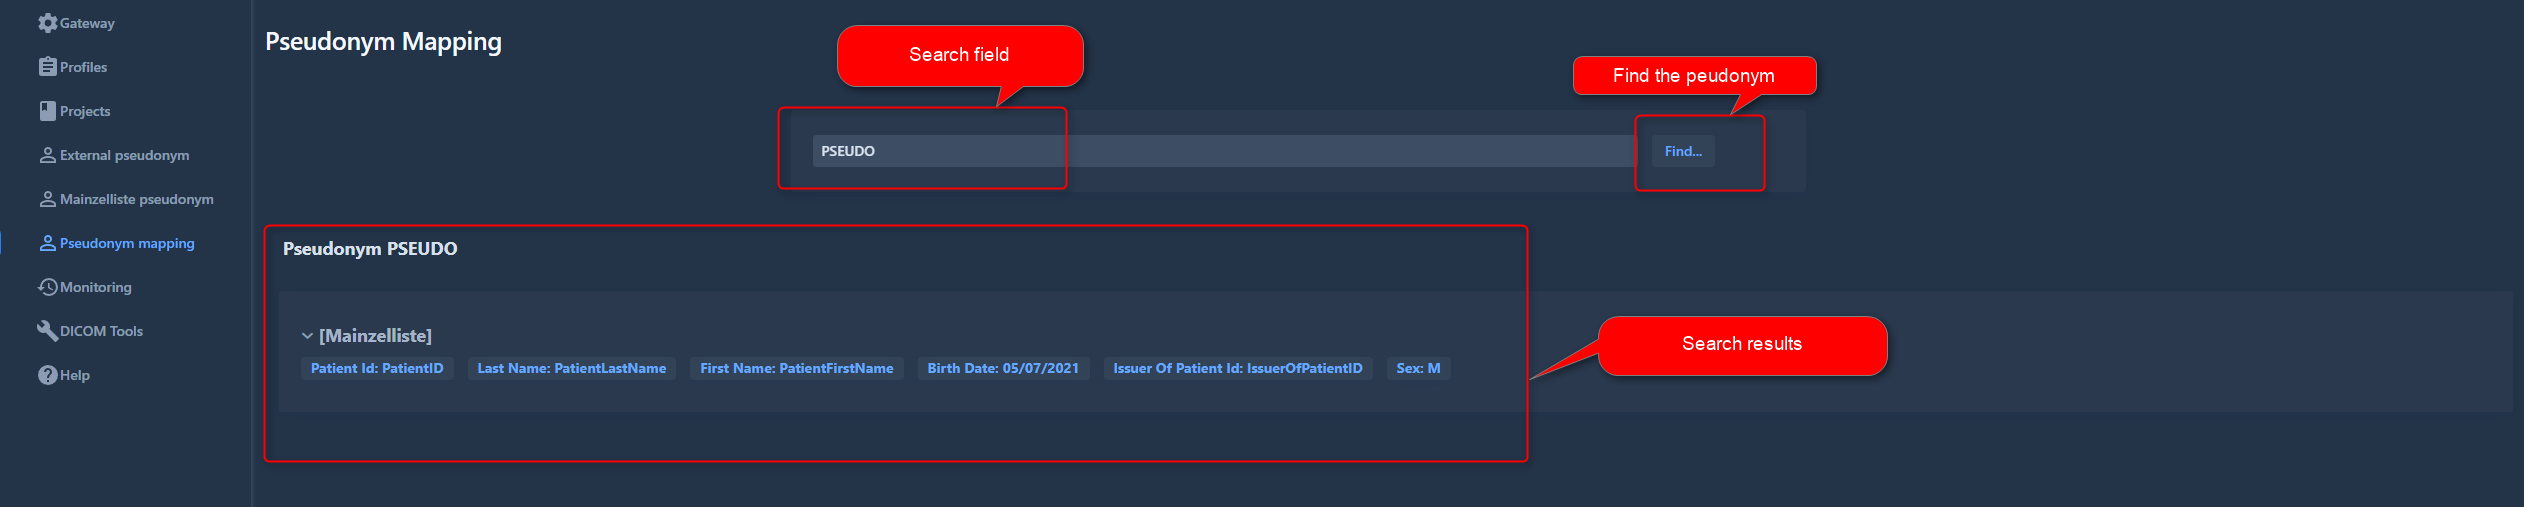
Pseudonym mapping
The pseudonym mapping page lets you look up the original data corresponding to pseudonyms that were added in the External pseudonym view. Note that the external pseudonym table is stored within a limited time frame.
1. Search field
To retrieve the original value:
Enter the pseudonym in the search field.
Click the Find button.
The search is case-sensitive.
2. Results
If a match is found, the result is displayed below the search field.
The prefix [External] indicates that the match comes from the external pseudonym table, followed by the associated project.
The original patient data is also displayed.
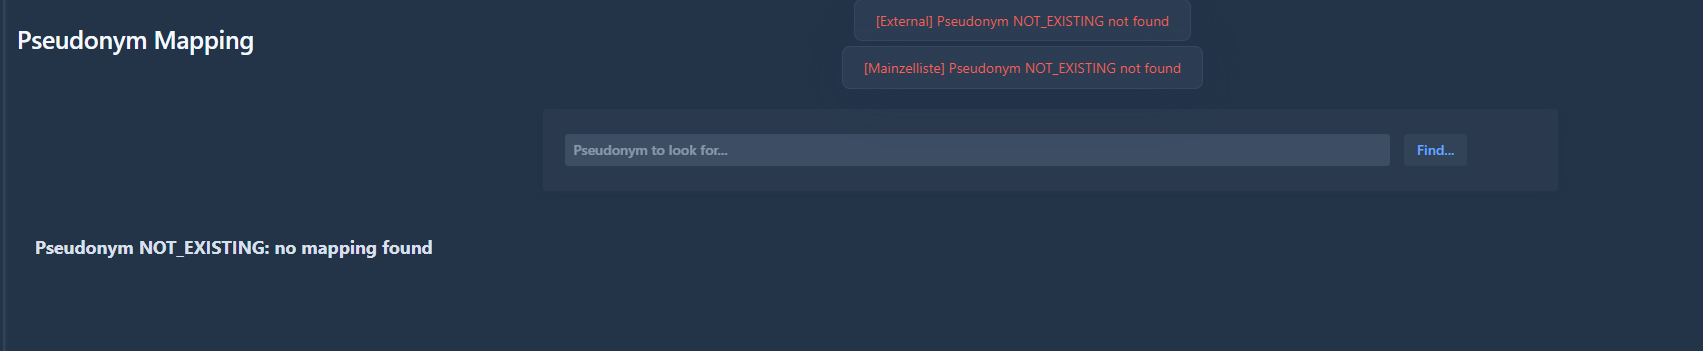
If no correspondence is found for the pseudonym, an error message is displayed, as illustrated below.
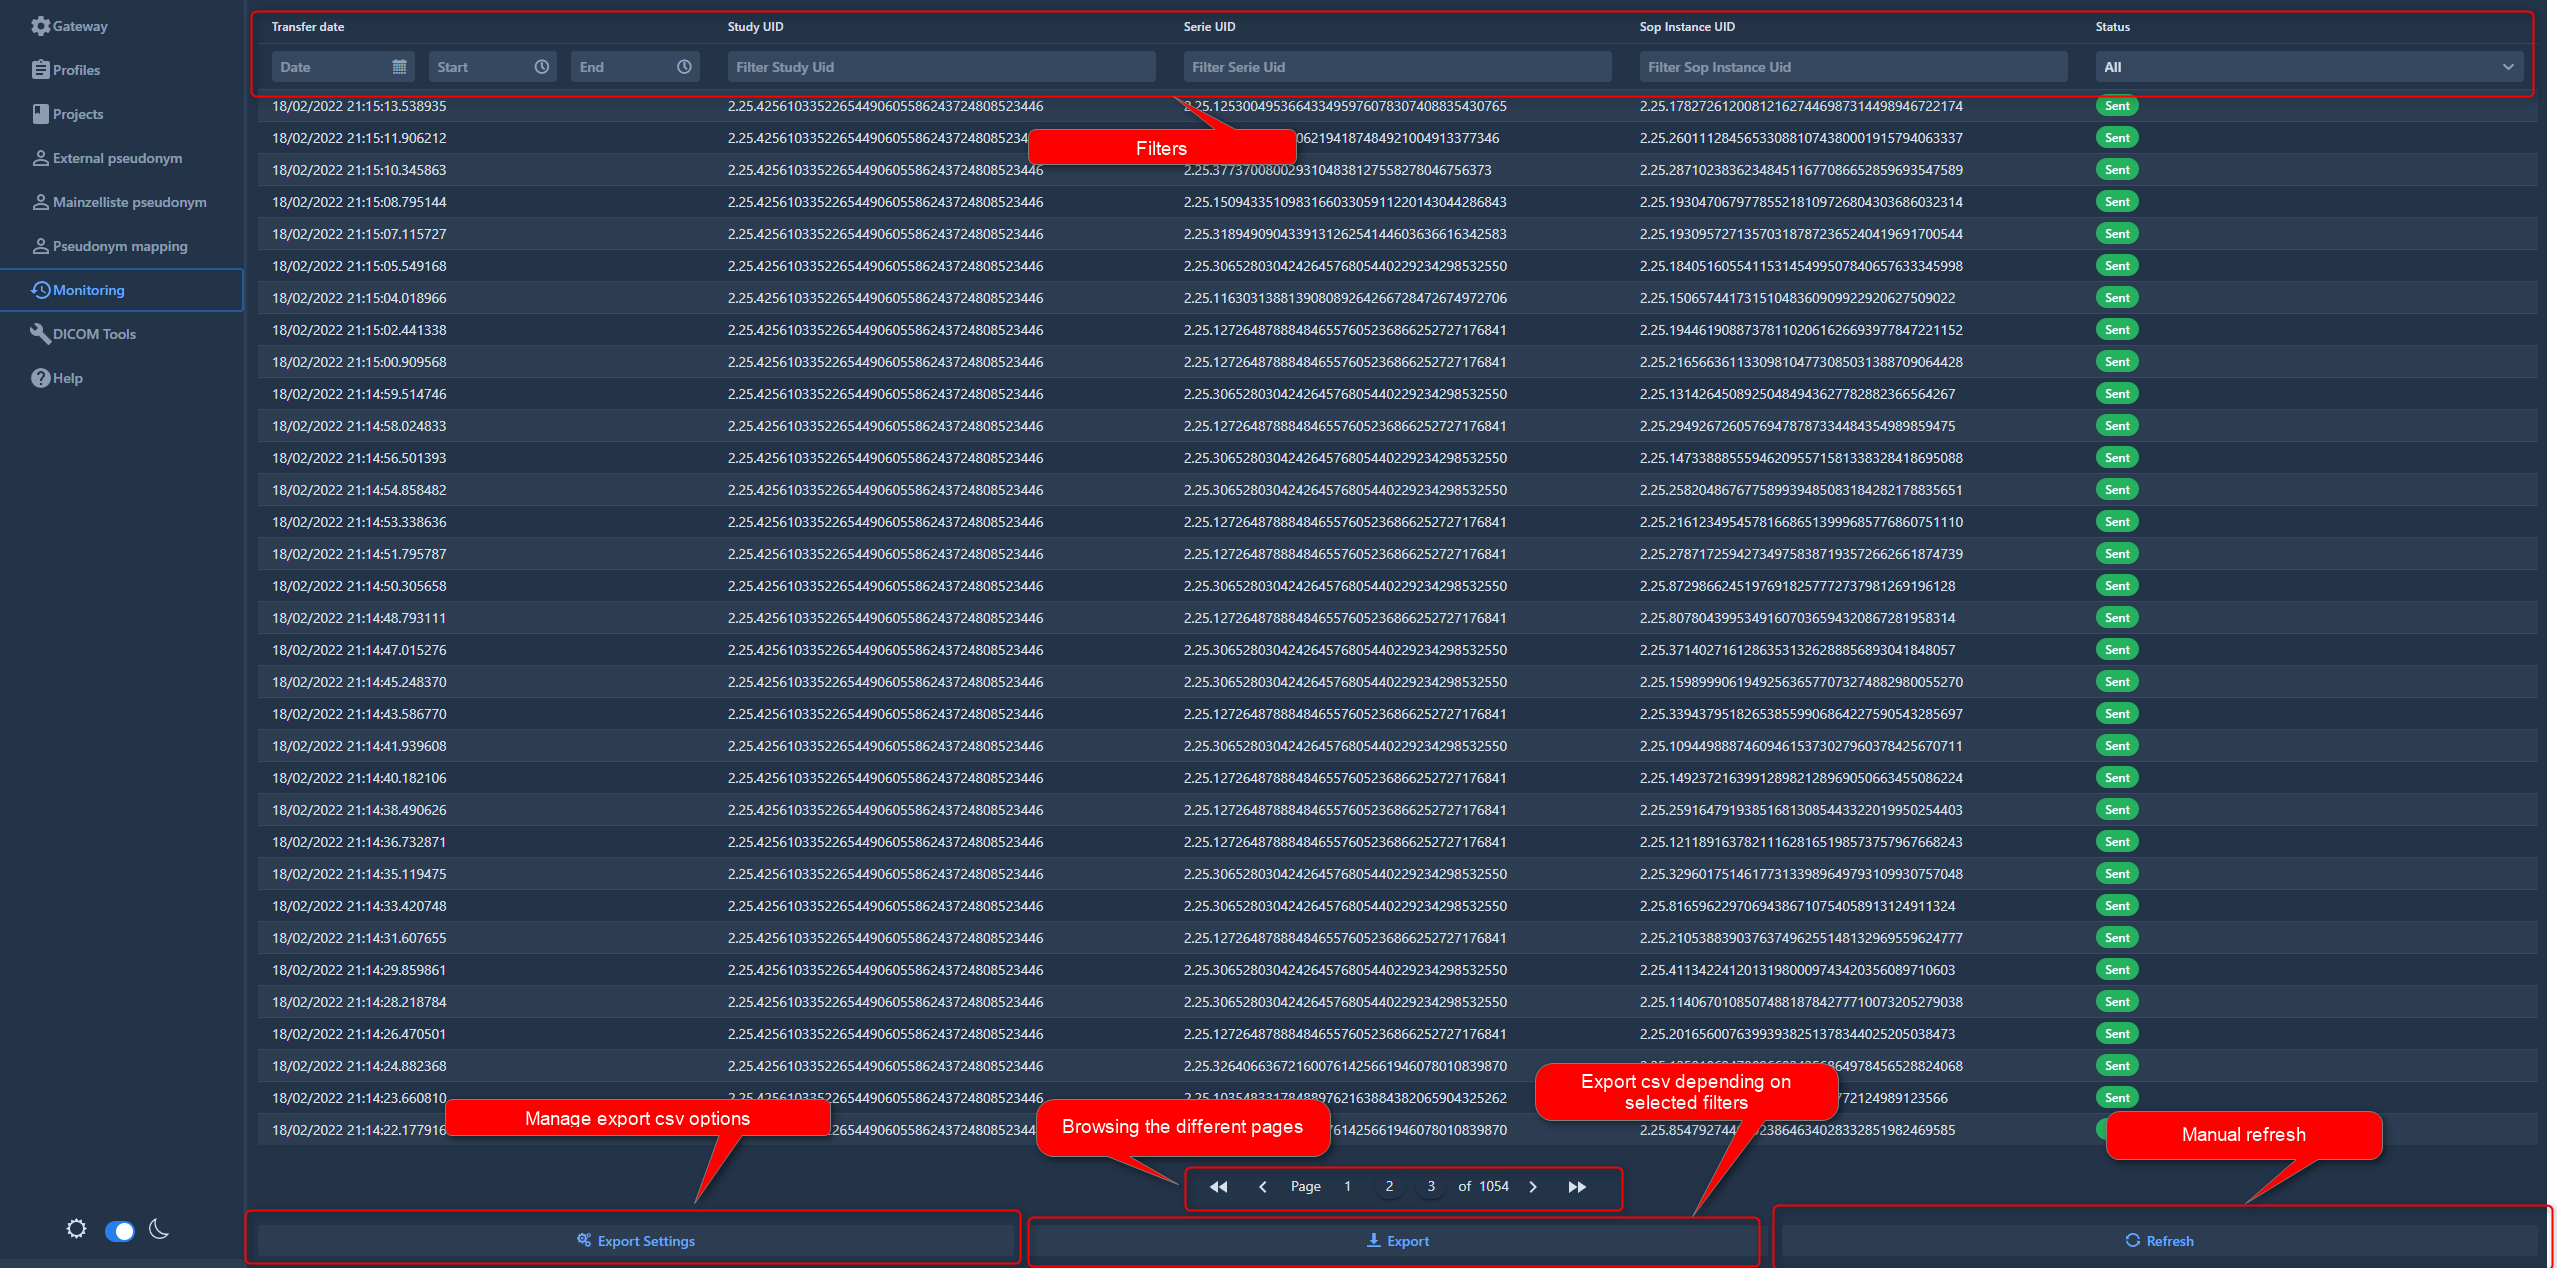
Monitoring
The Monitoring view allows you to track transfers in progress or view the history of recent transfers. The list is ordered chronologically, with the most recent transfers displayed first.
By default, the log retains the last 150,000 transfers. An automatic cleaning process runs to remove older entries when this limit is exceeded.
Detailed information for each transfer, including both original and de-identified attributes, can be viewed by clicking on a transfer row.
1. Filters
Filters allow you to search and narrow down the list of transfers. You can filter by:
Date/Time: Range of the transfer.
UIDs: Study, Series, or SOP Instance UID (matches original or de-identified values).
Status: The outcome of the transfer (Not sent, Sent, All, Excluded, Error).
Transfer Statuses
The status of a transfer is color-coded:
Sent (Green): The instance was successfully sent.
Excluded (Orange): The instance was not sent due to configuration rules. This includes the SOP Class filter, destination conditions, or the use of ExcludeInstance() in the profile. The label indicates the specific reason for exclusion.
Error (Red): The instance was not sent because an unexpected error occurred. The label indicates the error type.
2. Browsing
Use the navigation bar at the bottom of the view to browse through the pages of the transfer log.
3. Refresh
Click the refresh button to update the list with the most recent transfers.
4. Export
You can export the transfer log to a CSV file. The export function respects the currently active filters, so only the transfers displayed (or matching the criteria) will be included in the file.
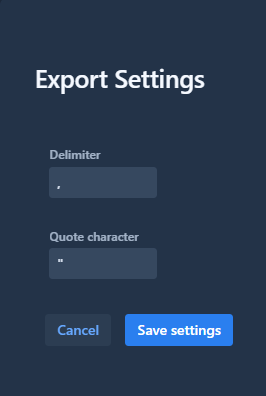
Before exporting, you can customize the CSV format:
Delimiter: Select the character used to separate fields.
Quote character: Select the character used to enclose fields.
Once customized, click the export button to generate and download the CSV file.
DICOM Tools
This page provides an overview of utility tools available in the DICOM Tools module, designed to assist with connectivity testing, querying, and status monitoring of DICOM servers. These tools enable users to:
Test DICOM node availability using DICOM Echo
Query a DICOM Worklist and display results
Monitor multiple DICOM nodes using DICOM Echo and WADO protocols
The different modules are accessed through tabs at the top of the page.
Info
Currently, the persistence of DICOM nodes and worklists is not supported. Configured nodes and worklists come from CSV files that are loaded when the Karnak server starts.
DICOM Echo
This tool tests DICOM communication between two Application Entity Titles (AETs).
Configuration Fields
The following fields must be configured to execute an Echo test:
Field
Description
Required
Calling AETitle
Identity of the calling DICOM entity
Yes
Called AETitle
Identity of the DICOM entity to test
Yes
Called Hostname
Hostname or IP address of the DICOM node
Yes
Called Port
Port number of the DICOM node
Yes
All fields are mandatory to execute the Echo test.
Running the Test
Click the Echo button to launch the connectivity test and DICOM Echo command.
Successful Test
Below is an example of a successful DICOM Echo test:
Failed Test
In this example, the “Called AETitle” value is intentionally incorrect. The network connectivity test succeeds, but the DICOM Echo fails, displaying the reason for the failure:
Select Node Utility
The Select Node popup simplifies configuration by allowing you to choose from pre-configured DICOM nodes.
Click the Select Node button to open the popup:
Configuration:
Choose the node type in the DICOM Nodes Type field
The DICOM Node dropdown updates automatically based on the selected type
Filter nodes by typing in the field (searches AET, hostname, port, or description)
Click Select to auto-fill the Called AETitle, Called Hostname, and Called Port fields
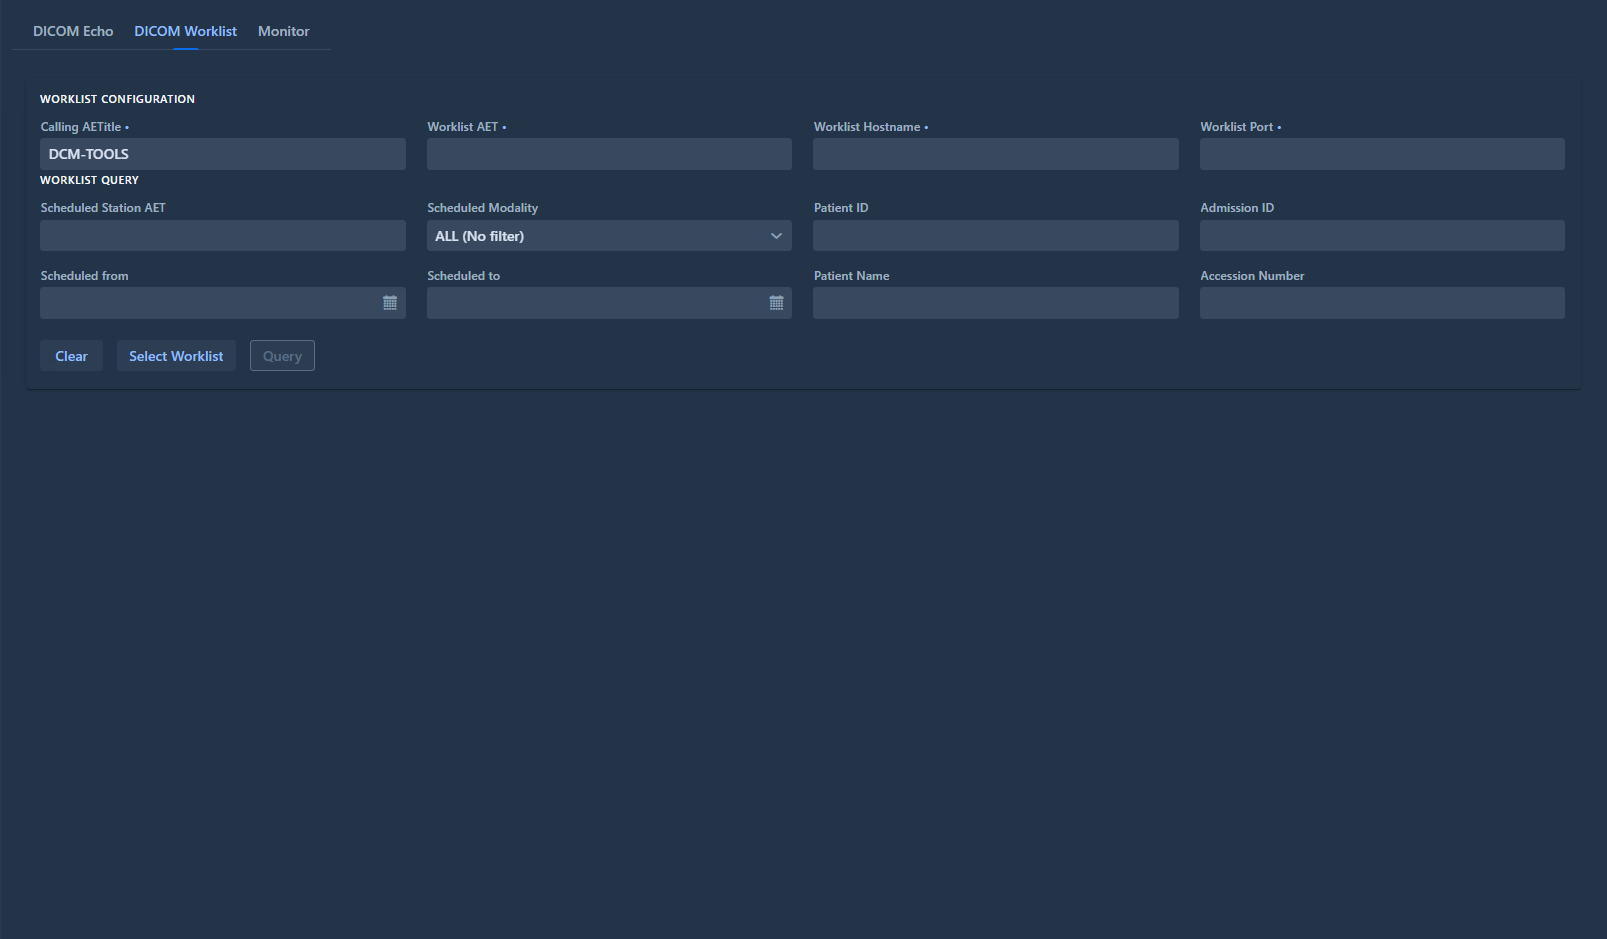
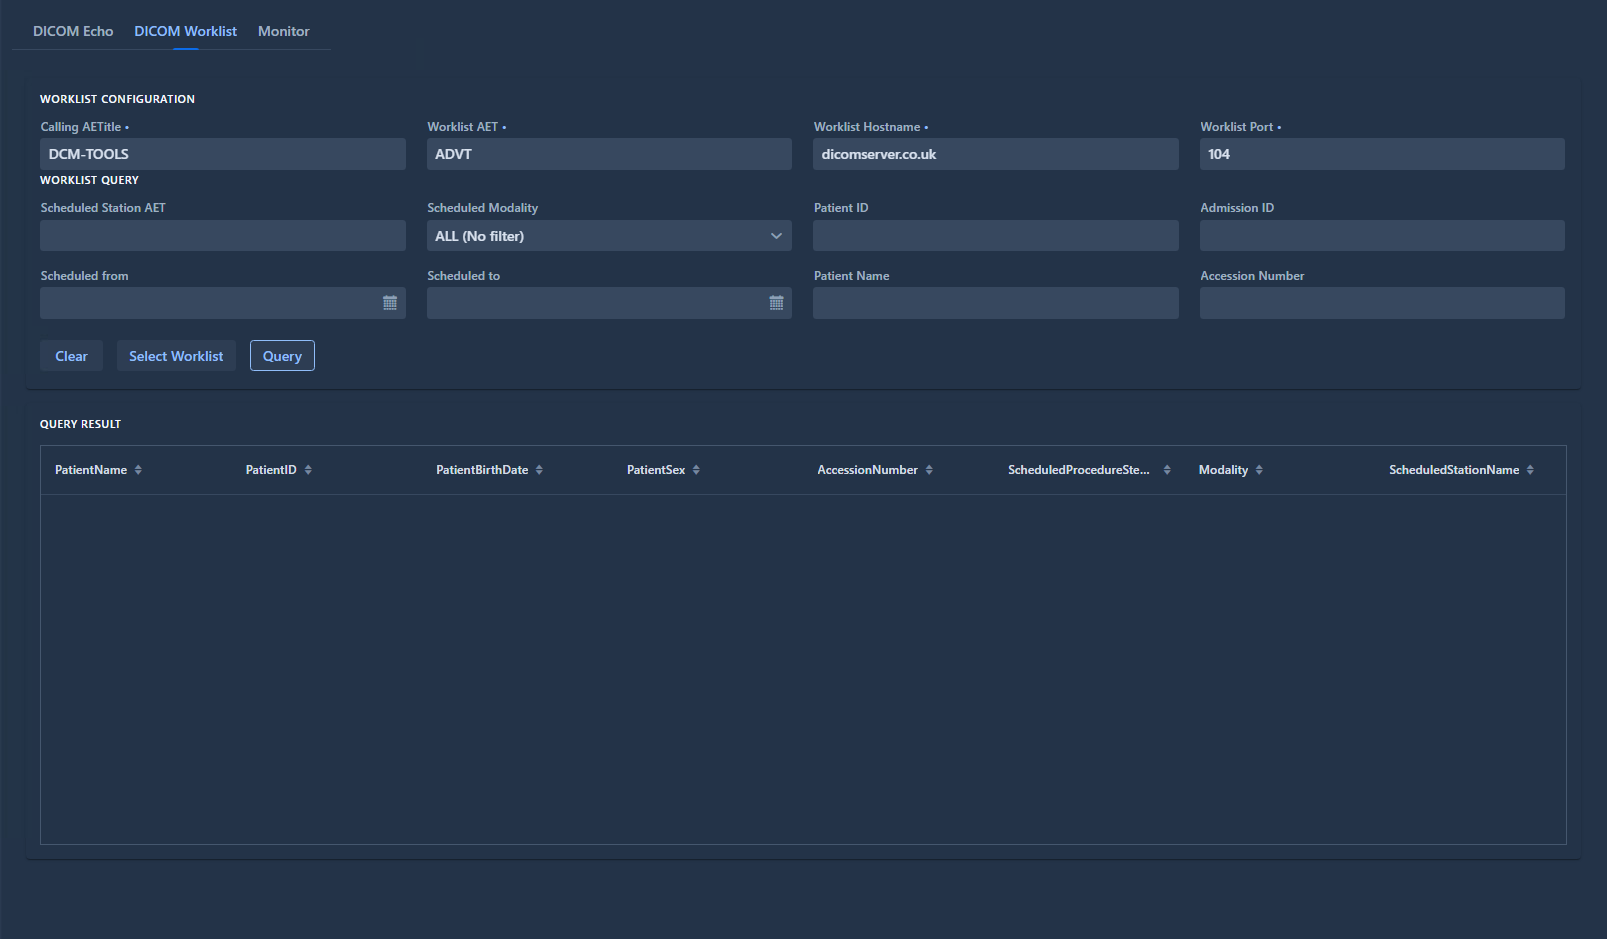
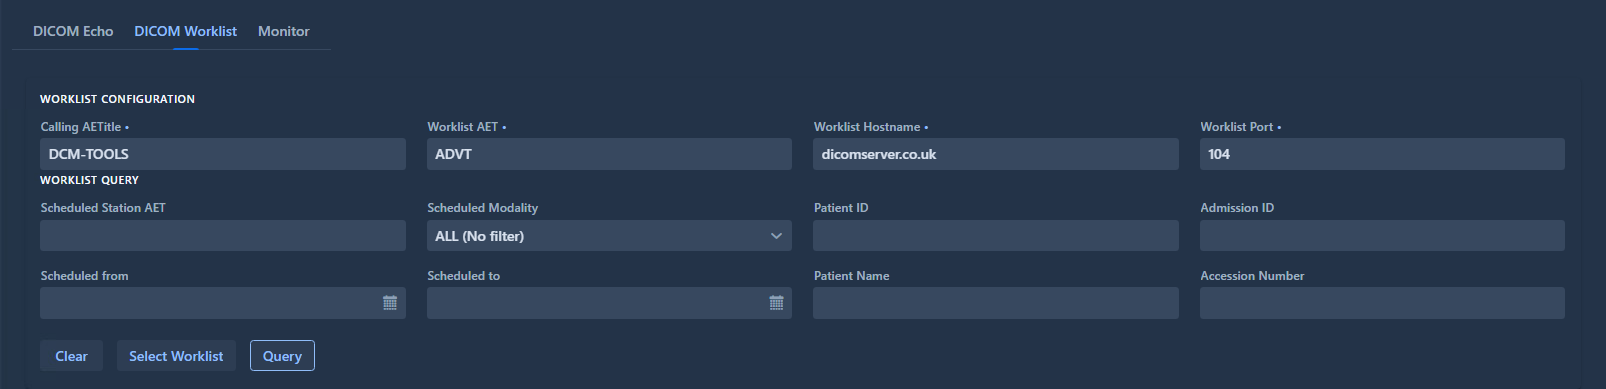
DICOM Worklist
This tool retrieves and displays the content of a DICOM Worklist to test connectivity and data retrieval.
Worklist Configuration
Configure the following fields to connect to a worklist:
Field
Description
Required
Calling AETitle
Identity of the calling DICOM entity
Yes
Worklist AET
Identity of the worklist to query
Yes
Worklist Hostname
Hostname or IP address of the worklist
Yes
Worklist Port
Port number of the worklist
Yes
All fields are mandatory to retrieve worklist content.
Worklist Query Filters
Additional optional fields are available to filter the results returned by the worklist:
If no filters are specified, all worklist entries are retrieved
Multiple filters can be combined to narrow results
Query Results
Click the Query Worklist button to execute the test and retrieve data.
Retrieved worklist data is displayed in a sortable table. Click any column header to sort by that column:
Select Worklist Utility
The Select Worklist popup allows you to choose from pre-configured worklists.
Click the Select Worklist button to open the popup:
Configuration:
Browse the list of available worklists
Filter by typing in the search field (searches AET, hostname, port, or description)
Click Select to auto-fill the Worklist AET, Worklist Hostname, and Worklist Port fields
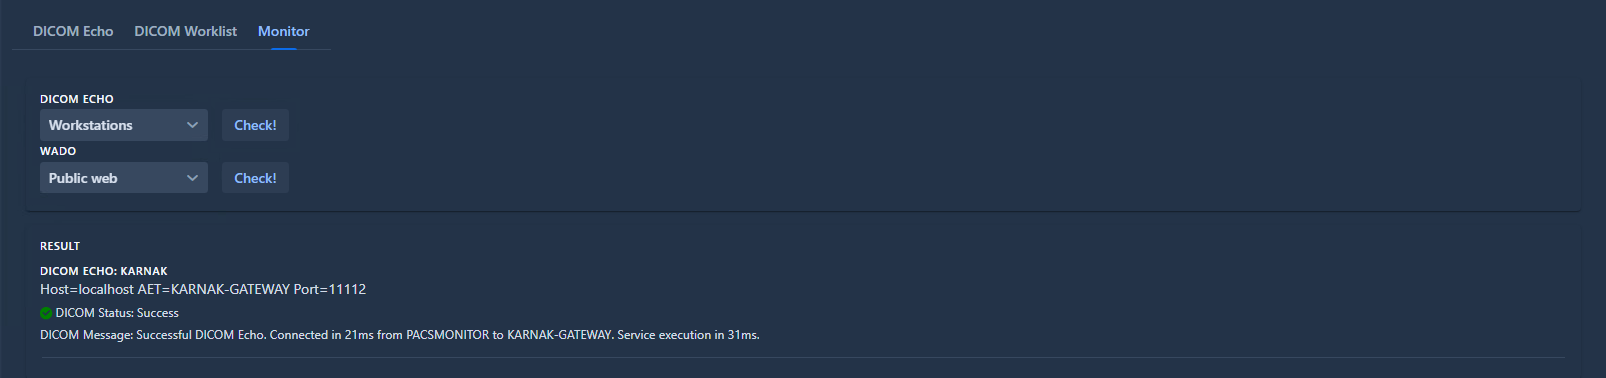
Monitor
This tool monitors the status of DICOM nodes using both DICOM and WADO protocols, allowing you to verify connectivity and service availability.
DICOM Echo Monitoring
To test a DICOM node:
Select a DICOM node from the list
Click the Check button to launch the DICOM Echo test
Below is an example of a successful DICOM Echo monitoring test:
WADO Monitoring
To test WADO connectivity:
Select a DICOM node from the list
Navigate to the WADO tab
Click the Check button to launch the WADO test
Below is an example of a successful WADO test:
Info
The Monitor tool is useful for regular health checks of your DICOM infrastructure and can help identify connectivity issues before they impact production workflows.
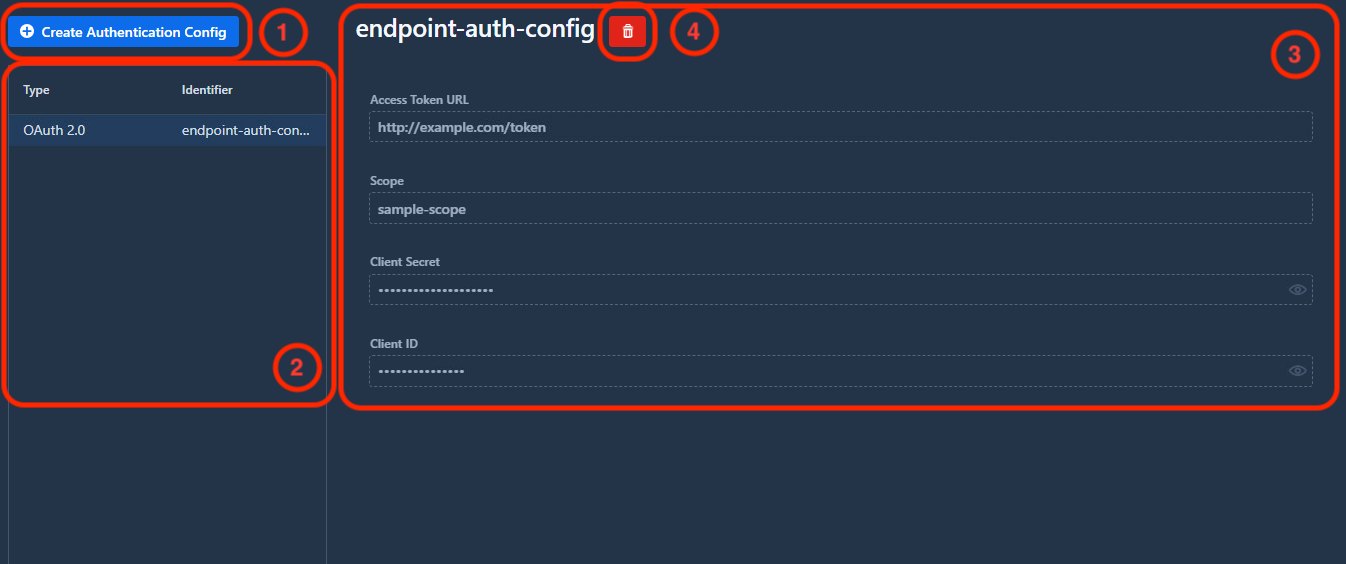
Authentication Configuration
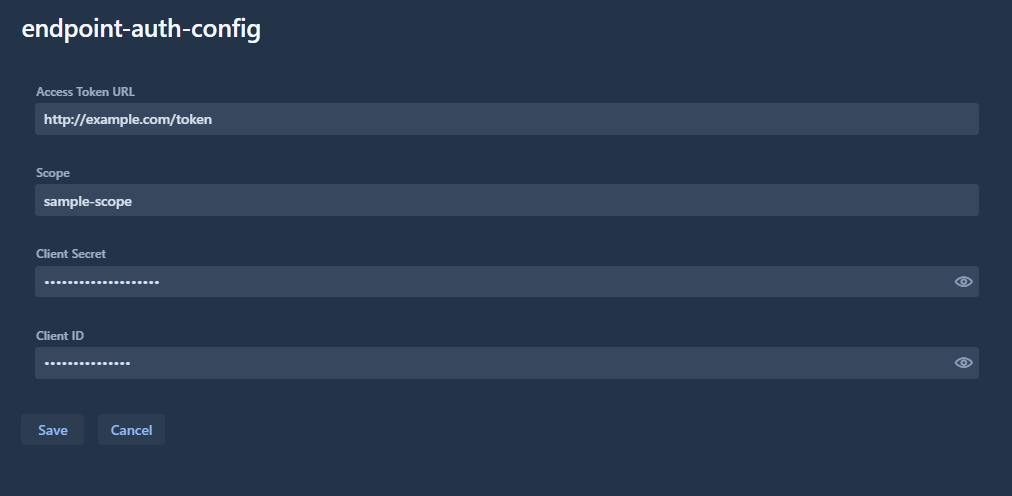
This page allows you to configure authentication credentials for API calls. Since this information is sensitive, it is stored in an encrypted database table.
1. Create an Authentication Configuration
Click the Create Authentication Config button to begin. You’ll be prompted to enter a unique identifier for the new configuration.
Requirements:
The identifier must be unique (an error will appear if a duplicate exists)
We recommend avoiding spaces in the identifier for easier reference in profiles
Click Create to proceed. The configuration will be added to the list on the left and its details will appear in the right panel.
OAuth 2.0
Currently, OAuth 2.0 is the only supported authentication type.
Required fields:
Field
Description
Access Token URL
The OAuth 2.0 token endpoint
Scope
Required scopes (separate multiple scopes with whitespace)
Client ID
OAuth 2.0 client identifier
Client Secret
OAuth 2.0 client secret
How it works:
When an API call references this configuration (via the authConfig parameter):
Karnak checks if a valid access token is available
If yes, the token is added to the request for authentication
If no, a new token is requested using the configuration details
The API call proceeds with the authenticated token
Warning
Authentication configurations cannot be modified after creation. To make changes, you must delete and recreate the configuration.
2. Authentication Configuration List
All available authentication configurations are displayed in the left panel. Select a configuration to view its details on the right.
3. Configuration Details
The details view displays all configuration information in read-only mode.
To modify a configuration, you must delete it and create a new one.
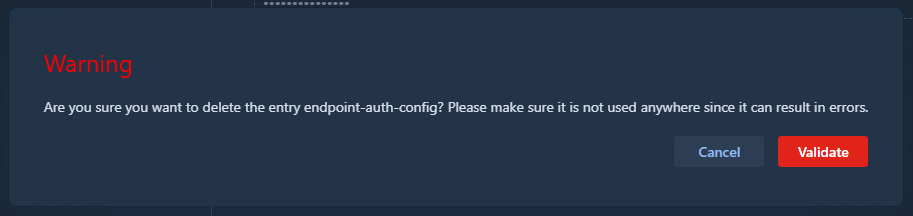
4. Delete Configuration
To delete a configuration:
Select it from the list
Click the red trash bin icon next to its identifier
Confirm the deletion in the popup
Info
Deleting a configuration in use may cause errors in your workflows. Karnak does not verify whether a configuration is referenced by profiles or de-identification processes before deletion. Ensure the configuration is not in use before deleting it, or transfers will fail.
Kheops
Create a destination album
To create a Kheops album as a destination, configure the following values:
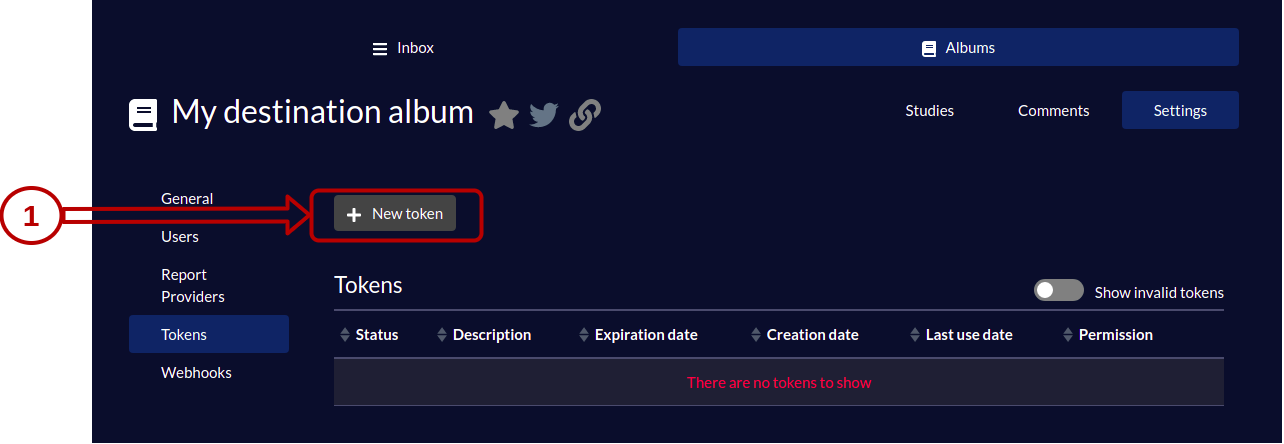
Once the album is created, follow these steps to configure it as a destination in Karnak:
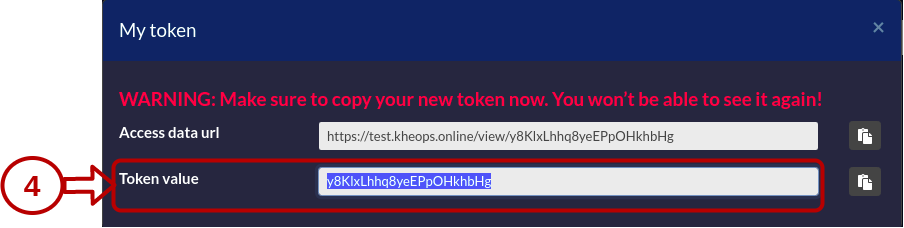
1. Create a new token
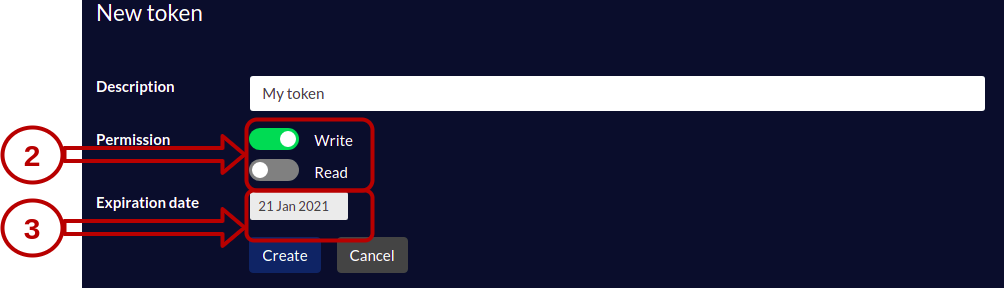
2. Configure token permissions
Give WRITE permission to the token and set the expiration date.
3. Copy the authentication token
Copy the authentication token value to use in the header of your Karnak destination.
For complete instructions on creating and configuring a STOW destination in Karnak, see Destinations.
Switching to different Kheops albums
When a destination points to a Kheops album, data can be propagated to underlying albums within the same Kheops instance.
This feature is useful for sharing specific studies with research groups without exposing the entire album. For example, you can send a cohort of studies to collaborators while maintaining data isolation.
Info
Studies cannot be shared between different Kheops instances. You must configure a separate destination in Karnak for each Kheops instance.
This functionality leverages the Kheops API to distribute data to multiple locations without creating additional destinations in Karnak. Data is automatically split according to rules defined in Kheops, ensuring that authorized users access only relevant data.
The following diagram illustrates how data flows through Karnak and is distributed to multiple Kheops albums:
graph LR;
  A(DICOM Data) --> B[Karnak]

  subgraph Kheops
    D[Main Album] --> E[Album X]
    D --> F[Album Y]
  end

  B --> D
First, a DICOM instance is received by Karnak. After processing it, it sends the instance to the main Kheops album. Depending on existing rules and conditions, the instance will also be shared to the album X and Y.
Create a switching Kheops album
To share a DICOM instance in different Kheops albums, the following fields must be filled and validated by clicking on Add button.
Fields
Description
Url API
The url of the Kheops API
Valid token of destination
The token to write to the album destination. Need WRITE permission
Valid token of source
The token to shared from the album source. Need READ, SEND (Sharing in the Kheops UI) permission
The condition field defines a condition to enable sharing an instance to a specific album if it is evaluated to true.
The condition syntax and usage are detailed in the Conditions page.
Portable distribution
Karnak Gateway can be distributed as a portable application, allowing you to run it without installing it on your system.
The purpose of this distribution is to provide an easy way to use Karnak Gateway for deidentification tasks on a local machine. It is typically used by researchers in collaborative projects that require a consistent method for de-identifying DICOM data with a shared de-identification profile.
Warning
The portable distribution is intended for personal use only on a single machine. For multiple gateway configurations, when using Karnak as a production service, please use the standard installation method on a server and adapt the resource allocation accordingly.
With the portable distribution, Karnak Gateway can be run directly from the extracted folder from the downloaded archive.
Double-click on the `run.bat` file to launch Karnak Gateway.
Double-click on the `run.sh` file to launch Karnak Gateway or execute it in the terminal.
Execute the `run.sh` file in the terminal to launch Karnak Gateway.
Once the application is running, you can access the Karnak Gateway web interface by opening your web browser and navigating to http://localhost:8081. The default login credentials are:
Username: admin
Password: karnak
Info
This web portal is accessible only from the local machine where it is running.
If the system already uses port 8081, you can change it by modifying the KARNAK_WEB_PORT value in run.cfg file located in the extracted directory.
For advanced configuration options, you can edit the run.cfg file to adjust other settings.
Specific folders in the extracted directory
logs: Contains the log files generated by Karnak Gateway during its execution. dicom: Default folder where DICOM instances are stored when using the “LOCAL” destination. data: Contains the embedded H2 database files used by Karnak Gateway to store its configurations. If you download a new version of the portable distribution, you can copy this folder to retain your existing configurations.
User guide
For detailed instructions on how to use Karnak Gateway, please refer to the Karnak Gateway User Guide. This distribution includes new features in the Forward Node view that are not covered in the main user guide:
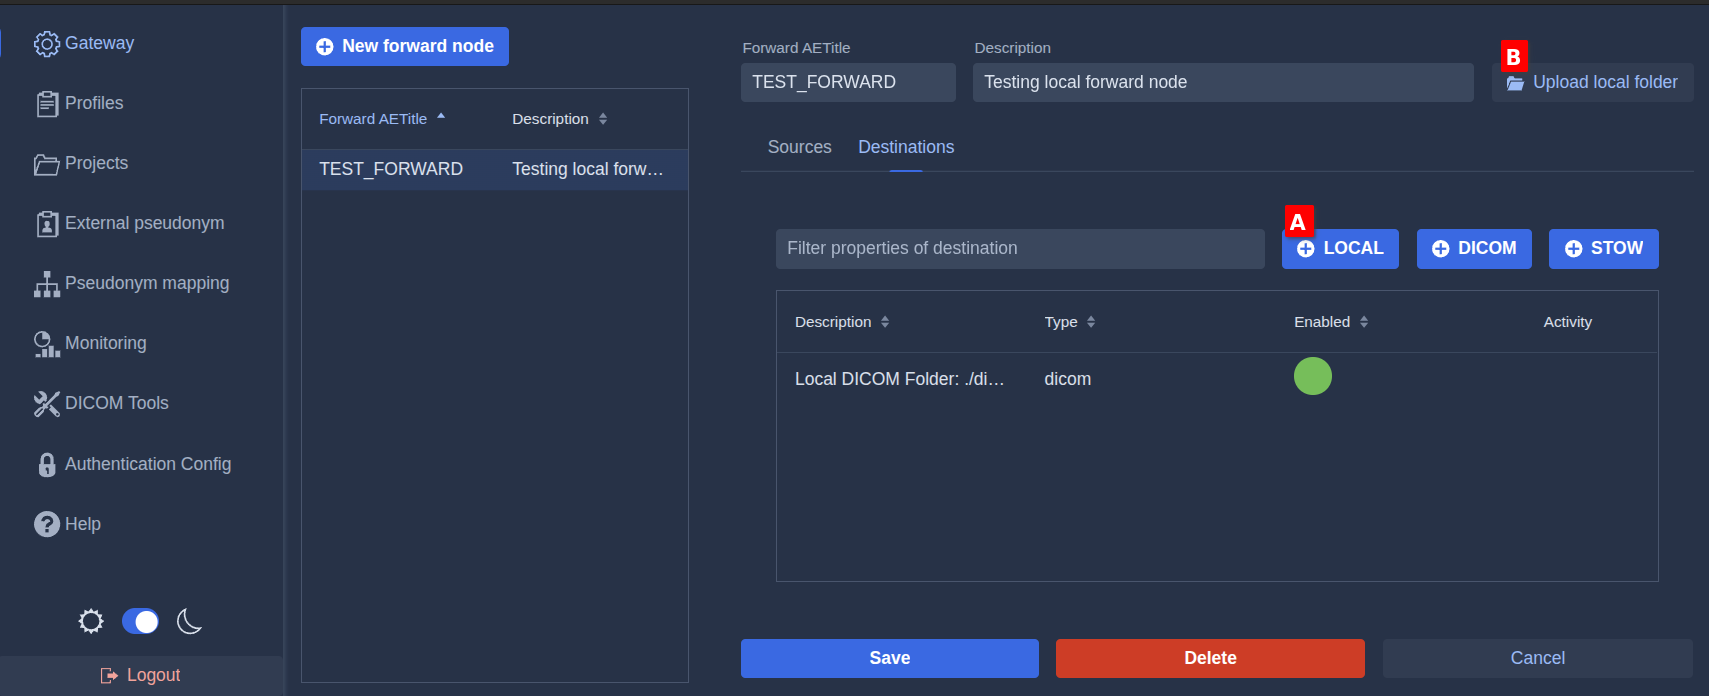
Add a local destination
Click the LOCAL button A to add a destination that saves DICOM instances to the dicom folder in the portable distribution’s extracted directory.
This button automatically configures a DICOM destination for local storage. For other options related to de-identification and forwarding rules, refer to the main user guide.
Upload local folder
Click the Upload Local Folder button B to select a local folder containing DICOM instances that you want to forward through the selected forward node destinations.