This user guide provides a comprehensive overview of the Karnak web interface, covering configuration, management, and operational features. Most of the sections below correspond to specific functionalities accessible from the left-hand menu in the main Karnak interface.
The Gateway page allows you to configure Forward Nodes in Karnak. A Forward Node represents a DICOM Application Entity (AE) that receives DICOM instances and routes them to one or more destinations.
Forward Node
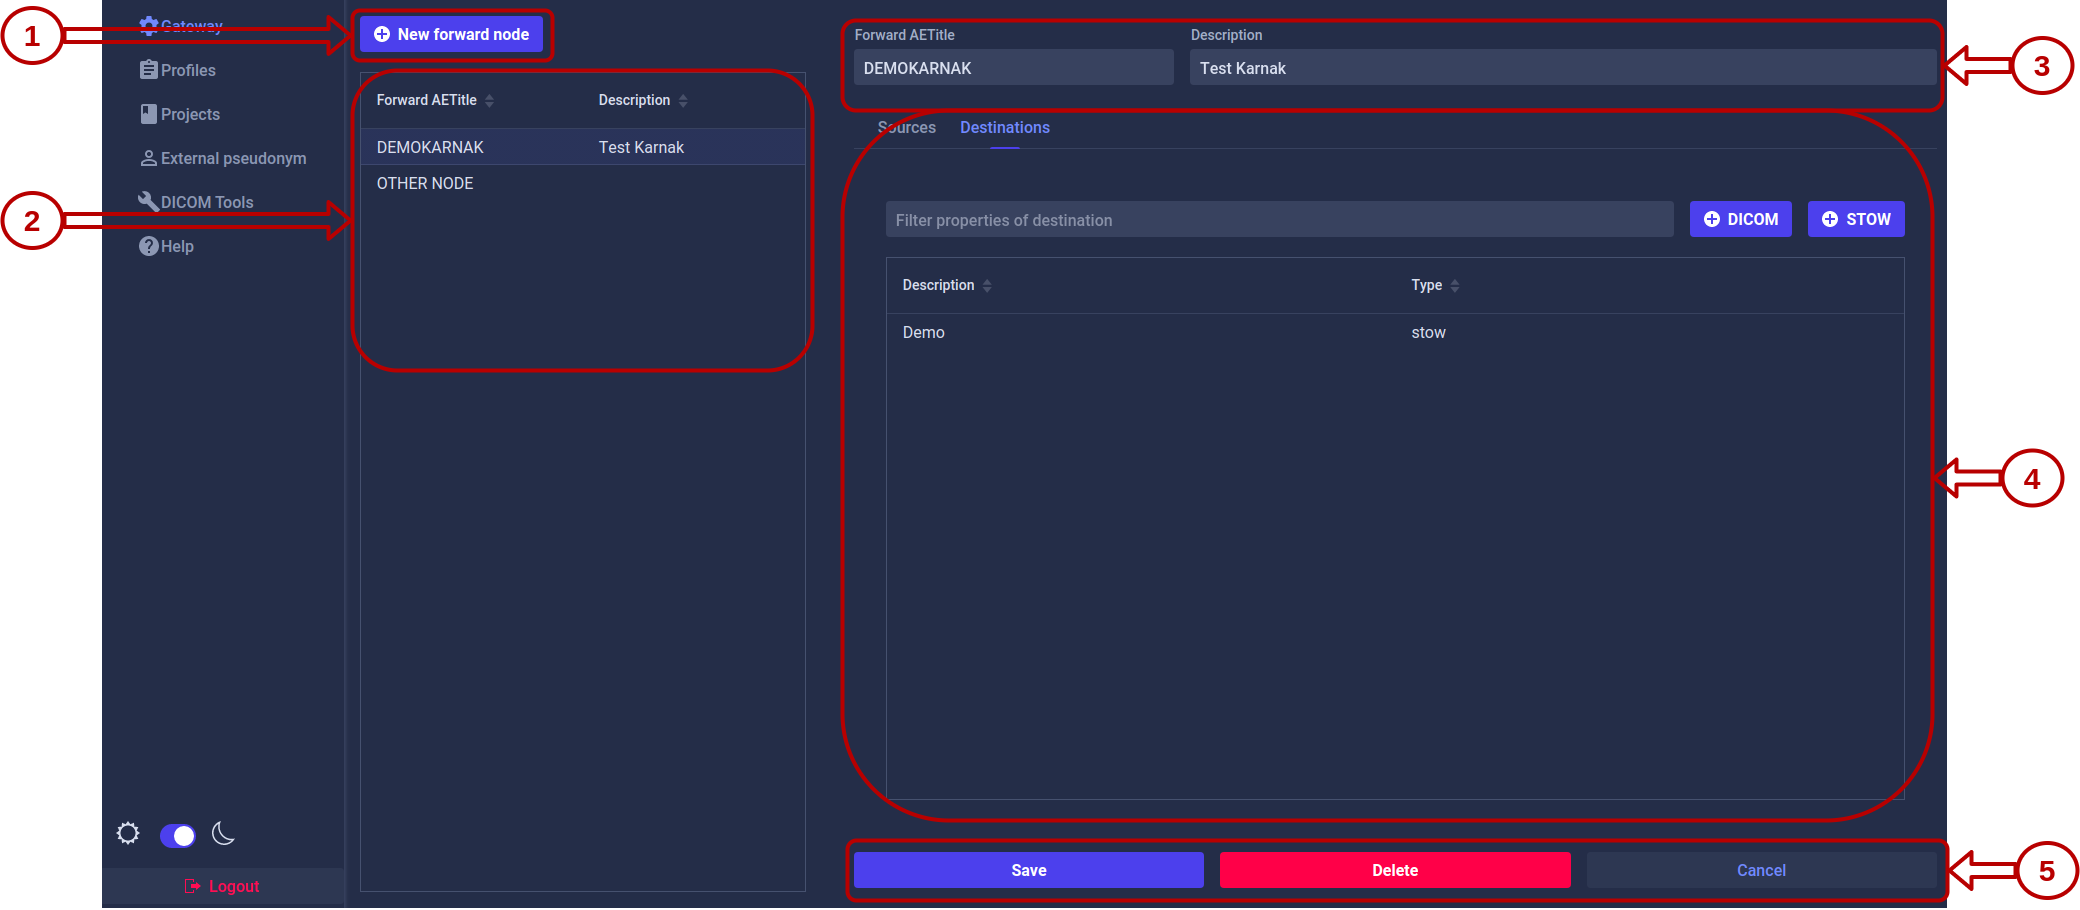
This page lists all the forward nodes configured in Karnak and allows you to create, edit, and delete them.
1. Create a Forward Node
Click the New forward node button. A form will appear:
Enter a unique value in the Forward AETitle field. AE Titles must not exceed 16 characters.
Click the Add button
The new forward node appears in the list and is automatically selected. Optionally, add a description and save your changes.
Info
The Forward AETitle must be unique across all forward nodes in the Karnak instance.
2. Forward Node List
All configured forward nodes are displayed in the left panel.
Select a forward node from the list to view and manage its configuration in the right panel.
Info
The copy icon
next to each forward node allows you to quickly copy its DICOM configuration in the clipboard for use in DICOM clients.
3. Forward Node Parameters
In the details view, you can modify:
Forward AETitle: The Application Entity Title of the forward node
Description: An optional description to help identify the node’s purpose
Click the Save button to apply your changes.
4. Sources and Destinations
Each forward node can be configured with:
Sources: Control which DICOM nodes are authorized to send data to this forward node
Destinations: Define where received DICOM instances should be forwarded
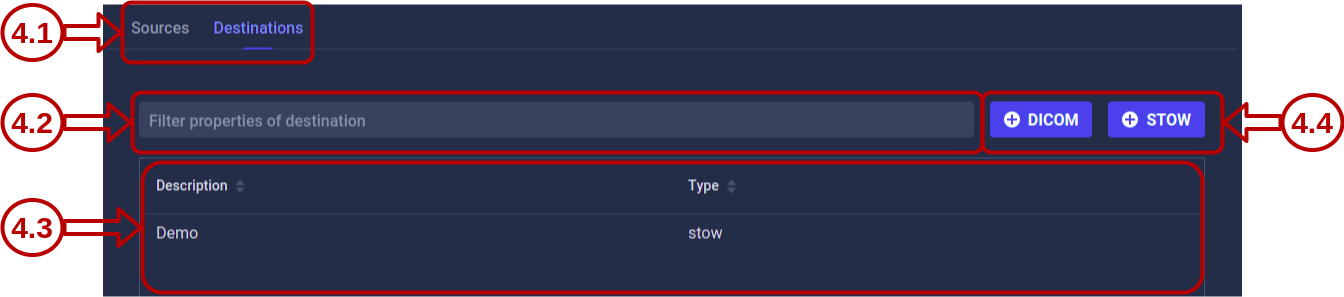
4.1 Navigation
Use the tabs to switch between the Destinations and Sources views for the selected forward node.
4.2 Filtering
Destinations tab: Filter by destination description
Sources tab: Filter by AE Title and hostname
4.3 List
All destinations or sources associated with the forward node are displayed here.
Click any item in the list to open its detailed view and edit its configuration.
4.4 Actions
The available action buttons depend on the active tab.
Destinations tab:
Create a new destination using either the DICOM or DICOM WEB (STOW) protocol. See the Destinations page for detailed configuration instructions.
Sources tab:
Create a new source to control which DICOM nodes can send data to this forward node. See the Sources page for detailed configuration instructions.
5. Forward Node Actions
Three action buttons are available:
Action
Description
Save
Saves changes made to the forward node parameters
Delete
Deletes the selected forward node and all associated configurations
Cancel
Reverts unsaved changes to the forward node parameters
Warning
Deleting a forward node will also remove all associated sources and destinations. This action cannot be undone.
Subsections of Gateway
Destinations
This page allows you to configure destinations for your forward nodes. Destinations define where DICOM instances are sent and how they are processed during transfer.
Info
To access this page, first select a forward node from the Gateway page, then click the Destinations tab.
Depending on the protocol used, two types of destinations can be created:
A DICOM Destination uses the traditional DICOM protocol to forward instances to another DICOM node.
Creating a DICOM Destination
AETitle, Hostname and Port are mandatory when creating a DICOM Destination.
Configuration Options
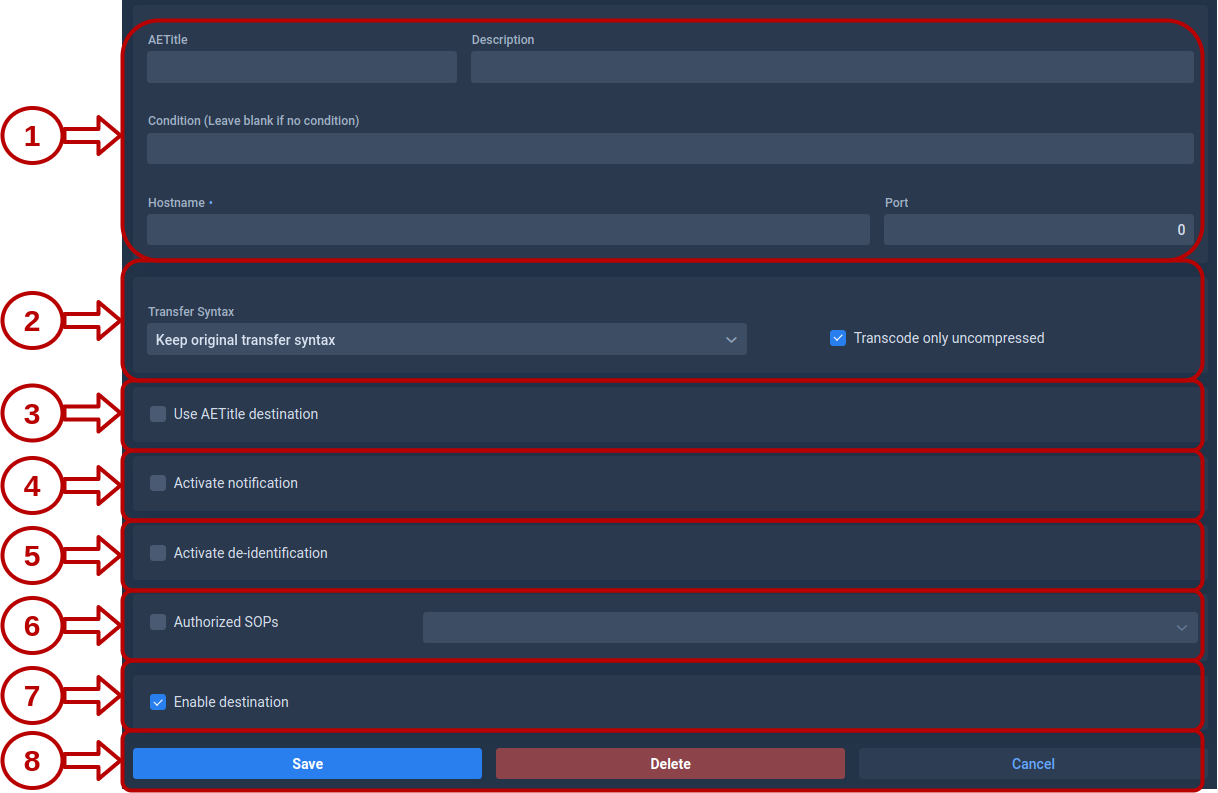
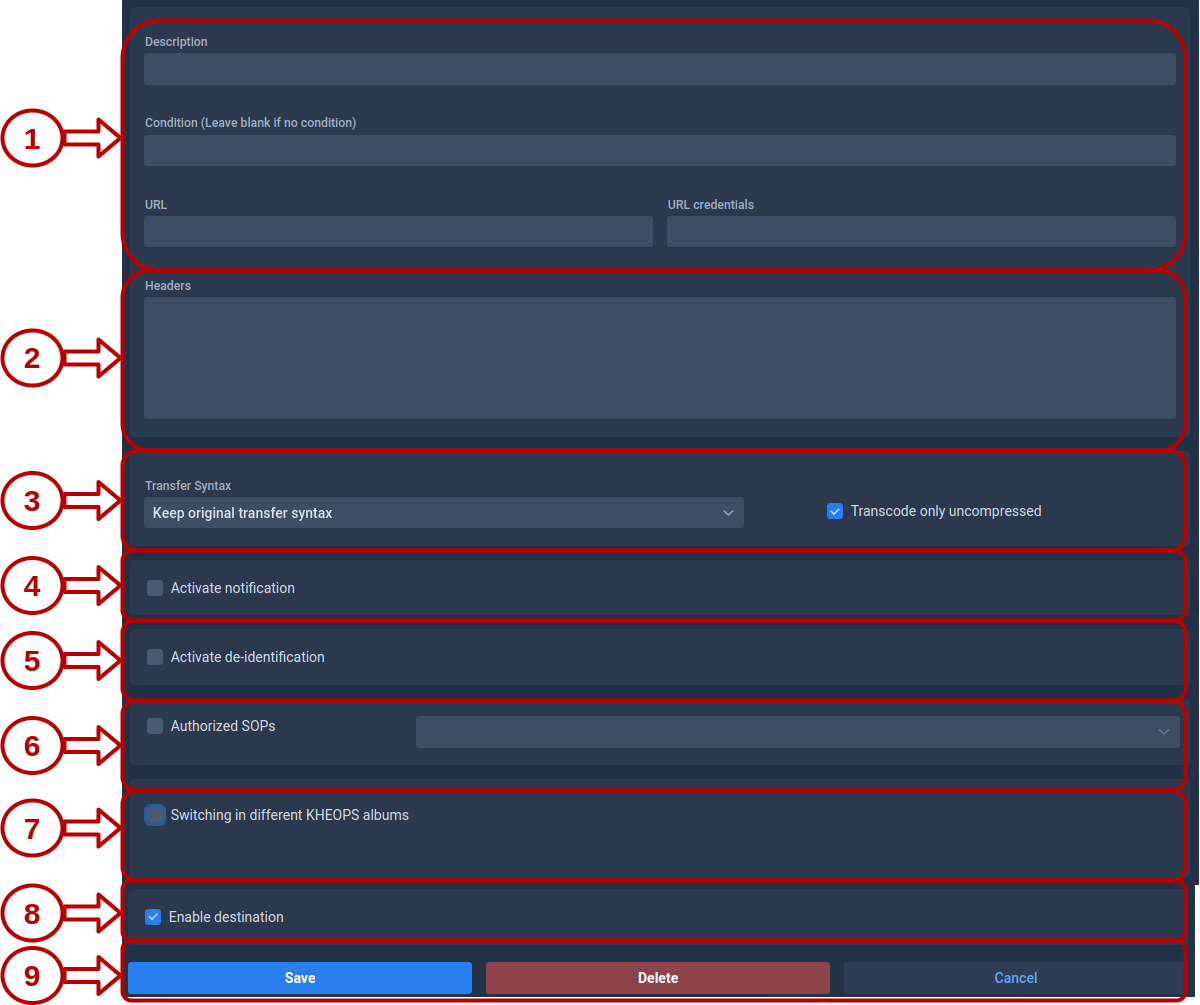
1. Destination Parameters
These fields define where Karnak should send the DICOM instances.
AETitle: The Application Entity Title that identifies the destination DICOM node.
Hostname: The IP address or hostname of the destination server.
Port: The network port used by the destination DICOM service (must be between 1 and 65535).
Condition: An optional field that can contain an expression. If the condition is met, the destination will be activated. See Conditions for more details.
2. Transfer Syntax
This field defines the transfer syntax used when sending DICOM instances to this destination. The transfer syntax determines the encoding and compression format of the DICOM data.
It is recommended to choose “Keep original transfer syntax” unless you have specific requirements for compression or compatibility with the destination system.
When selecting a specific transfer syntax, ensure that the destination system supports it to avoid decompression or compatibility issues. It is also recommended to check “Transcode only uncompressed” when selecting lossy syntaxes to avoid re-compressing already compressed data.
Info
Transcoding may increase processing time and resource usage, especially for large datasets. Use it judiciously based on your workflow needs.
3. Use AETitle Destination
When this option is checked, use the destination AETitle as the calling AETitle instead of the Forward Node AETitle during the DICOM association.
4. Notifications
Enable email notifications to receive automatic summaries of forwarded instances, including success and error reports.
Configuration fields:
Field
Description
Default Value
List of emails
Comma-separated list of recipient email addresses
None
Error subject prefix
Prefix added to email subjects when an error occurs
**ERROR**
Rejection subject prefix
Prefix added when an instance is rejected due to filters or criteria
DICOM attributes to inject into the subject pattern (PatientID, StudyDescription, StudyDate, StudyInstanceUID)
PatientID,StudyDescription
Interval
Time in seconds to wait before sending notification (aggregates multiple instances)
45
Info
The interval setting helps reduce email volume by aggregating notifications. All instances received within the specified interval are summarized in a single email.
5. Tag Morphing
Tag morphing allows you to modify specific DICOM tag values defined in a profile. With this mode, it is not mandatory to de-identify patient information like in De-identification mode.
The applied profile and its version are displayed below the selection
Info
Activate tag morphing and Activate de-identification are mutually exclusive options. Only one can be active at a time.
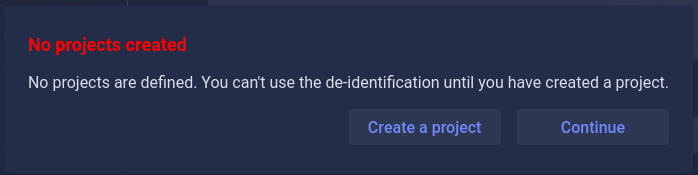
6. De-identification
De-identification removes or replaces patient-identifying information in DICOM instances according to configurable rules and profiles. It is not possible to preserve the patient identity in the profile when this option is activated.
Info
Activate de-identification and Activate tag morphing are mutually exclusive options. Only one can be active at a time.
A popup will appear with two options, either create a project or continue without activating de-identification.
If a project exists:
Configure de-identification as shown below:
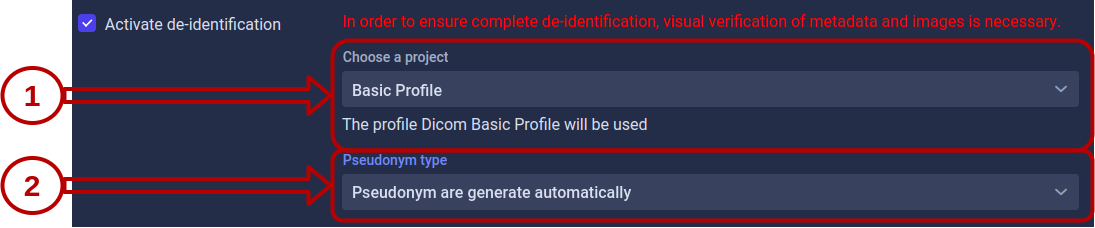
Project Selection
Select the project that defines the de-identification profile to apply. The profile name and version are displayed below the selection.
Each project is associated with:
A de-identification profile
A secret key used for pseudonymization and UID generation
See the Projects page for more information about project configuration.
Pseudonym Type
Pseudonyms replace patient identifiers while maintaining the ability to link de-identified data back to the original patient (when necessary and authorized).
Choose how Karnak should retrieve or generate pseudonyms:
This field provides a default value for the Issuer of Patient ID when it’s not present in the DICOM instance.
Usage:
This value is used when retrieving the pseudonym using the External Pseudonym cache. The pseudonym is queried based on:
Patient ID (from DICOM tag 0010,0020)
Issuer of Patient ID (from DICOM tag 0010,0021 or this default value)
The combination of Patient ID and Issuer ensures unique patient identification across different healthcare systems.
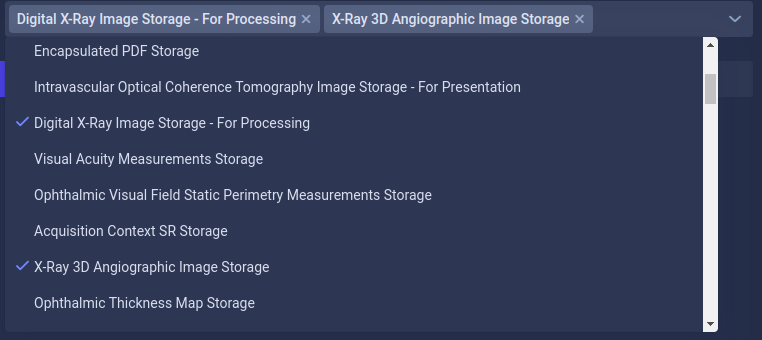
7. Authorized SOPs
Filter which DICOM instance types (SOP Classes) are forwarded to this destination.
Configuration:
Enabled: Only instances matching the specified SOP Classes are transferred
Disabled: All SOP Classes are transferred without restriction
8. Enable the Destination
This toggle allows you to temporarily disable a destination without deleting it. The state is also visible in the destination list with a green (enabled) or red (disabled) indicator.
Use this feature to:
Temporarily pause forwarding during maintenance
Test configurations without affecting production destinations
Keep backup destination configurations ready but inactive
9. Action Buttons
Three actions are available to manage the destination:
Button
Description
Save
Saves all changes made to the destination configuration
Delete
Permanently deletes the selected destination
Cancel
Reverts all unsaved changes to the last saved state
Warning
Deleting a destination cannot be undone. All configuration settings will be permanently removed.
Creating a STOW Destination
The URL is required for STOW Destination creation. Most configuration options are identical to DICOM Destinations. Only the differences are detailed below.
Configuration Differences
1. Destination Parameters
URL: The DICOMweb STOW-RS endpoint where DICOM instances will be sent (e.g., https://pacs.example.com/dicomweb/studies).
Condition: An optional expression that activates the destination when met. See Conditions for more details.
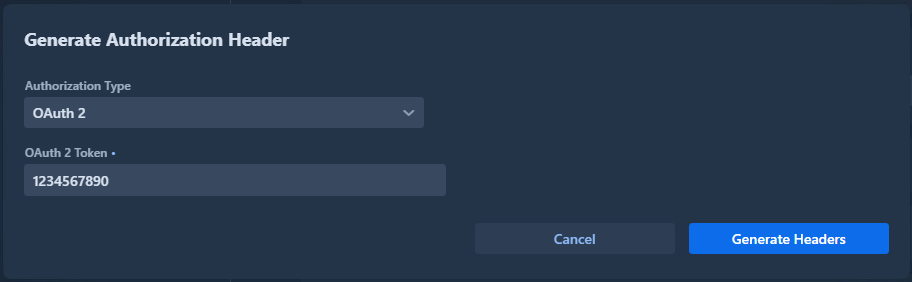
HTTP Headers
The Headers field contains HTTP headers added to each STOW-RS request.
Format: Headers are defined using XML-style key-value tags as shown below:
Click the Generate Authorization Header button to automatically generate properly formatted authentication headers.
Warning
If a header with <key>Authorization</key> already exists, an error will be displayed. The generator will append to existing headers if they don’t conflict.
If the destination is a Kheops endpoint, it is possible to configure multiple albums by selecting the option “Switching in different KHEOPS albums”.
Explanations for configuring Kheops-related parameters can be found in the Kheops section.
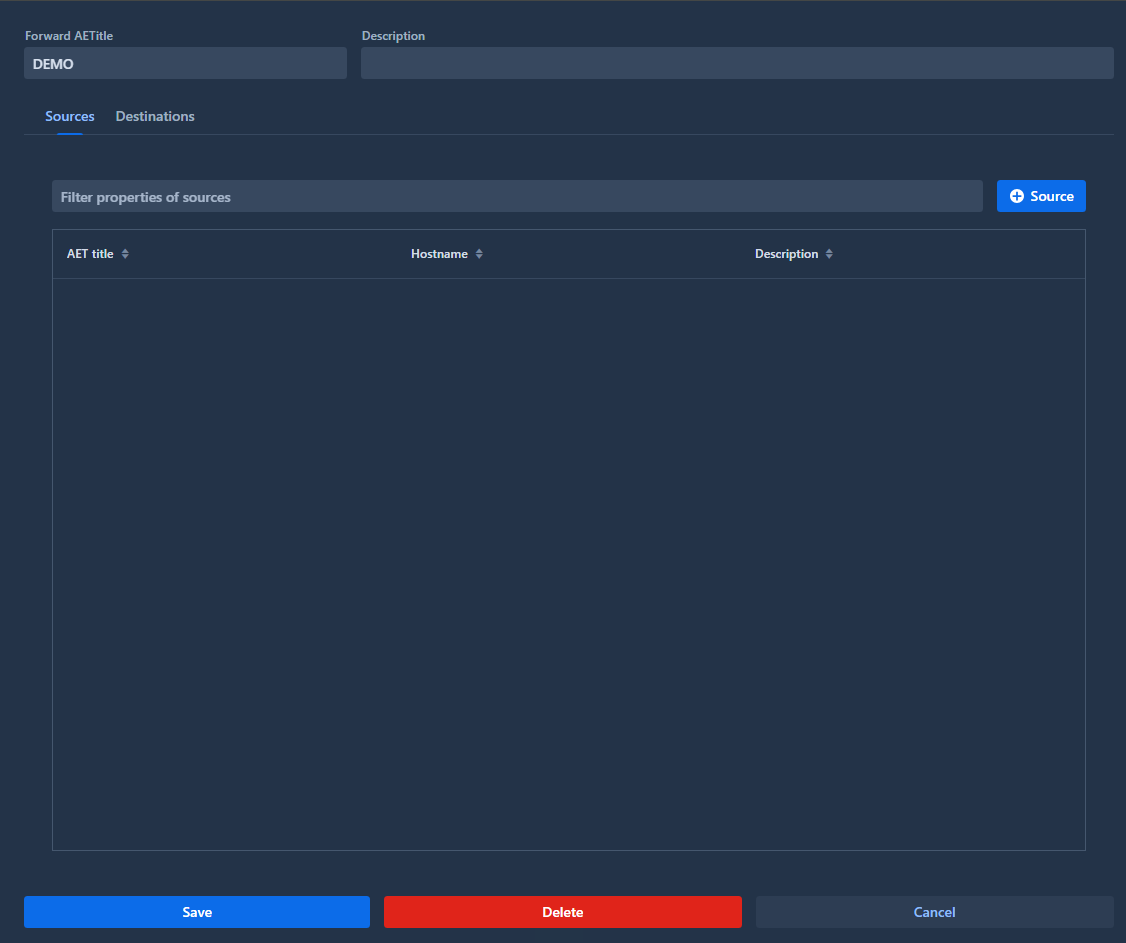
Sources
Sources
The Sources tab displays all configured sources for the selected forward node.
A source is used to control which entities can send DICOM data to the forward node. It validates that received DICOM instances come from a known Application Entity Title (AET).
Info
If no sources are defined, the forward node will accept DICOM instances from any AET without restrictions.
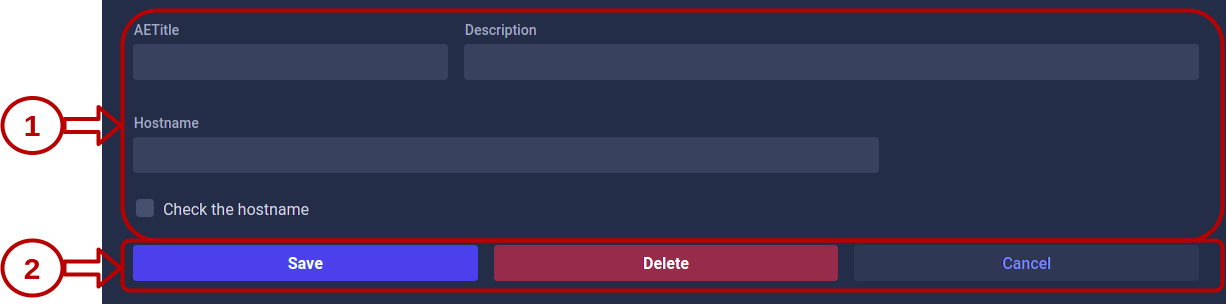
Create a source
To create a new source, click the Source button and configure the following fields:
Field
Description
Required
AETitle
Application Entity Title of the source DICOM node
Yes
Description
Optional description to identify the source
No
Hostname
Hostname or IP address of the source DICOM node
No*
*The Hostname field becomes required if you enable the “Check the hostname” option. When enabled, Karnak will validate both the AET and the hostname of incoming DICOM instances.
Source validation behavior
When a DICOM instance is received by the forward node:
With sources configured: Only instances from registered AETs (and hostnames, if enabled) are accepted
Without sources configured: All instances are accepted.
This provides flexible security control for your DICOM workflow.
Profiles
This page lists all profiles configured in Karnak and allows you to create, edit, and delete them. A profile defines the actions to apply to a DICOM instance before it is sent.
The Dicom Basic Profile is available by default and cannot be deleted. It is the reference de-identification profile based on the DICOM standard. For more details, see How does de-identification work?
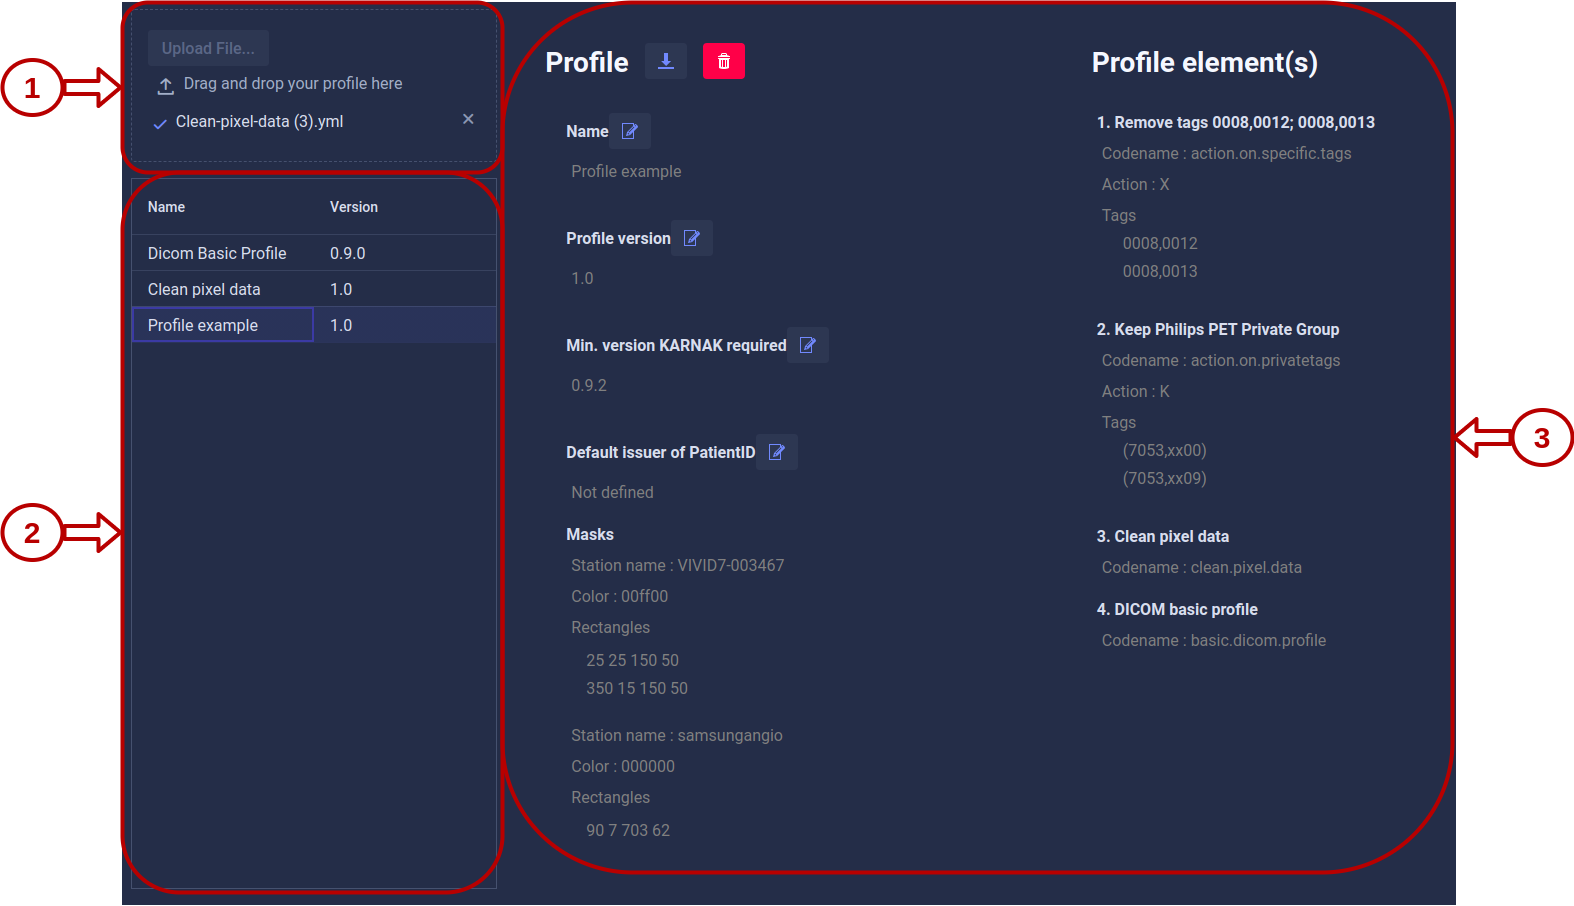
1. Profile drag and drop area
Profiles can only be created by importing a YAML file using the top-right component of the Profiles view. You can select a file by clicking the Upload file... button or by dragging and dropping it into the area. The file is then loaded and analyzed. If no errors are found, a new profile is automatically created from the file and added to the profile list.
Info
For details on the profile structure and how to create a valid YAML file, see the Profile Structure documentation.
2. Profile list
All available profiles are listed here. A profile can evolve over time and appear multiple times in the list under the same name but with different versions.
When you select a profile in the list, its details are displayed on the right.
3. Profile details
This area shows the details of the selected profile.
Some fields, such as the name, version, and minimum required Karnak version, can be edited by clicking the pen icon.
Edit the field value, then click the checkmark button to save the changes or the cross button to discard them.
Info
The rest of the profile cannot be modified. To make changes to the profile rules or structure, you must delete the profile and upload a new version.
4. Profile actions
You can download the entire profile as a YAML file by clicking the button on the right or delete it by clicking the trash icon.
Download: Export the profile configuration as a YAML file for backup or sharing with other Karnak instances.
Delete: Remove the profile from Karnak. If the profile is in use by one or more projects, a warning message appears to prevent accidental deletion.
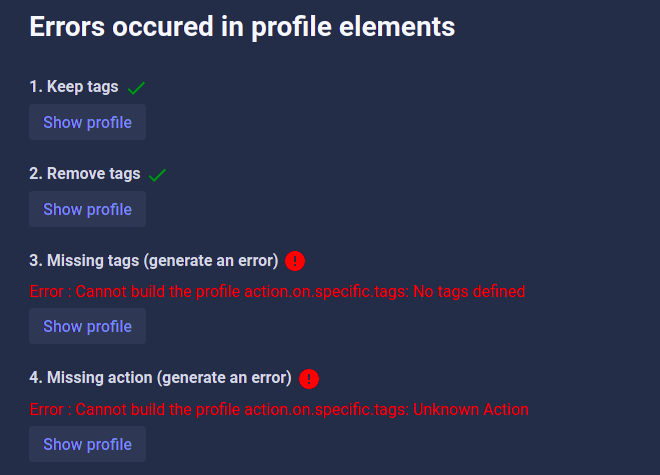
5. Profile upload feedback
When a YAML file is imported successfully, this view shows the details of the newly created profile.
If errors occur during profile creation, the profile is not added to the list. The errors are shown in the right panel with details about their cause, as illustrated below.
Projects
This page lists all projects configured in Karnak and lets you create, edit, and delete them. A project is linked to a profile and contains a secret used for de-identification.
1. Create a project
To create a new project:
Enter a name.
Select a profile.
Click Add.
The project is added to the list and its details appear in the right panel.
2. Project list
All available projects are listed in the left panel.
Selecting a project displays its details on the right.
3. Project details
In the details view you can:
Change the project name.
Change the de-identification profile.
Click Update to save your changes.
4. Project secret
The project secret is central to Karnak’s de-identification process.
It is a 32-character hexadecimal value.
A secret is automatically generated when the project is created.
In the details view, the secret is shown along with its creation date and time.
You can generate a new secret by clicking Generate Secret. When you do this:
Previous secrets are kept in the database.
You can select any previous secret to use again.
Warning
Changing the project secret can cause data consistency issues between old and new de-identified DICOM instances. Use this feature with caution and only when necessary.
A destination is associated with a project for de-identification, as described in the Destination configuration.
To generate new values like UIDs and pseudonymize some patient information, Karnak uses a hash function seeded with the project secret. This makes the generated values unique per project and deterministic as long as the secret does not change.
Implications of changing the secret:
If a DICOM instance is de-identified twice using the same project, secret, and profile, the resulting de-identified instances are identical.
If the secret changes, de-identifying the same DICOM instance again with the same project and profile but the new secret will produce different de-identified instances.
Details about the algorithm and UID generation using the project secret are available here.
5. Action buttons
Click Update to save any change made to a project.
Click Remove to delete the selected project.
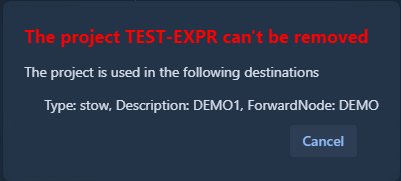
If the project is associated with a destination, deletion fails and an error message is displayed.
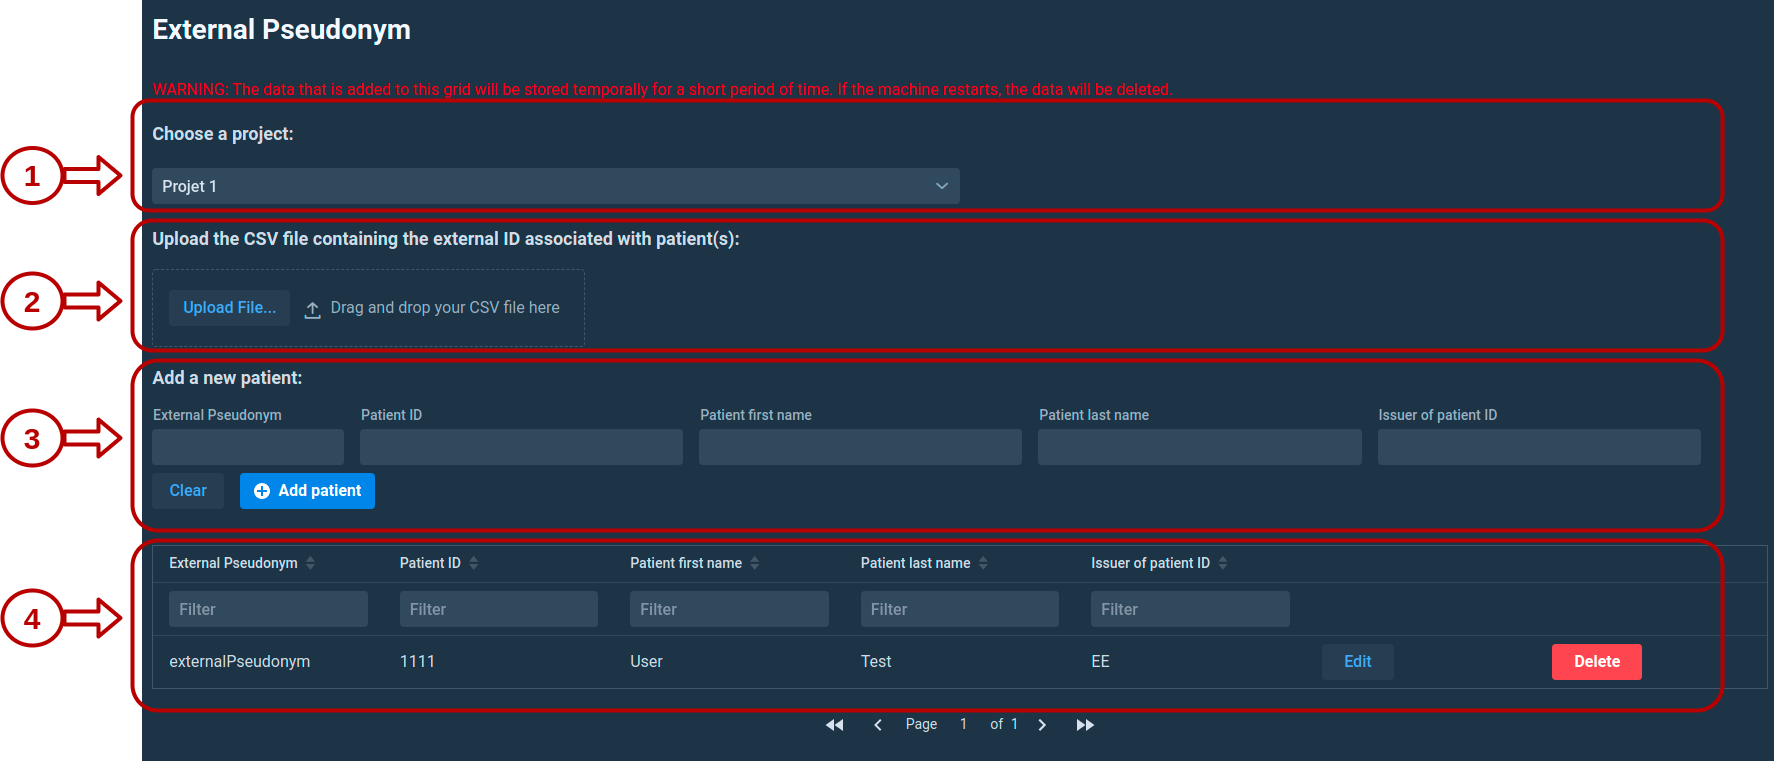
External Pseudonym
This page allows you to create or import pseudonyms that Karnak will use during de-identification. The de-identification process and how pseudonyms are used is detailed in the Pseudonym chapter.
Pseudonyms created or imported on this page are stored in a cache with a maximum lifetime of 7 days.
With the portable version of Karnak, the cache is persistent only the time the application is running. Restarting the application will clear the cache.
1. Choose a project
External pseudonyms are linked to a specific project. This allows Karnak to properly handle cases where:
A patient participates in multiple clinical studies with different pseudonyms
Potential pseudonym collisions occur between projects
2. Upload a CSV file
You can upload a CSV file containing external pseudonyms by:
Clicking the Upload File button
Dragging and dropping a file onto the upload area
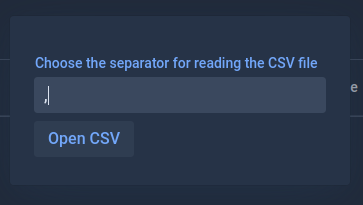
2.1 CSV separator configuration
After selecting a file, a dialog appears asking for the CSV separator character. The default value is a comma (,).
Click Open CSV to proceed to the import configuration.
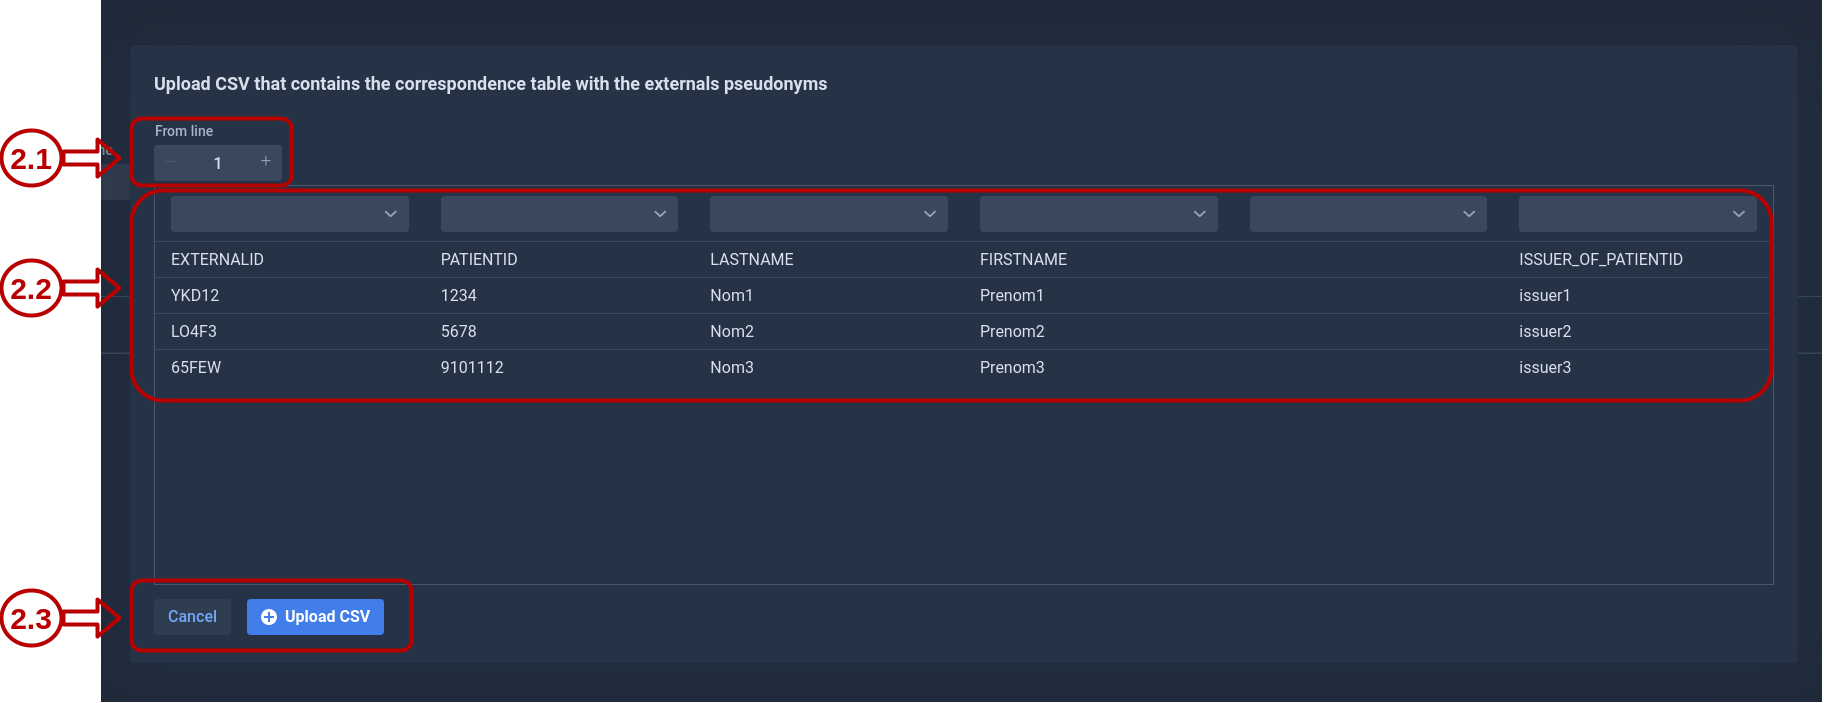
2.2 Preview and configuration
The CSV data is displayed in a grid for review and configuration.
From line: This field defines the starting row for the import. Use this to skip header rows or other non-data lines at the beginning of the file.
Column assignments: Map each CSV column to the corresponding pseudonym attribute. Only the Patient ID and External Pseudonym fields are required. Other fields are optional.
2.3 Import validation
Click Upload CSV to import the data. Karnak performs validation checks including:
Duplicate Patient IDs
Duplicate Pseudonyms
Required field validation
If validation errors occur, they will be displayed and the import will be rejected.
3. Add a new patient manually
You can also add external pseudonyms manually by filling in the form fields:
External Pseudonym (required)
Patient ID (required)
Patient First Name (optional)
Patient Last Name (optional)
Issuer of Patient ID (optional)
Click Add patient to add the entry to the external pseudonyms table.
4. Pseudonym management
4.1 Edit or delete individual entries
Each pseudonym row has action buttons:
Edit: Modify the patient fields
Delete: Remove the pseudonym from the cache
4.2 Bulk operations
Select multiple rows using the checkboxes on the left side of each row. Click Delete selected patients to remove all selected entries and confirm the action in the dialog.
4.3 Delete all patients
The Delete all patients button removes all external pseudonyms for the selected project only. Pseudonyms linked to other projects are not affected.
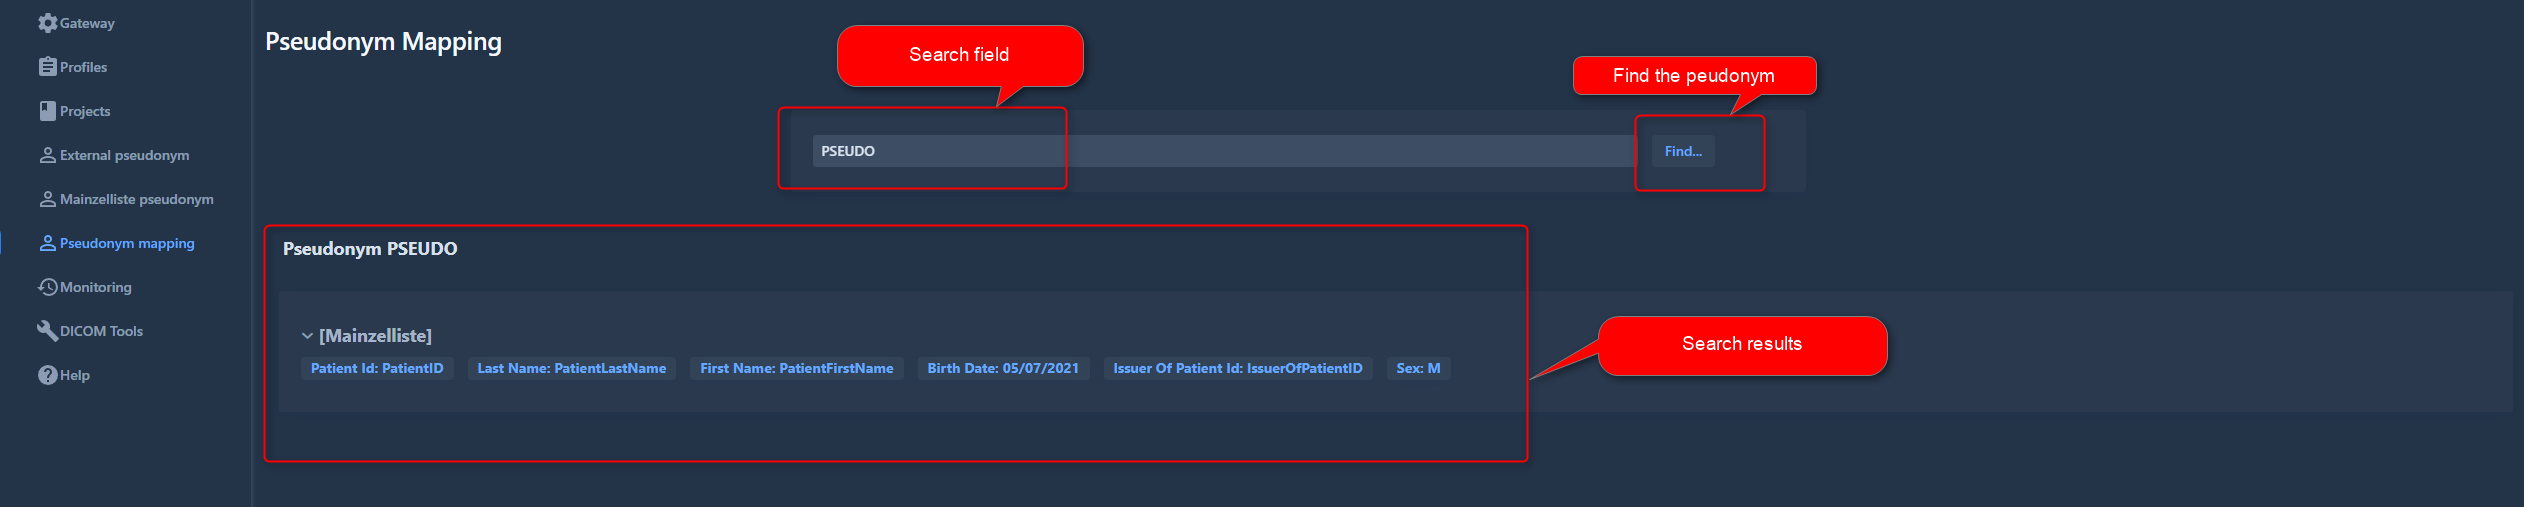
Pseudonym mapping
The pseudonym mapping page lets you look up the original data corresponding to pseudonyms that were added in the External pseudonym view. Note that the external pseudonym table is stored within a limited time frame.
1. Search field
To retrieve the original value:
Enter the pseudonym in the search field.
Click the Find button.
The search is case-sensitive.
2. Results
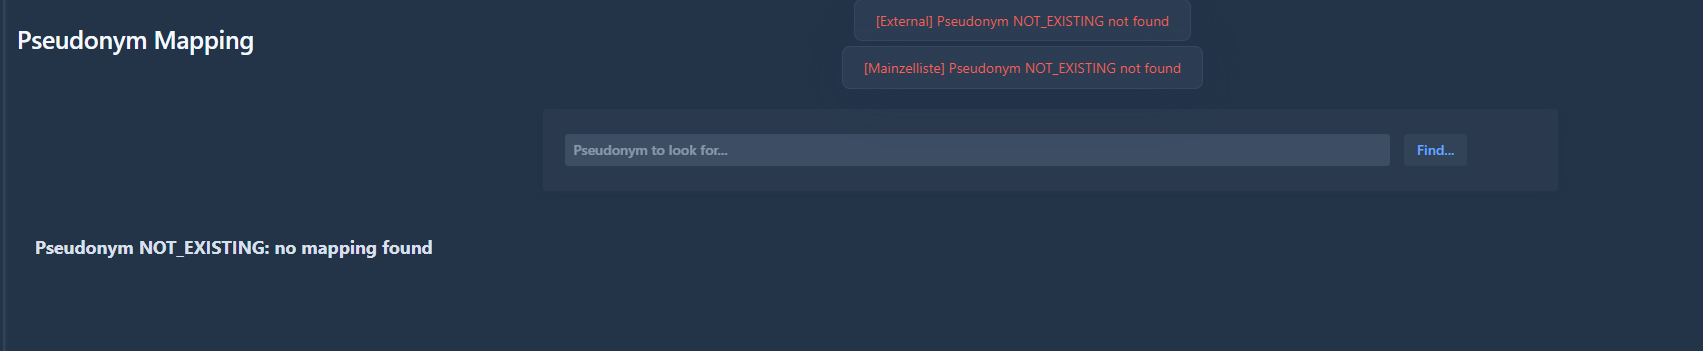
If a match is found, the result is displayed below the search field.
The prefix [External] indicates that the match comes from the external pseudonym table, followed by the associated project.
The original patient data is also displayed.
If no correspondence is found for the pseudonym, an error message is displayed, as illustrated below.
Monitoring
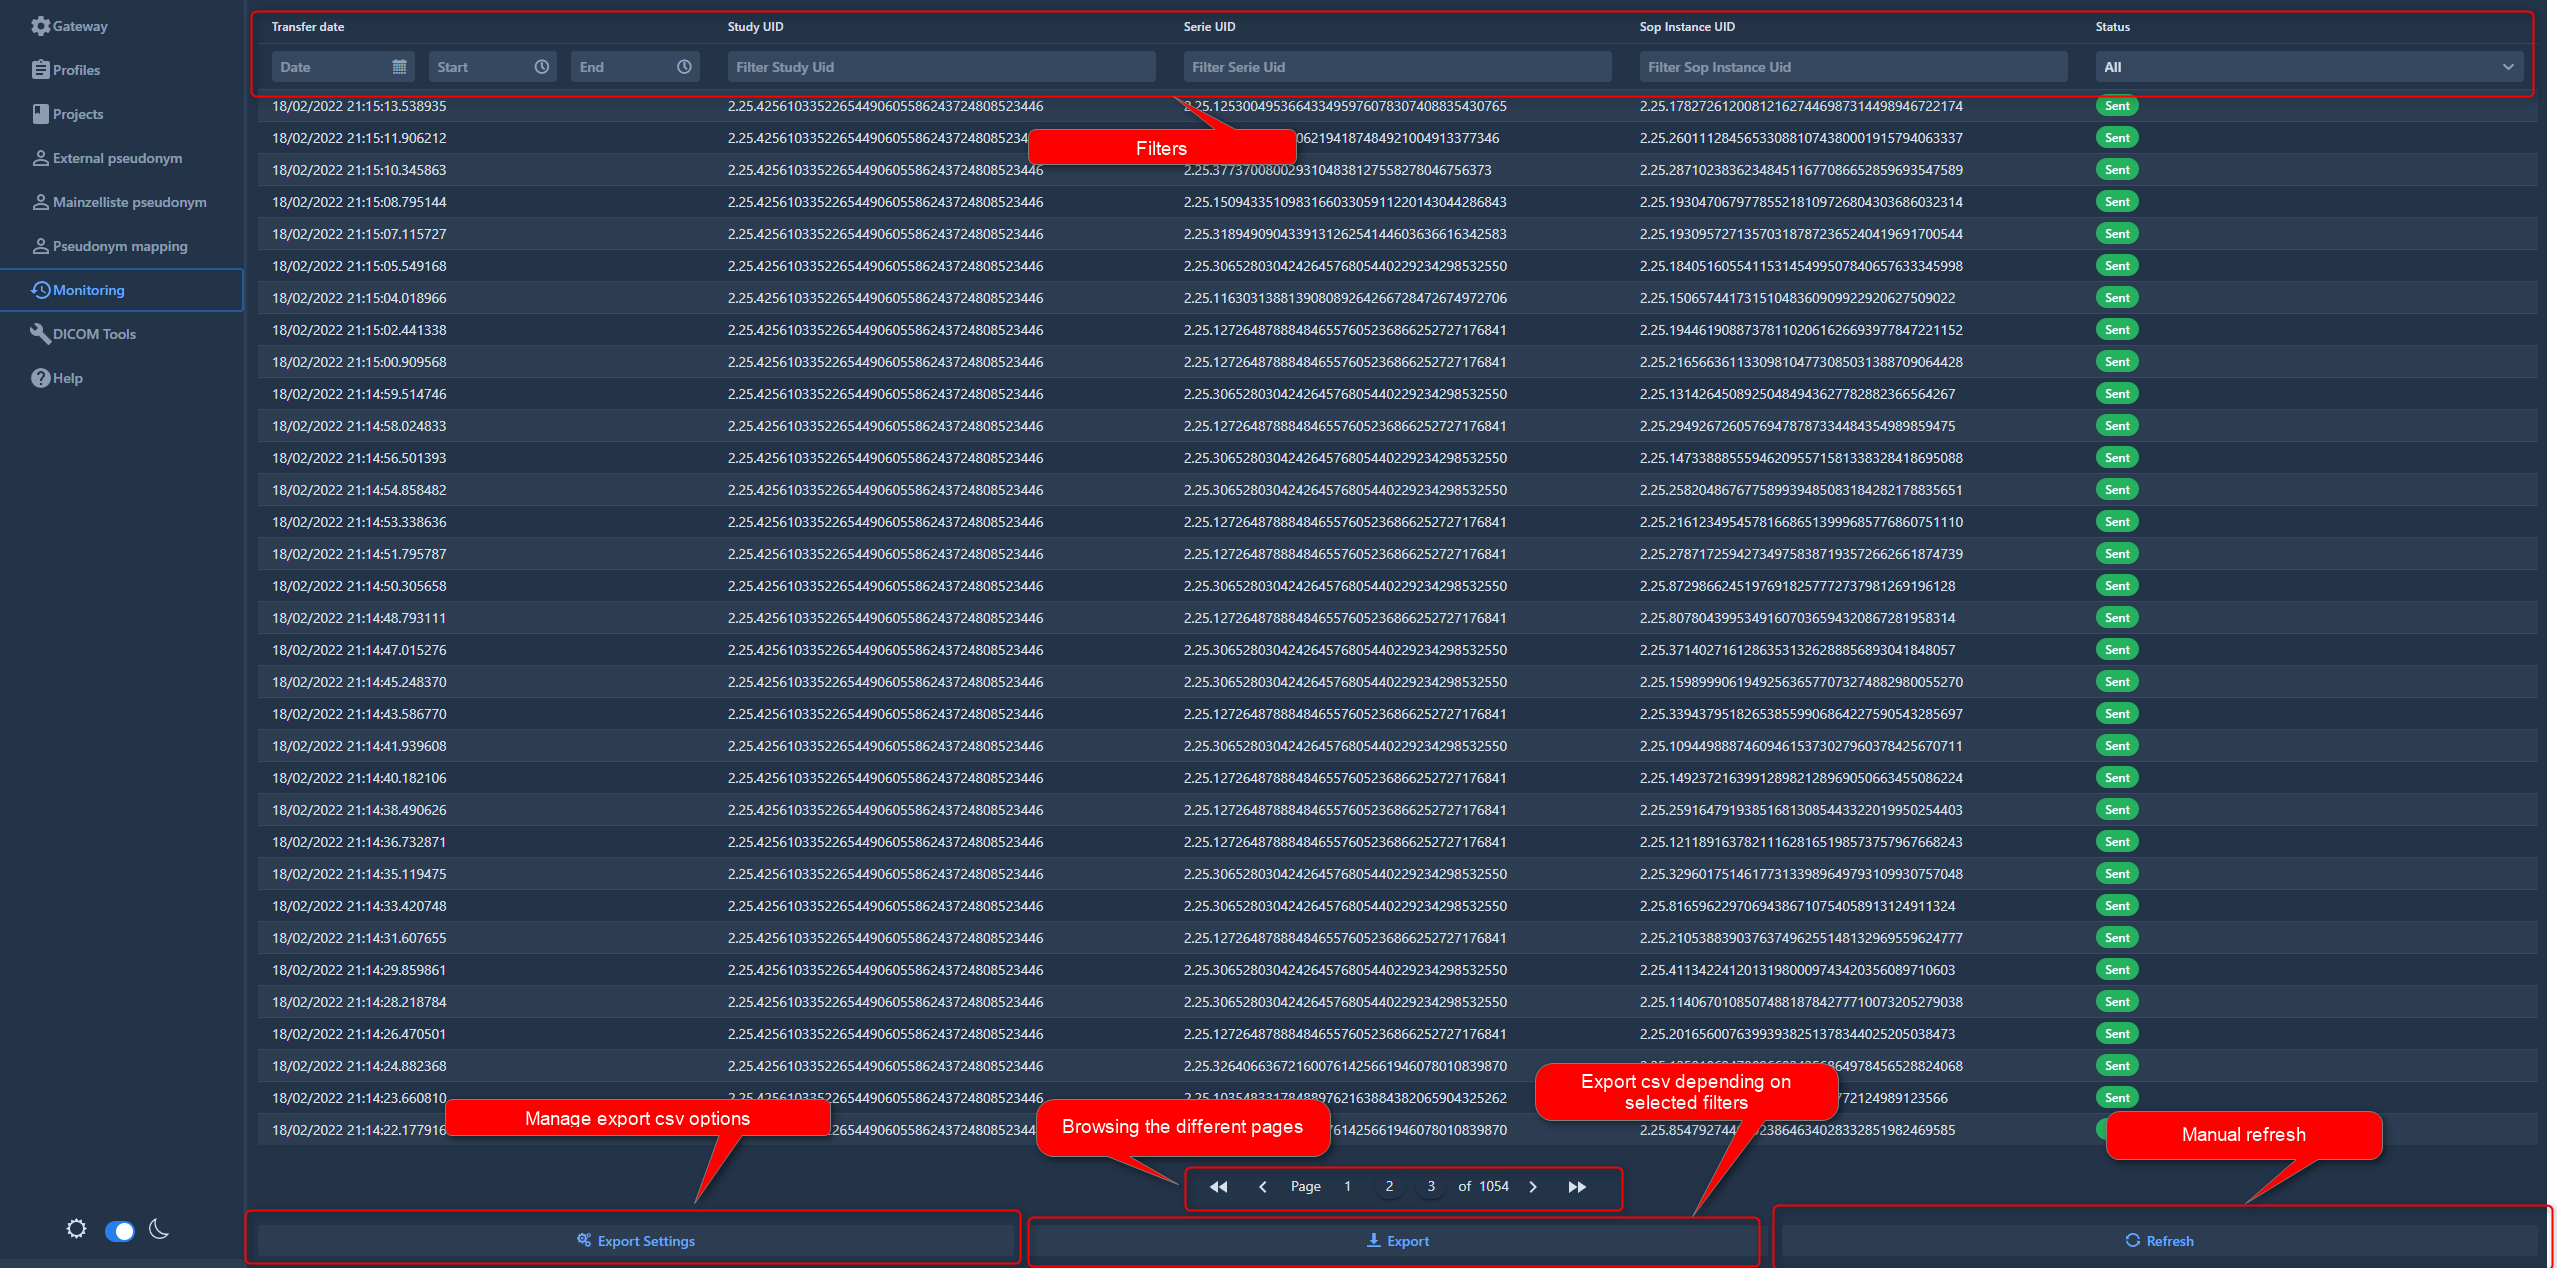
The Monitoring view allows you to track transfers in progress or view the history of recent transfers. The list is ordered chronologically, with the most recent transfers displayed first.
By default, the log retains the last 150,000 transfers. An automatic cleaning process runs to remove older entries when this limit is exceeded.
Detailed information for each transfer, including both original and de-identified attributes, can be viewed by clicking on a transfer row.
1. Filters
Filters allow you to search and narrow down the list of transfers. You can filter by:
Date/Time: Range of the transfer.
UIDs: Study, Series, or SOP Instance UID (matches original or de-identified values).
Status: The outcome of the transfer (Not sent, Sent, All, Excluded, Error).
Transfer Statuses
The status of a transfer is color-coded:
Sent (Green): The instance was successfully sent.
Excluded (Orange): The instance was not sent due to configuration rules. This includes the SOP Class filter, destination conditions, or the use of ExcludeInstance() in the profile. The label indicates the specific reason for exclusion.
Error (Red): The instance was not sent because an unexpected error occurred. The label indicates the error type.
2. Browsing
Use the navigation bar at the bottom of the view to browse through the pages of the transfer log.
3. Refresh
Click the refresh button to update the list with the most recent transfers.
4. Export
You can export the transfer log to a CSV file. The export function respects the currently active filters, so only the transfers displayed (or matching the criteria) will be included in the file.
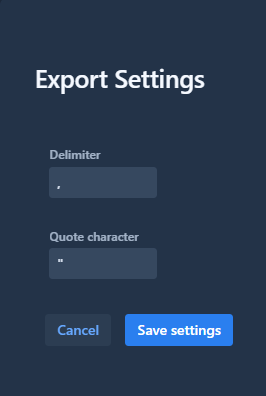
Before exporting, you can customize the CSV format:
Delimiter: Select the character used to separate fields.
Quote character: Select the character used to enclose fields.
Once customized, click the export button to generate and download the CSV file.
DICOM Tools
This page provides an overview of utility tools available in the DICOM Tools module, designed to assist with connectivity testing, querying, and status monitoring of DICOM servers. These tools enable users to:
Test DICOM node availability using DICOM Echo
Query a DICOM Worklist and display results
Monitor multiple DICOM nodes using DICOM Echo and WADO protocols
The different modules are accessed through tabs at the top of the page.
Info
Currently, the persistence of DICOM nodes and worklists is not supported. Configured nodes and worklists come from CSV files that are loaded when the Karnak server starts.
DICOM Echo
This tool tests DICOM communication between two Application Entity Titles (AETs).
Configuration Fields
The following fields must be configured to execute an Echo test:
Field
Description
Required
Calling AETitle
Identity of the calling DICOM entity
Yes
Called AETitle
Identity of the DICOM entity to test
Yes
Called Hostname
Hostname or IP address of the DICOM node
Yes
Called Port
Port number of the DICOM node
Yes
All fields are mandatory to execute the Echo test.
Running the Test
Click the Echo button to launch the connectivity test and DICOM Echo command.
Successful Test
Below is an example of a successful DICOM Echo test:
Failed Test
In this example, the “Called AETitle” value is intentionally incorrect. The network connectivity test succeeds, but the DICOM Echo fails, displaying the reason for the failure:
Select Node Utility
The Select Node popup simplifies configuration by allowing you to choose from pre-configured DICOM nodes.
Click the Select Node button to open the popup:
Configuration:
Choose the node type in the DICOM Nodes Type field
The DICOM Node dropdown updates automatically based on the selected type
Filter nodes by typing in the field (searches AET, hostname, port, or description)
Click Select to auto-fill the Called AETitle, Called Hostname, and Called Port fields
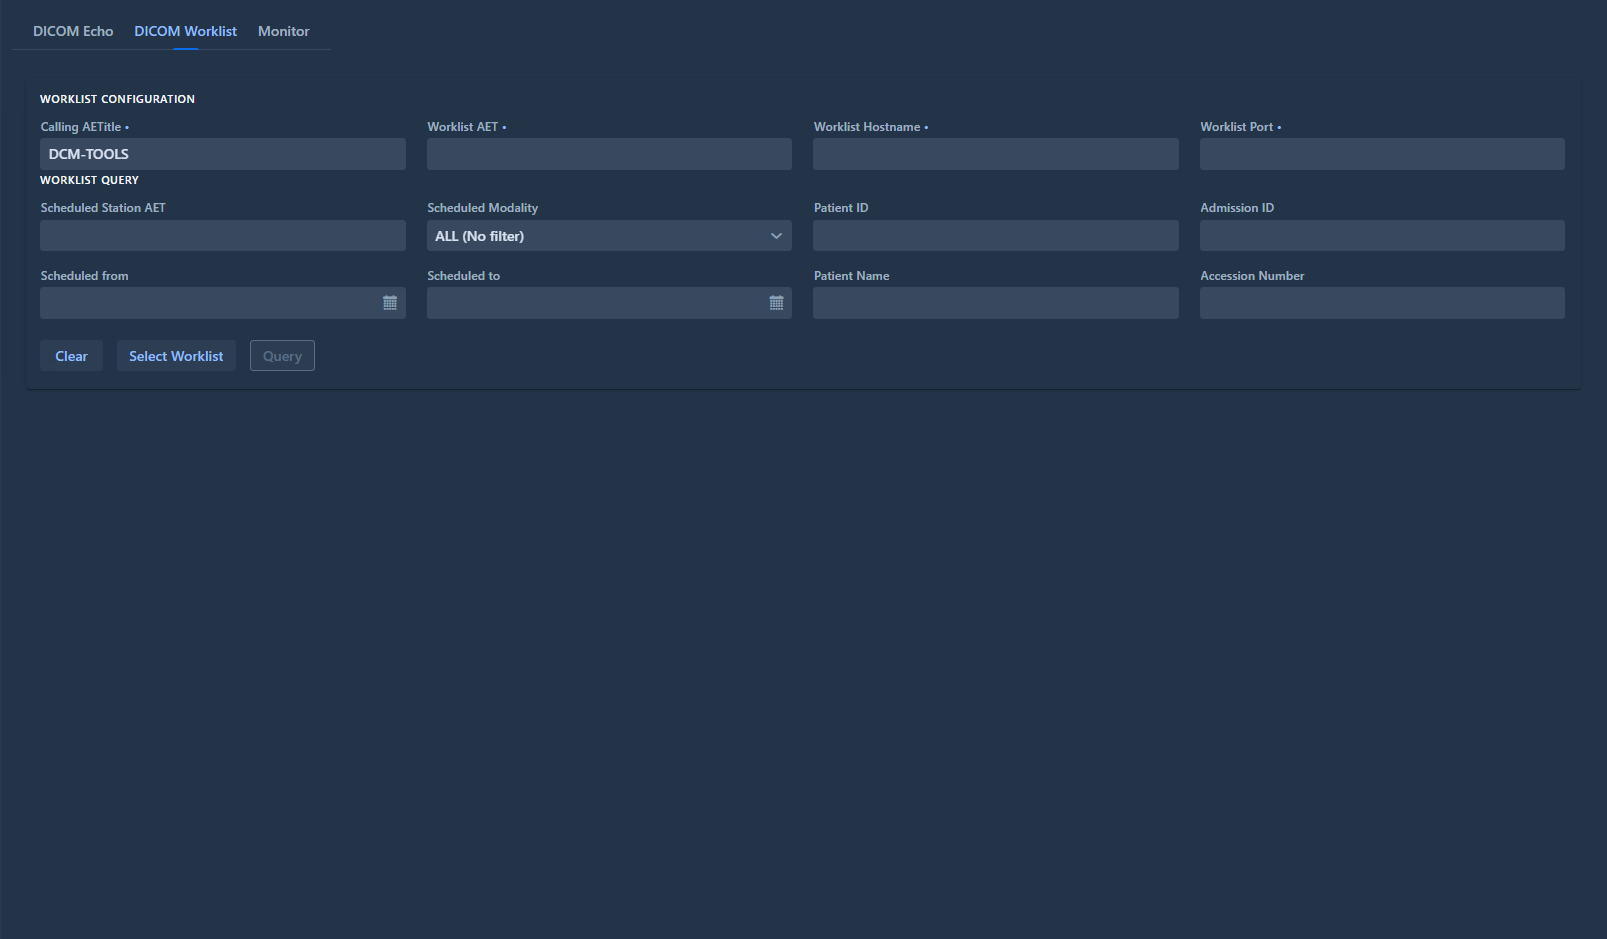
DICOM Worklist
This tool retrieves and displays the content of a DICOM Worklist to test connectivity and data retrieval.
Worklist Configuration
Configure the following fields to connect to a worklist:
Field
Description
Required
Calling AETitle
Identity of the calling DICOM entity
Yes
Worklist AET
Identity of the worklist to query
Yes
Worklist Hostname
Hostname or IP address of the worklist
Yes
Worklist Port
Port number of the worklist
Yes
All fields are mandatory to retrieve worklist content.
Worklist Query Filters
Additional optional fields are available to filter the results returned by the worklist:
If no filters are specified, all worklist entries are retrieved
Multiple filters can be combined to narrow results
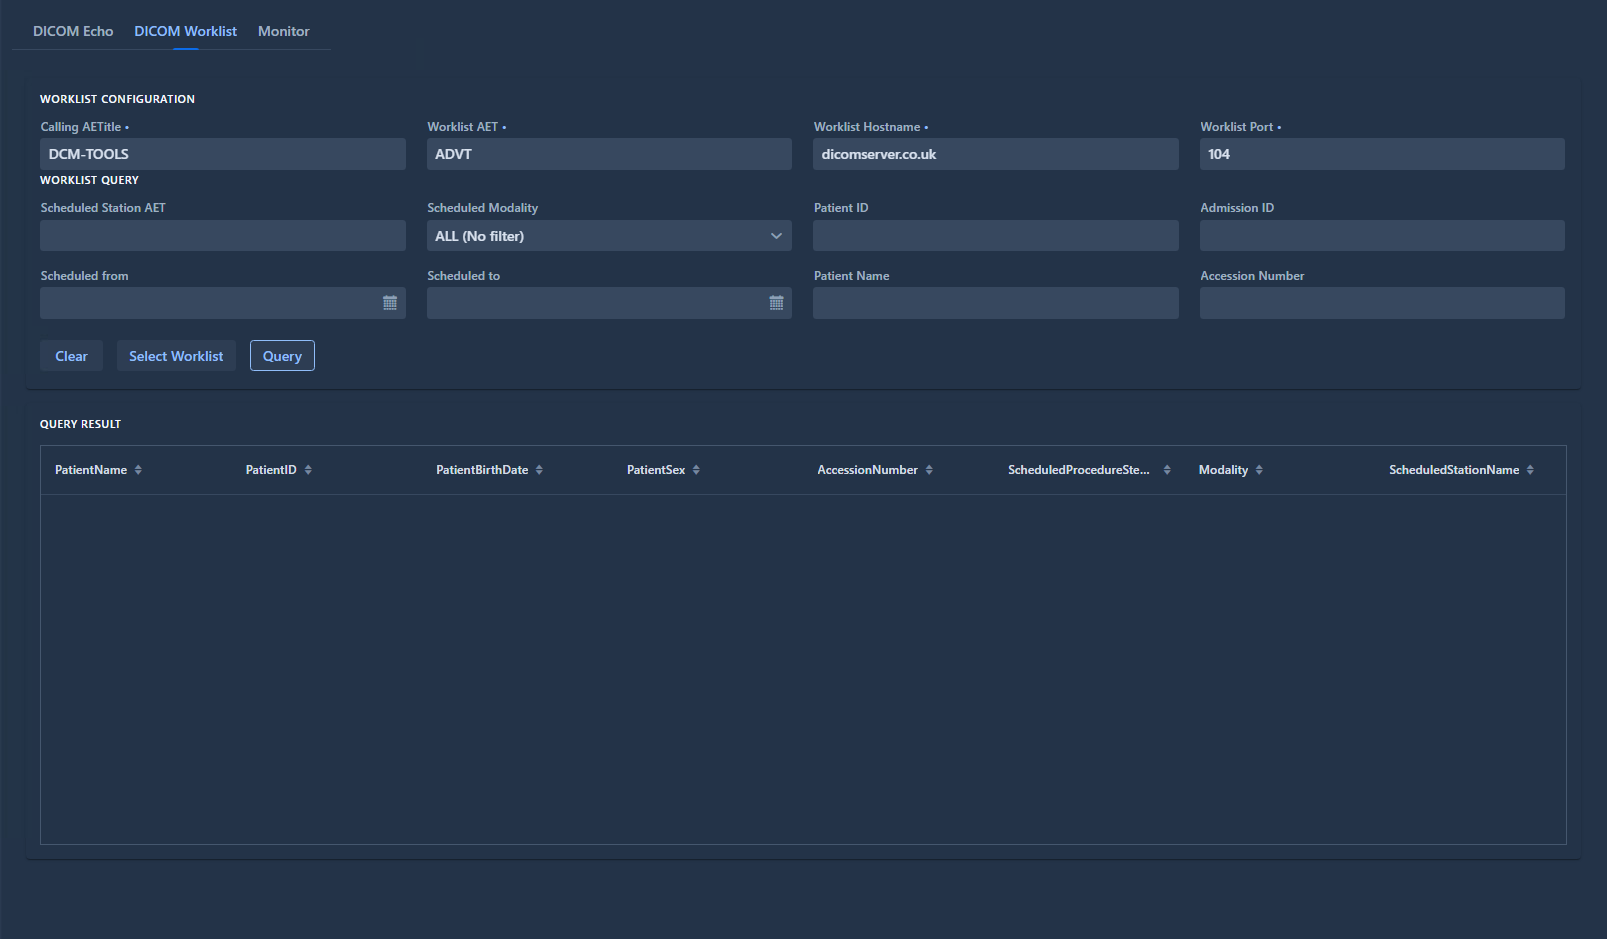
Query Results
Click the Query Worklist button to execute the test and retrieve data.
Retrieved worklist data is displayed in a sortable table. Click any column header to sort by that column:
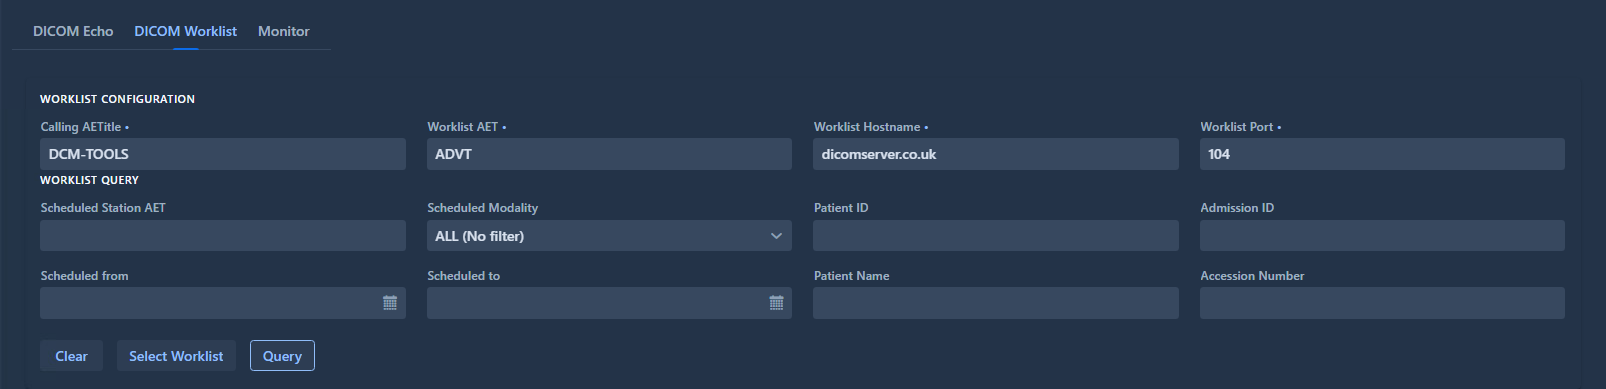
Select Worklist Utility
The Select Worklist popup allows you to choose from pre-configured worklists.
Click the Select Worklist button to open the popup:
Configuration:
Browse the list of available worklists
Filter by typing in the search field (searches AET, hostname, port, or description)
Click Select to auto-fill the Worklist AET, Worklist Hostname, and Worklist Port fields
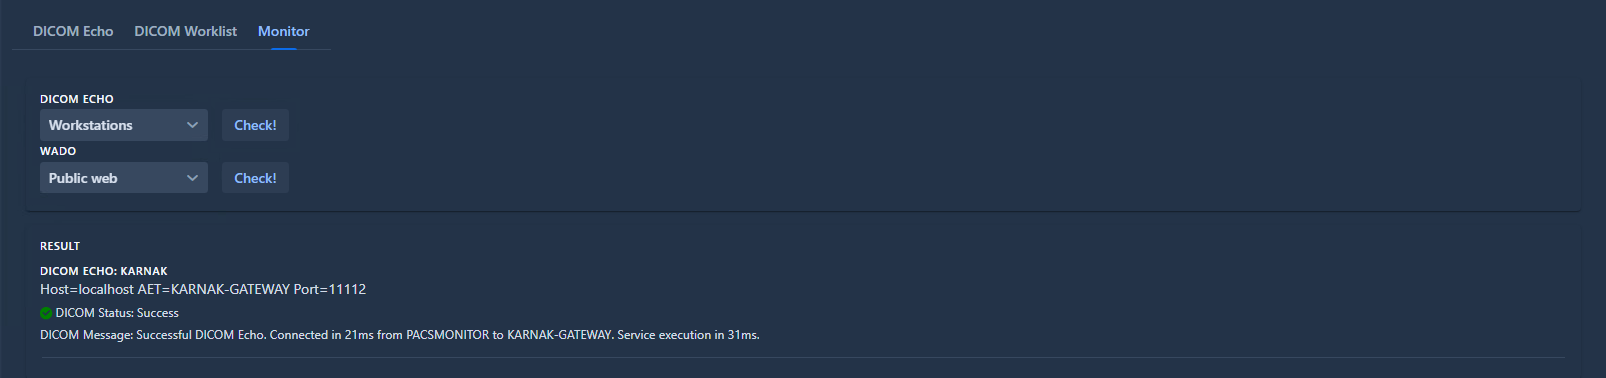
Monitor
This tool monitors the status of DICOM nodes using both DICOM and WADO protocols, allowing you to verify connectivity and service availability.
DICOM Echo Monitoring
To test a DICOM node:
Select a DICOM node from the list
Click the Check button to launch the DICOM Echo test
Below is an example of a successful DICOM Echo monitoring test:
WADO Monitoring
To test WADO connectivity:
Select a DICOM node from the list
Navigate to the WADO tab
Click the Check button to launch the WADO test
Below is an example of a successful WADO test:
Info
The Monitor tool is useful for regular health checks of your DICOM infrastructure and can help identify connectivity issues before they impact production workflows.
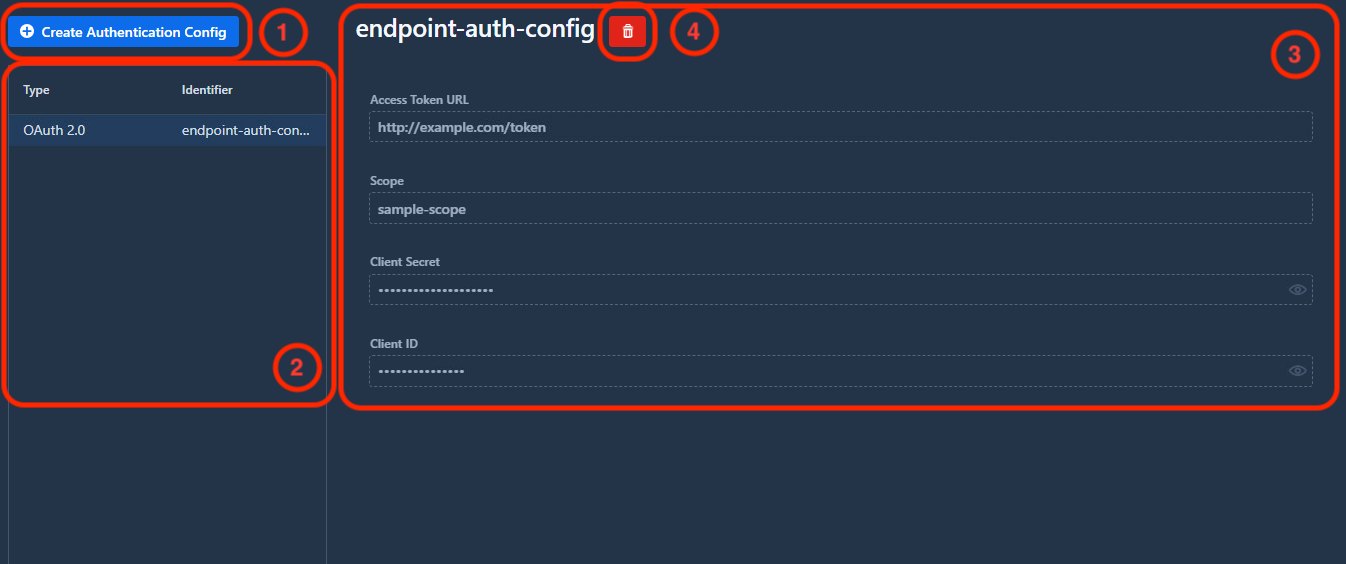
Authentication Configuration
This page allows you to configure authentication credentials for API calls. Since this information is sensitive, it is stored in an encrypted database table.
1. Create an Authentication Configuration
Click the Create Authentication Config button to begin. You’ll be prompted to enter a unique identifier for the new configuration.
Requirements:
The identifier must be unique (an error will appear if a duplicate exists)
We recommend avoiding spaces in the identifier for easier reference in profiles
Click Create to proceed. The configuration will be added to the list on the left and its details will appear in the right panel.
OAuth 2.0
Currently, OAuth 2.0 is the only supported authentication type.
Required fields:
Field
Description
Access Token URL
The OAuth 2.0 token endpoint
Scope
Required scopes (separate multiple scopes with whitespace)
Client ID
OAuth 2.0 client identifier
Client Secret
OAuth 2.0 client secret
How it works:
When an API call references this configuration (via the authConfig parameter):
Karnak checks if a valid access token is available
If yes, the token is added to the request for authentication
If no, a new token is requested using the configuration details
The API call proceeds with the authenticated token
Warning
Authentication configurations cannot be modified after creation. To make changes, you must delete and recreate the configuration.
2. Authentication Configuration List
All available authentication configurations are displayed in the left panel. Select a configuration to view its details on the right.
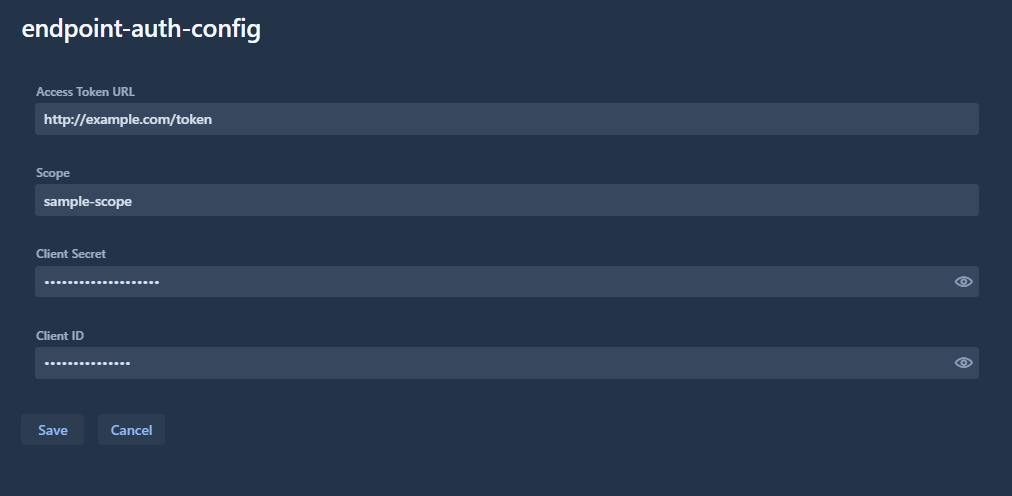
3. Configuration Details
The details view displays all configuration information in read-only mode.
To modify a configuration, you must delete it and create a new one.
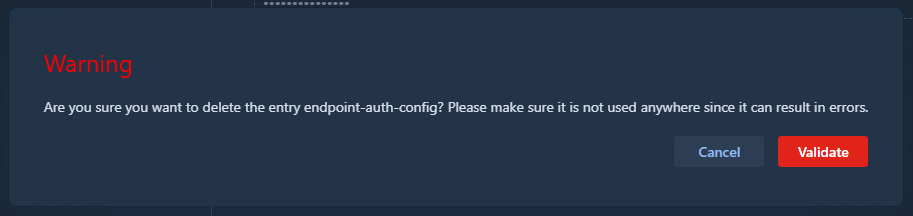
4. Delete Configuration
To delete a configuration:
Select it from the list
Click the red trash bin icon next to its identifier
Confirm the deletion in the popup
Info
Deleting a configuration in use may cause errors in your workflows. Karnak does not verify whether a configuration is referenced by profiles or de-identification processes before deletion. Ensure the configuration is not in use before deleting it, or transfers will fail.
Kheops
Create a destination album
To create a Kheops album as a destination, configure the following values:
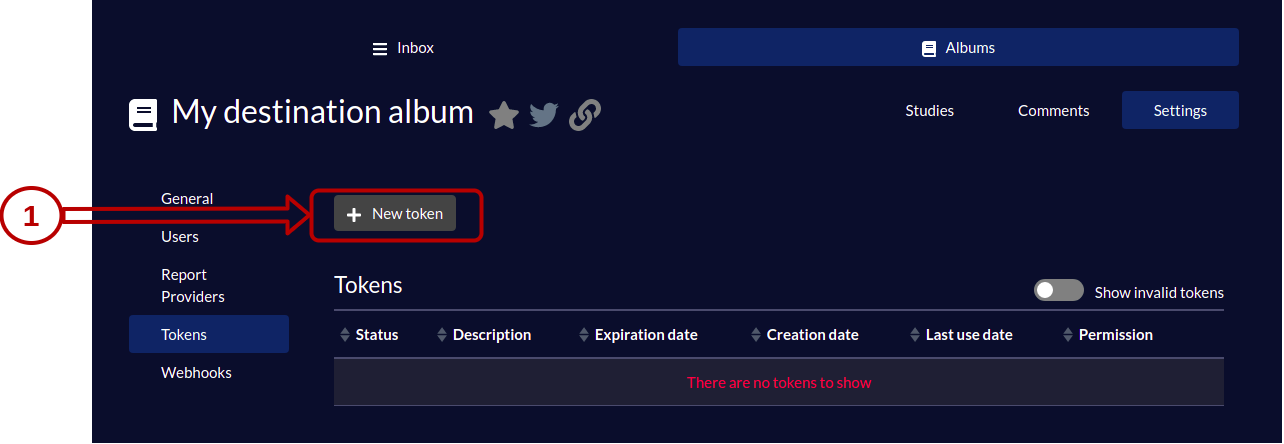
Once the album is created, follow these steps to configure it as a destination in Karnak:
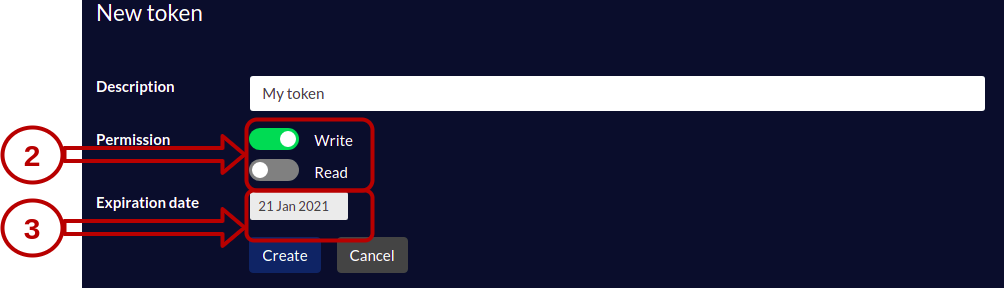
1. Create a new token
2. Configure token permissions
Give WRITE permission to the token and set the expiration date.
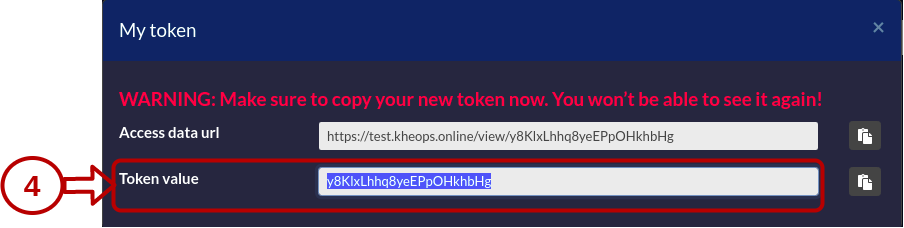
3. Copy the authentication token
Copy the authentication token value to use in the header of your Karnak destination.
For complete instructions on creating and configuring a STOW destination in Karnak, see Destinations.
Switching to different Kheops albums
When a destination points to a Kheops album, data can be propagated to underlying albums within the same Kheops instance.
This feature is useful for sharing specific studies with research groups without exposing the entire album. For example, you can send a cohort of studies to collaborators while maintaining data isolation.
Info
Studies cannot be shared between different Kheops instances. You must configure a separate destination in Karnak for each Kheops instance.
This functionality leverages the Kheops API to distribute data to multiple locations without creating additional destinations in Karnak. Data is automatically split according to rules defined in Kheops, ensuring that authorized users access only relevant data.
The following diagram illustrates how data flows through Karnak and is distributed to multiple Kheops albums:
graph LR;
  A(DICOM Data) --> B[Karnak]

  subgraph Kheops
    D[Main Album] --> E[Album X]
    D --> F[Album Y]
  end

  B --> D
First, a DICOM instance is received by Karnak. After processing it, it sends the instance to the main Kheops album. Depending on existing rules and conditions, the instance will also be shared to the album X and Y.
Create a switching Kheops album
To share a DICOM instance in different Kheops albums, the following fields must be filled and validated by clicking on Add button.
Fields
Description
Url API
The url of the Kheops API
Valid token of destination
The token to write to the album destination. Need WRITE permission
Valid token of source
The token to shared from the album source. Need READ, SEND (Sharing in the Kheops UI) permission
The condition field defines a condition to enable sharing an instance to a specific album if it is evaluated to true.
The condition syntax and usage are detailed in the Conditions page.
Portable distribution
Karnak Gateway can be distributed as a portable application, allowing you to run it without installing it on your system.
The purpose of this distribution is to provide an easy way to use Karnak Gateway for deidentification tasks on a local machine. It is typically used by researchers in collaborative projects that require a consistent method for de-identifying DICOM data with a shared de-identification profile.
Warning
The portable distribution is intended for personal use only on a single machine. For multiple gateway configurations, when using Karnak as a production service, please use the standard installation method on a server and adapt the resource allocation accordingly.
With the portable distribution, Karnak Gateway can be run directly from the extracted folder from the downloaded archive.
Double-click on the `run.bat` file to launch Karnak Gateway.
Double-click on the `run.sh` file to launch Karnak Gateway or execute it in the terminal.
Execute the `run.sh` file in the terminal to launch Karnak Gateway.
Once the application is running, you can access the Karnak Gateway web interface by opening your web browser and navigating to http://localhost:8081. The default login credentials are:
Username: admin
Password: karnak
Info
This web portal is accessible only from the local machine where it is running.
If the system already uses port 8081, you can change it by modifying the KARNAK_WEB_PORT value in run.cfg file located in the extracted directory.
For advanced configuration options, you can edit the run.cfg file to adjust other settings.
Specific folders in the extracted directory
logs: Contains the log files generated by Karnak Gateway during its execution. dicom: Default folder where DICOM instances are stored when using the “LOCAL” destination. data: Contains the embedded H2 database files used by Karnak Gateway to store its configurations. If you download a new version of the portable distribution, you can copy this folder to retain your existing configurations.
User guide
For detailed instructions on how to use Karnak Gateway, please refer to the Karnak Gateway User Guide. This distribution includes new features in the Forward Node view that are not covered in the main user guide:
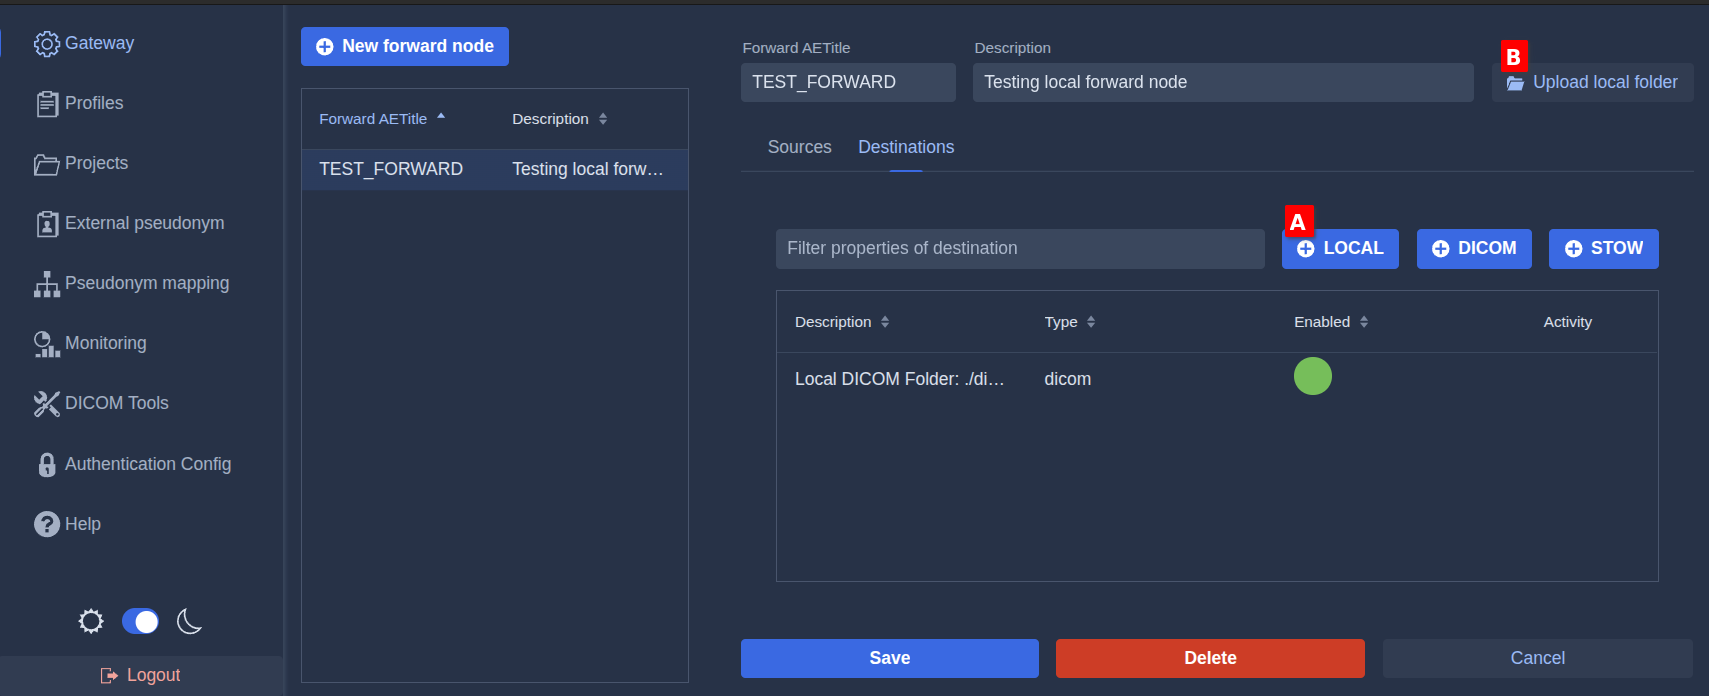
Add a local destination
Click the LOCAL button A to add a destination that saves DICOM instances to the dicom folder in the portable distribution’s extracted directory.
This button automatically configures a DICOM destination for local storage. For other options related to de-identification and forwarding rules, refer to the main user guide.
Upload local folder
Click the Upload Local Folder button B to select a local folder containing DICOM instances that you want to forward through the selected forward node destinations.